Pages

Sunday, July 29, 2018

McCall's 7780: Just Keep Sewing

I saw this pattern and went completely ga-ga. I actually love most all of the variations! View D is far too long but the other 3 are so cute.


I wanted a cool white summer top!!! I had a cut of white handkerchief linen in stash - or so I thought. When our sewing group met up at Sewing Lounge I was considering buying the linen for a Burda top and ended up going with a cotton lawn. Once I pulled it out the fabric, I decided it wouldn't really work for the McCall's top. And THEN I saw the call for contributors on the Sewcialists blog for "Sew Style Heroes" and decided I needed ivory fabric and to SR Harris I went!

I checked in the linen section, but no dice. The Burnsville location of SR Harris is slightly more organized than the main location and lots of stuff is actually labeled. I grabbed this bolt and it just said "lightweight woven". It had a linen-like weave and the weight felt pretty good. I took a chance and grabbed 2 yards...figured $12 wasn't too much of a gamble. When I got home I did a burn test and huzzah! It's either linen or a linen/cotton blend. The two perform very similarly in the test...but I also have a hard time believing it's 100% linen because they'd label it as such and it'd cost more.

Either way, it came out of the dryer wrinkled as all hell but presses very, very well and was a joy to sew (and press!!).


love.


The pattern is size 14. Because of the loose, oversized fit I didn't do an FBA but instead cheated a bit by adding some length at CF grading to nothing at the side seam. I did a swayback adjustment but I'm not sure if it helped much :)


I did not take into account how the top rests on the arms. Mine strains but look at the photo! It strains a bit on her too! doh. I also think that the shaping from the cut-on sleeve to the body is too tight of a curve.


Why 'Just Keep Sewing'? I got to the point of attaching the peplum and ruh-roh... I had sewn the front and back together right side to wrong side. I decided to unpick the CB seam because it's the back! Oh boy. Because the shoulder seam and underarm/side seam were already sewn and serged, it was actually the front that needed to be changed. So I had to resew the CB seam and open up and resew the CF seam. OY!

Got that fixed, got the peplum attached, basted my straps in...what the...that's weird that the front peplum is so long...WAIT A MINUTE!!!!


I'd decided to use D-rings - I actually thought they were included on the pattern until I saw a finished version and realized they were ties - and so the direction mattered. I'd basted by machine so I had to unpick those stitches and reverse the straps. I sewed my tag in...onto the front facing. I had to unpick that too. Once I was certain that I'd actually sewn the top correctly, I washed it and it came out of the dryer a MESS. It was so wrinkled and the seam between the top and the facing was unraveling. I'm not sure I had that happen before. I definitely don't want to serge it because the serging may show through. I will try pinking it. It took me forever to iron it and it will likely never see a w/d again. I don't dry-clean much but there are a few items in the wardrobe that I won't deal with.

WHEW. Sometimes you just have to persevere! I'd love to sew the 'drapier' version and I love the flouncy sleeved one too. Decisions, decisions.


This top was already planned and then catapulted to the top of my sewing queue for my contribution to the Sewcialist blog. Watch that space to learn more about my 'Sew Style Hero'


Monday, July 23, 2018

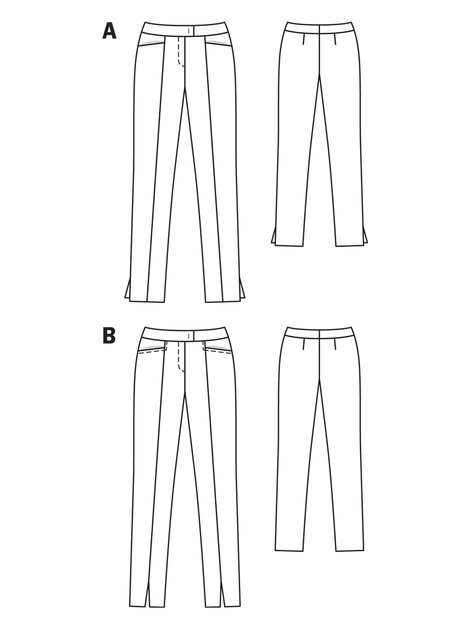
Burda 8/2012 #129: New Pants!

It took a hot second for me to come around but I absolutely love these pants.


As mentioned, I wanted to make a few near pairs of casual pants. I was kind of on the fence on patterns and needed to see how the fabrics washed up.  In the end I decided on these in black, M7547 in olive and V1522 in navy.

This fabric is an awesome cotton sateen from Mood. I prewashed the fabric and washed them before hemming and they look just as awesome as they did when I pulled the fabric out of the bag!

These pants don't fit like they look like they're supposed to fit.

I had this pattern from the defunct US version of the mag. They had some patterns in the magazine and a code to download others. This was a download so I had to do the PDF thing. Bleh.

I traced a size 44 and made my normal Burda pant adjustments plus one more!

  • Removed 1/2" from the front crotch - I usually remove quite a bit more and trace the crotch point one size smaller. But I wanted these to sit higher and after measuring, came up with the 3/8" adjustment.
  • Added 1" to the back crotch rise - I almost always have to add an inch.
  • Added 1/4" to the back crotch point.
  • I bought Betzina's fast fit book and made the knock-knee adjustment for the first time. eliminated a lot of those back wrinkles! But, I forgot to scoop! I will scoop out a little in back, dropping the curve a bit which should take care of those last few wrinkles.
  • I added hem allowances, which I NEVER do with Burda. I added a 1" hem allowance aaaaaand removed 1" from the length! LOL!
  • After playing around a bit with the seams trying to reshape the leg, I am SO glad I took pics from behind and things had gone wonky in the back upper thigh. So I decided to sew them as they were intended. If I want to change the fit through the leg I'd have to do it at the flat pattern stage.
    • Quick note here. I was dissatisfied with the fit when basting. Partially because I expected a straight fit through the leg...they are straight from the hip down. But removing the excess length improved the way they looked. I had L point this out to me some time ago on a project...it's not always circumference; sometimes it's a length issue.
  • Once I decided they'd stay as-is, I went ahead and sewed them up. I used 7/8" side seam allowances and a 1 1/4" double turned hem. 

WHEW!

Once they were basted - which means the inseams were sewn and the crotch was sewn and the waistband was attached (but not the facing), I decided to insert welt pockets. I am so glad I did but it made it a little harder and also I wasn't able to catch the pocket lining in the stitching of the waistband. Well, I could have redone it but nope. LOL!


I went back and forth on button or hook and eye closures. Ultimately, my problem hand meant I didn't want to do any hand sewing PLUS the fact that these are my casual pants...I went with a button. I made a practice keyhole buttonhole...aaaand then the real one went horribly. But of course it did!

Grr.

I LOVE this style pocket. Vogue 9155 has this pocket and I keep meaning to make another pair. Perhaps this fall; I want a flat-front plaid pant :)


They are SO comfortable and I love them rolled up! 


I know these are a little different from what I normally wear; I like fitted clothes. But I just love them. They can go completely casual with a tee (or sweatshirt in fall!) and sporty sandals/sneakers...and can also be dressed up a little. Works for me!


I really wanted to get the Burnside Bibs done this month. I hope so!!

The short of it; when I fell last summer I actually fractured my hand. The X-ray did not show it and it took 3 months of me asking for an MRI to get an MRI (which is so annoying!!). By the time I got the MRI we were 9 months post-fall. My orthopedic doc assumed the healed fracture he saw on the MRI was an "old break"! Today I'm like, NO! THAT IS FROM THE FALL! And then, "Oh. Ohhhhh. It didn't quite heal properly." Well Duh! So 1-year later I still have swelling, I have a bit of weirdness with the cartilage, but he feels PT should help.

I start PT for my hand on Wednesday. I ordered a set of hand strengthening tools on Amazon and they showed up Sunday. I found a series of exercises to do with the ball and my hand felt better today than it has in awhile. So I am hopeful.

Tuesday, July 17, 2018

Butterick 6330 - WIN!

aka THE SUMMER DRESS OF MY DREAMS!!

I exaggerate. EVER SO Slightly.

This post is photo heavy as I walked around my community testing out areas. It wasn't a great time of day; it was about 1 p.m. and the sun was really high.

Location 1

Last year I made  KS4169 in a beautiful ITY print. This dress does not really work...but I loved the idea of it and wore it frequently. I'm a tad smaller this year and had to take a dart at the armhole so it wouldn't sag/gape, the surplice is a baggy, and while I love (again) the idea of racerbacks, I hate having to come up with alternative bra options. Hate. (caveat: I actually have a strapless that I love).

I've wanted a tank style maxi for quite a while. Forever ago I made McCall's 6559 like everyone else. I've realized now that I want a waist seam/tie because I'm fairly rectangular viewed front-on.


Location 2

I actually bought this pattern for the jumpsuit but looked a little bit closer and thought, hmm, this could work. I feel like this style of pattern and in sml sizing often runs pretty large from the Big4 so I got the smaller size range and cut a medium. This pattern uses the same piece for the front and back of the skirt and I absolutely cannot do that. Typically, I'd grade the back piece up but for this simple style and elastic waist, I moved the piece 1/2" from the fold (adding 1"). I did not add anything to back bodice as it is unneeded there.

Going off the finished pattern piece when I do pivot and slide FBAs, I did a cheater FBA here (I've done this before with knits). This DOES result in a longer side seam for the front piece compared to the back but that can easily be eased in and especially so in a knit. I raised the armhole and took a tuck to avoid gaping. When I make this again, I'd take a little 1/4" tuck from the neckline. I lowered the neckline 2" which could have caused the slight gaping; I don't normally need to adjust the neckline on size Medium. Lowering the neckline allowed me to eliminate the keyhole (I hate keyhole backs).


The pattern calls for a turn-and-stitch finish to the neckline and armholes. I'm not always opposed but it usually isn't the best finish IMO.  I cut strips of fabric 1 1/4" wide and stitched by machine (5/8"). I then trimmed and turned/pressed and topstitched with the coverstitch machine. 


On the jumpsuit, the tie isn't real. It's a bow stitched to the front. Boooo!! I inserted the elastic and stitched the casing down to the bodice. I then added a self-fabric tie.


The fabric.

I've never used double brushed poly before and really had no interest in it. I run hot, hot, hot. I bought a cut of scuba once, some years ago, and decided the rest of the sewing community could have that trend! :-p I assumed dbp was not for me (it is not). I saw this PRINT when we were at Fabric Mart and had to have it. It is the perfect print for this dress and I don't regret using it but not sure I'd buy this type of fabric again.

And oh.my.gosh! it was SO 'sticky'. It was like velcro (okay fine, slight exaggeration) but it was sticky!! It took forever to thread the elastic through and I almost gave up on the tie. Next time I'll use twill tape because the fabric was just sticking to itself through the casing AND because the tie was stretchy too, attempts to pull it through were just annoyingly difficult.


Location 3


BUT I LOVE THIS DRESS THE MOST POSSIBLE! :-p

As soon as my fabric is organized there WILL be another one! This is why I almost always buy Butterick wardrobe patterns; I have found some serious gems.

July is turning out to be quite epic! Especially since I sewed ONE thing in June which was a fail. But to be fair, summer sewing is always a little faster IMO...

My McCall's 7780 top is giving me all the life. I have it pressed and pinned and just need to stitch the hem. My package arrived from Mood for my casual pants and my paper pattern for the Burnside Bibs arrived too. Woohoo!

Location 4 which is just around the corner from #2


Friday, July 13, 2018

Vogue 9238 and an Updated Sewing Plan


*I* was up past midnight sewing this dress!! It was rough!!! But once I decided to go for it and settled on fabrics, I couldn't get it out of my head.

I'd waffled a bit on this one leading up to my birthday; I've mentioned before that construction is generally worked out in my head before I ever cut into the fabric. And I could not work out the CF inset/strap on this to save my life! But, it's actually super simple and it works out well.

I painstakingly marked all the dots and whatnot with tailors tacks but then stitched the straps closed down to what was supposed to be the dot for the neckline opening. Then trimmed it all. Between 1) unpicking stitches on a crepe knit (black! with black thread!) or 2) recutting the bands, I chose to recut.

The front of the dress and the capelet is shaped; the band is a rectangle. You reinforce, turn each RST and  stitch the straps close, turn out the straps. Then you open the bands and lie them flat, RST and stitch from the dot to the end. Fold them out, WST and stitch to the front. It all lined up so well!! I had taken the time to baste the front and capelet together.

 
I love how the neckline comes together!


I wanted to get more pics but unfortunately, I haven't had a ton of extra time this week. And I'm back into the zone and don't want to get backlogged on projects. I hate when that happens. And I have been trying to blog everything because it is my 'online sewing diary' more than anything. I also hate when I search my blog for something and can't find it because I never blogged it :(

With more time I probably would have mirrored the print on the center band but...eh.
 
The dress is quite fitted (I love it!). I sewed a size  14, did a pivot & slide FBA on the front (didn't even think to do the capelet too and clearly I needed a little extra room). I sewed the CB and side seams at 5'8" up top tapering the CB seam to 3/8" from the waist down and the side seams to 1/2". Because the front bands are attached last per the instructions, it's tough to try on as you go.

I removed 2" from the length and hemmed with the coverstitch. The only "issue" with the dress is the cream ponte is much different than the black. It wrinkles when you maybe, perhaps glance at it (never had any ponte like this) and ironing just that part is not fun because of how it's attached. Boooo! I'm pretty sure all fabric was from Fabric Mart.

I wore the dress to see Hamilton and felt cute and fancy but not overdressed. The show was AMAZING by the way!!


The views from the hotel were just amazing. The weather was perfect so we spent a lot of time walking around downtown. 

My family spends  a lot of time trying to convince me that we should move back...maybe if I could wake up to these views everyday! :-D

I posted stories on IG as I was working on my Butterick 6330 dress (which is now complete and is e.v.e.r.y.t.h.i.n.g.! I wanted to just walk around in it and never take it off!)
 
  
this was before any hemming was done

Up next will be McCall's 7780 in a very lightweight cream twill. I am obsessed with this top and must have it NOW! I'd really like to make the other photographed view but want this one NOW. I need more cute tops for going out/weekend.


Also obsessed with the Burnside Bibs. I wanted them after seeing Bunny's pair and we know she is NOT going to mince words on the quality of a pattern indie or otherwise. Then, while I was still on the fence I came across this interview with the founder and decided to go for it.  Indie patterns designed by trained pattern designers I am more than willing to try if I like the design! I am less into blogger-turned-'designer'-who learned a little CAD. sorry, not sorry.

I have a lightweight cotton/rayon suiting I plan to use from stash. I bought it awhile ago for a pair of casual pants but I don't really like elastic-waist pants all that much so this will be the perfect use! I think I'm going to go with the shorter style, and definitely the more fitted view with darts and zipper closure. I'm excited!!!

I also caved after 7 weeks of not buying fabric and bought 3 pieces from Mood for casual bottoms. I have jeans but I am just not a jeans-wearer like that. I LOVE sewing them but I rarely reach for them to wear...I'd rather have other types of pants. And I have a strange 'thing' about mixing "work clothes" and "casual/weekend clothes". I mean, some of that is obvious; I'm not wearing an off-shoulder dress to work and I'm not wearing a black sheath to go to Trader Joe's. But even my favorite ankle-length slim pants from LOFT are strictly M-F in my mind. Weird. I know!

I bought black sateen and olive twill, both with Lycra, and plan to make this pair from Burda 8/2012 in olive twill. I actually love the front slit but will probably make these a tiny bit longer and plan to roll them up. They should tuck into boots nicely come fall. I will also add back welts.
I'd like to make McCall's 7547 in the black sateen. I really like the cut on these (even though I do not believe the Big4 when they show 'skinny' pants. I like the higher waist and jeans styling with side zipper. The front will be nice and flat.
 
I forgot (hence my 'fabric diet) I bought a cut of that amazing Telio Jockey ponte for V1522:
I think this another casual bottom that will transition well into fall. 

I've seen so many cute versions of B6562 that I really want to make one for my mom. I have a big cut of chambray that should easily get this top and another top for me down the line! :-D


There's still stuff my original "rest of summer" plans but these have my attention for now!

Monday, July 9, 2018

New Look 6507

This pattern entered the stash almost immediately after it was released. Pattern Review tells me I added it to my pattern stash on June 2, 2017. And then mid-June I bought a fun border print cotton lawn from SR Harris...but I couldn't work out how to use the print with the flounces and put it away. And then I hurt my hand and didn't sew for nearly 2 months. Well by then it was near September + Tundra = No More Summer Dresses. :)

When I ordered this rayon challis from FM (in this colorway and a blue & green), I knew immediately that I'd be making a version of this pattern! And then I decided it was cute enough to be a birthday day dress.

headed to birthday brunch!

My sewing room still isn't fully set up since the move but I figured it is such a simple dress, it'd be no sweat! Oy vey. Moving around boxes and bags and what not is not easy! Especially in an already small space!

As one might expect, this pattern is pretty simple and straightforward and relatively quick to sew.

I used the size Medium (I normally use a medium on top and large on bottom in s/m/l patterns). I did a pivot and slide FBA adding 3/4". I added a center back seam and did a 5/8" swayback adjustment, and I added 1/2" through the back hip.

I used my new (awesome!) rolled hem foot to hem the flounces. Since they have some bias in them, you may end up with wavy edges. Just line it up carefully on the ironing board and press it with a good bit of steam and then do not touch it. Let it sit until it cools. The underarm is finished with self-bias tape and then the flounce is attached right side to wrong side of the dress. Flip it out and stitch for the casing. HATED. HATED. HATED. I am not sure how else to achieve this but it was SO bulky and I had to open it up at the seams to get the elastic through.

 
I understitched the bodice front and back before flipping out the flounce and topstitching the casing

I sewed the side seams and didn't like it as much as I'd hoped. I also felt that the fabric was kind of blah. I liked it more on my table than on my body! Behold, crappy nighttime cell phone pics:


I took a ton of pics and realized it was too boxy on me...

I'm holding the excess fabric in...yes! It needs to be taken in!
 
I took it in about 1/4" at all 3 vertical seams, just through the waist:
 
 
There was something still off for me and I was beginning to get discouraged. I hadn't rushed it all; I started it on July 2 and finished it on the morning of the 6th. And I felt it *should* work, darn it! :)
 
In the pic below I have it tucked up under the flounce, about 2". THAT'S IT! It was too long. I knew I didn't want to go too short because of the giant flounce but *just* above the knee is usually ideal for me.

I also removed about 3" from the recommended elastic length. I was much happier with the fit after making these changes!

I didn't have enough fabric to match the print (I thought I'd have to settle for just one flounce) but I did make sure the motif was at least in the correct position horizontally through the side and CB seam. The CB seam actually matched fairly well for me to not have given it a thought. #birthdaymagic

Shortening it also allowed me to fix this weird side seam issue. It was only on the left side...I'm not sure if I did that while hemming or if it was cut slightly off grain. I removed a total of 1 3/4"in length, and another 1/2" at that wonky side seam.


 I had a FABULOUS birthday! I was still munching on 4th of July bbq'd meats...mmmmm! I had chocolate mousse filled chocolate cake with strawberries (my absolute fave!). I went to brunch and saw Ant Man and then took a road trip to Chicago to see Hamilton!! I made a dress for the show as well and hope to get full photos and get it reviewed too!

The Big 3-9! :-D
(ignore my house full of unpacked boxes! :-p )


I really enjoyed wearing this dress and the rayon challis in this fun, bright print kept me cool and comfy all day!