
This post is kind of epic...lots of photos!

Blahhhhh. Not the coat. Me. As mentioned in my prior post, I decided on a slow sewing project for a couple of reasons. And I know that 15 days for a piece of outerwear isn't technically a long time...it felt like forever! LOL! But also felt very low-pressure, which was needed.
I purchased this fabric - wool melton - from Fabric Mart last November in the buy the piece section. I spent $21 for 2.25 yards. When I went to NYC, I saw these buttons at M&J Trimming and decided they were IT! I spent $3.98 per button and bought 7 (1 extra to have on hand) so they cost more than the main fabric! I got my lining from Metro Textiles.

I traced this pattern in a size 42 and did a 1" FBA and ended up lowering the dior dart too much. Sometimes I notice it and it annoys me...sometimes I don't. I'm sure in the long run I won't care. On Burda tops, I normally trace a size 40 shoulder but stayed with the 42 here because, outerwear. I think it fits fine.
The sleeve measured *ok* but then, I have to always consider the intended design ease - I want to keep with the spirit of the pattern. And since I normally need to add to the bicep I decided to muslin the sleeve to decide on the adjustment.

It was okay -- not tight but I didn't want to struggle when wearing a long sleeves or a sweater underneath. I added 1" which ended up being too much. I took 1/2" out (total) from the back seam. You'll also notice that my sleeve dart is super pointy on the muslin. I ended up having to baste the dart until I got it smooth and then I stitched it and removed the basting stitches.
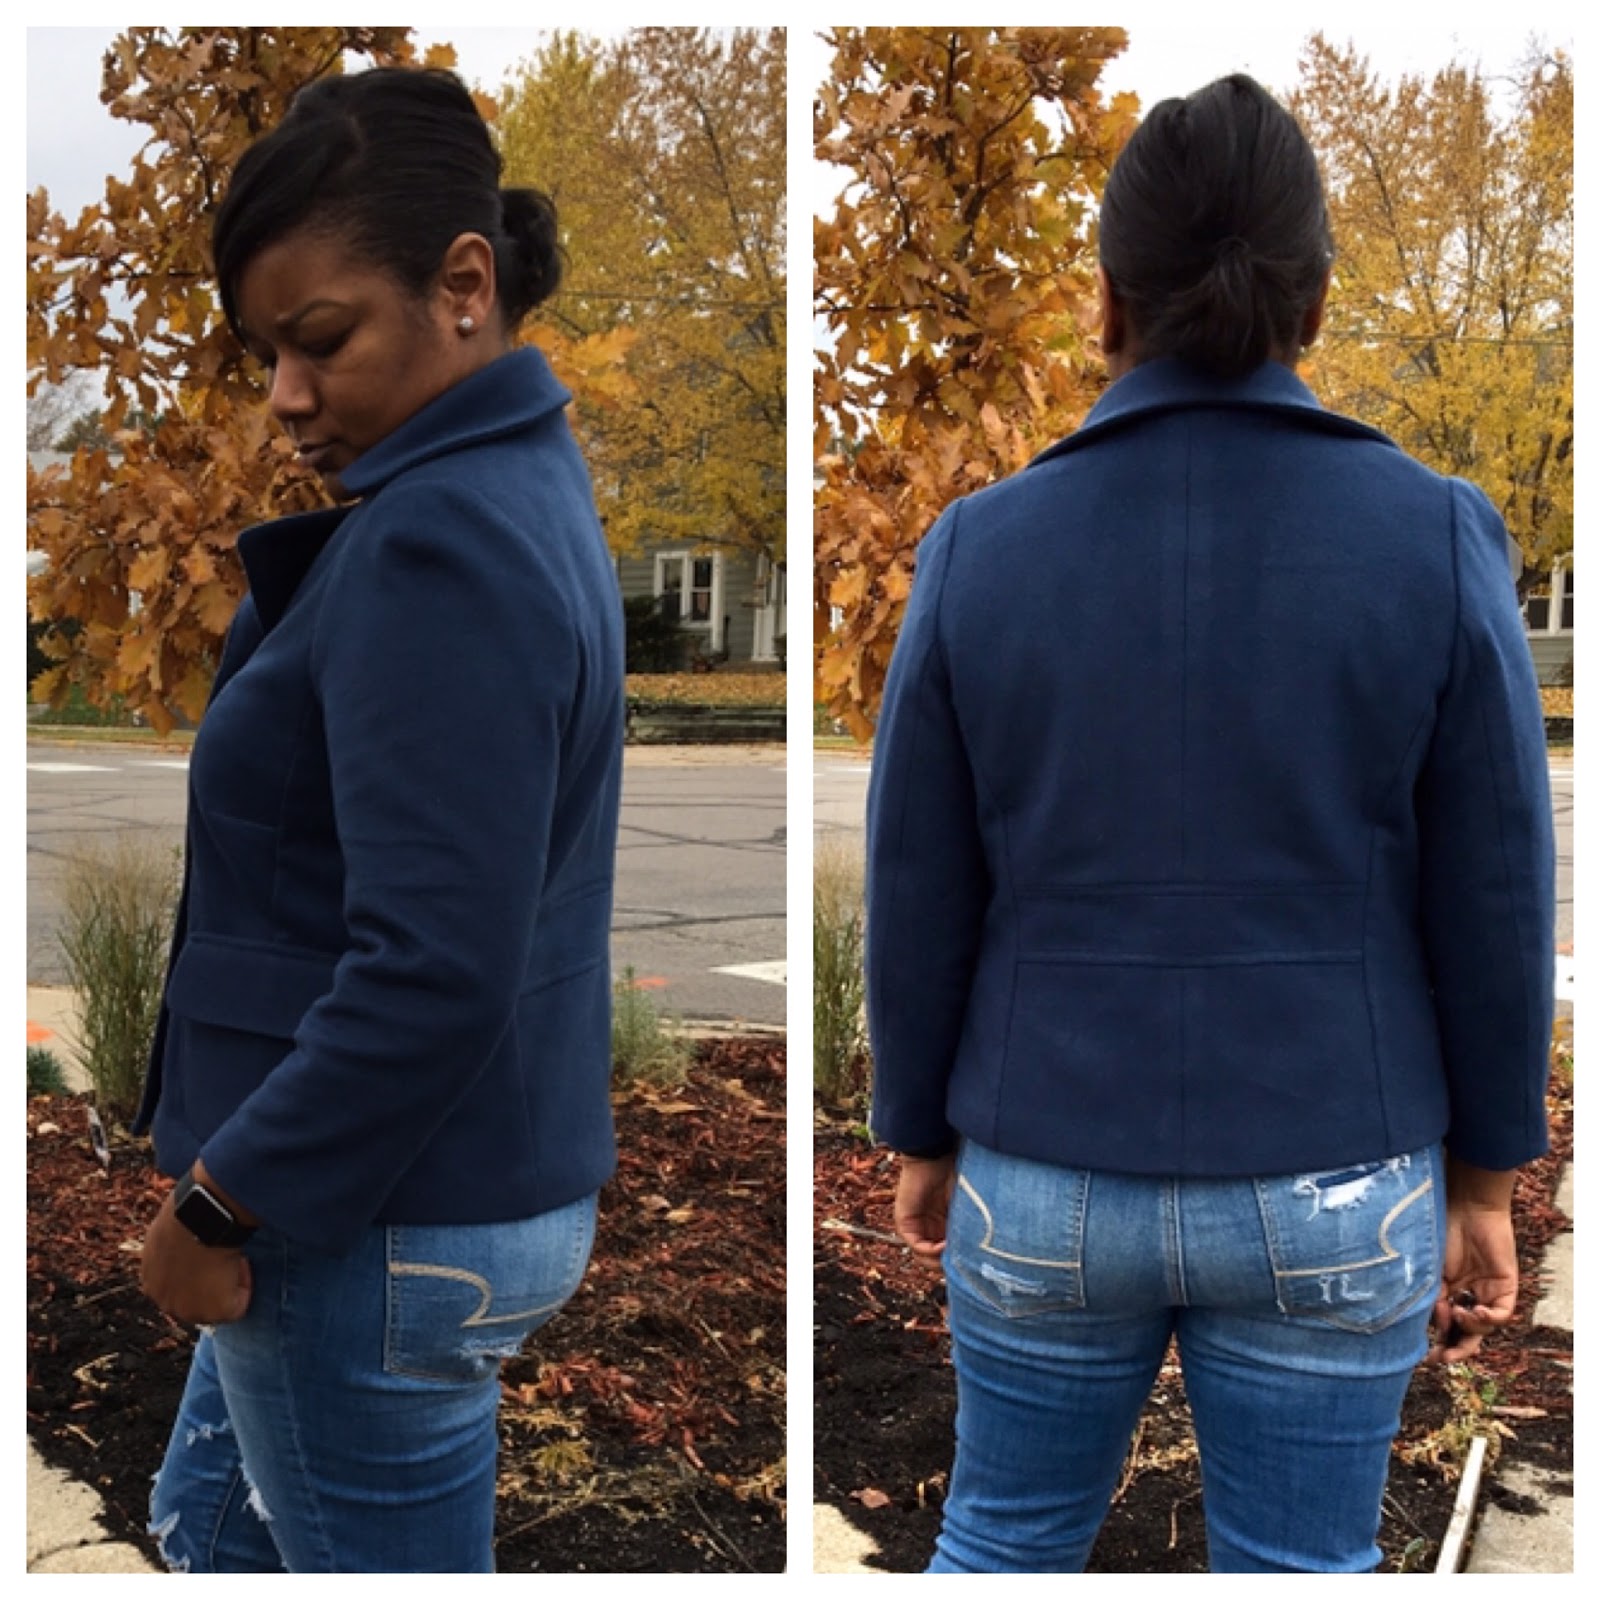
LOVE the back fit!!!
I love the collar and know why they had you interface the upper and under...but this melton is THICK. I should have used a lighter interfacing or only interfaced one side. The under-collar uses the same piece when really, it should be slightly smaller.
Speaking of the collar...the instructions have you attach a collar stand to each collar piece and then sew those together. The stand almost looked like it didn't fit the collar (there's this flat part on the collar) but you just have to mind your markings. On the stand, I marked in the seam allowance and lined it up with the collar...

And ta-da! Unpicking those stitches was NOT fun though.

I adore the in-seam buttonhole and decided to go with bound buttonholes for the other two. For the windows in the facing, I used the 'interfacing method' where you use interfacing instead of organza and when you turn it to the inside you can fuse it in place. I still stitched around it by machine because I'd rather be safe than sorry.

Makes me happy!!
The shoulder seam on the jacket is forward but I'm not sure why. The facing and lining has the shoulder seam in the normal position. Just a design choice??
The sleeves are new to me...some kind of a raglan / set-in hybrid?? It's 2-piece but you have the dart and it didn't need easing. Weird!

I used a raglan shoulder pad from Wawak

This is the only time I'll ever button that upper button! LOL!!!

The pockets aren't very usable for me :-/ One, I put them too close to the flaps and two, they sit high up on the body. They can't really be lowered though...if I were making this again for some reason I'd just add welt pockets.
The entire time I was sewing the pocket flaps, I knew that the double layer of melton was too much. After getting them done, I knew there was no way they would attach neatly. So I redid the flaps with lining on the interior. I skipped the topstitching in most places on this jacket. I hand stitched the pockets to the jacket.


Kudos to Burda for their wonderful back lining piece. No finagling to ensure you have ease in back!

I cut gussets and finished the area. Shrug.
Then I had it repinned, had sewed the sleeve lining to the sleeves already and was ready to sew the hem. OMG...I forgot the shoulder pads! So I had to go in there and insert them. I sat down to tack the pads in and saw this:

SERIOUSLY?!!?
I unpicked the area, resewed it and FINALLY hemmed it. I placed my inseam button and then placed the others by measuring. It was very important that they line up. When I went to button it I realized I didn't leave enough slack on the functioning buttons so I'll need to re-sew them. Wahhhh! :)
But I finished it and I love it!
I've wanted to take photos at this wall since forever. It's the side of the building of the Ace Hardware. They also had a fall display out and a sign welcoming people to take photos!


This coat has been on my to-do list for awhile and I am SO glad I finally got to it! If you're interested in this one, it's the featured pattern and has full instructions and pics.
I have the Style Arc Mindi pattern cut out so that's up next.
26 comments:
It looks wonderful - love the detail re how you adjusted the pattern :)
The perfect fall backdrop on a perfect fall day. Doesn't it feel good to have created the cutiest little jacket ever?
I love it that you took the jacket in front of the mural. It's the perfect backdrop for your amazing coat!
Oh how I love this on you! Great job!!!! Now you can wear it as much as um you like!
Ah this looks fabulous! I am sewing a coat at the moment and it feels like it is taking forever!
It looks amazing, well done.
Gorgeous coat and lovely photos! Another fabulous make!
Wow! That bound buttonhole is spot-on perfect and your jacket is to beautiful.
Thank you Graca!!
Thanks so much!!
Thank you!!
Thank you!
Hang in there! It does seem like it goes on and on and on! LOL!!!!
Thank you Vanessa! I'm excited to wear it!
Thank you! I have been waiting for a project to photo there for a minute!! And I wanted someone to take the pics. But every one that lives in my house except for the cat and me, are out of town! LOL!!!!
Thank you Faye! I LOVE IT!
Thank you! I try to remember to include those details :)
Fabulous jacket and photos. I love that the jacket looks great worn both opened and buttoned, I'm often put off by double breasted jackets because they look odd worn open which inevitably is how I wear my jackets. Also, that bound buttonhole is perfection!
I love your new jacket! If you're coming to the meet-up on Saturday, you should bring it. I'd love to see it in person.
Thank you Lisa! I am, and I will!! :) See you Saturday!
Thanks Allison! That is a challenge often times...and this one seems to work!
I love this! It is such a great jacket - it looks like it will go with so many things for the fall. And the photos are so fun!
Thank you!!! :)
That's one beautiful jacket. Using lining for the underflap certainly is the solution on thick fabrics. I did the same on the coat I'm working on. Lovely details in this pattern and your fabric make them stand out.
Thanks Sigrid!
Love, love, love your recent coat project :)
I love, love, love this jacket. Great job. I know you are a fast sewist and 15 days would seem like a long time for you. Again great job with this and love the blue color.
What can I say, these pictures are breathtaking.Your outfits are lovely! When I saw this, I thought that you might like these women's outerwear
Post a Comment