Pages

Showing posts with label Outerwear. Show all posts

Thursday, May 15, 2025

A New Jacket, Just in Time for Summer? Simplicity 2508

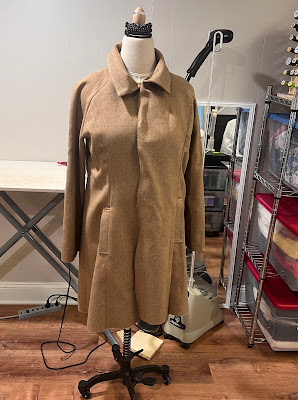
At the beginning of March, we got dumped with a huge pile of snow (like nearly a foot!). I'd been complaining about my black wool coat being too big. I'd ordered a couple different coats online and none of them fit well, plus, the fabrics were subpar. 

On its maiden voyage to my office

I decided to use a pattern that I've made before (coincidentally, in March, but in 2015!) to make it easier on myself and to make it quickly (I did not make it quickly). As these things go, I started the coat on March 5 and finished it on April 20th. 

2015 version in pink wool blend from Hancock Fabrics ( :tears: )

I decided to use a camel-colored wool from stash (that came from a woman in my machine knitting group), brown buttons from stash, and champagne-colored rayon lining from stash (a Ralph Lauren Fabric Mart find for $1.99/yd in 2019!). I LOVE THESE KINDS OF PROJECTS!

From my previous version:
  • Size 16 (44.5" finished bust; I am around 39.5")
  • Adjustments; sewed 1/2" seams on front princess and side seams
  • 100% wool coating in magenta from Hancock Fabrics
  • 100% polyester pongee lining fabric in baby pink from FabricMart
  • Bound buttonholes tutorials by Iconic Patterns and Julia Bobbin.
  • Bagging the lining tutorial by Grainline Studios
  • (Need: small FBA, shift bust point down 1", lengthen sleeve 1/2", raise pockets 3/4-1", back facing)

This time;

  • size 16
  • I initially used smaller seam allowance and had to resew them all to 5/8"
  • 100% wool coating from stash
  • 100% rayon lining in champagne tan from Fabric Mart
  • Regular buttonholes with buttons from Fabric Mart
  • Bagged the lining using Cecelia Podolak's 'Easy Guide to Sewing Jackets' book
  • I did not need an FBA, I did shift the bust point down 1", I did not lengthen the sleeve and should have, I did not raise the pockets and should have!, I did add a back facing. And, I lowered the back tab on this version.

In preparing to sew this jacket, I read my own review and a bunch of other reviews. SO many people complained about pattern errors and I was all, "I don't remember having any issues last time..."

Ha! Well, inexperienced sewer me probably didn't have any issues. This pattern has A LOT of errors. Notches that didn't line up, an error in drafting the straight collar (which I didn't catch until it was assembled), the lack of a back facing is insane, I think there were more. Grr. 


By March 7th, I had the pockets inserted and princess seams sewn, realizing I should have moved the pockets up. I only had 7 of these buttons and there were supposed to be 5 on the front and 2 on the collar, so I decided I didn't have enough for the sleeve bands. With the collar error, I could have done the button bands. I think the sleeves look better with them!!!


By March 12th, I had the shell constructed and ruh-roh, this is too big. I took all the seams from 1/2" to 5/8". And, WHY is the back band so high?! I think it's a notch error. 


March 22nd, I realize the collar is wrong. I'm super annoyed but not enough to recut the thing (do I even have enough fabric to do so?!).


I lazily drafted a facing and topstitched it down instead of doing it the "right way" because it's a raglan. It would have crossed part of the front sleeve, part of the back sleeve, and the back. 

It must have bothered me more than I realized because it was April 17th before I returned to working on the jacket. But, it's ready for buttonholes!


The buttonholes needed are too big. Sigh. I can do it. I can do manual buttonholes. I watched a Threads video, mimicked the settings used, and, success! 


April 20th, my finished coat, ready for wear (I am contemplating topstitching the collar). And oops, I moved that back band down a little bit TOO far :)


I think I wore it 3 times before the weather changed. Ah well, there's always next year! 


Saturday, October 27, 2018

Sewing Outerwear! Burda 8/2017 Jacket

This post is kind of epic...lots of photos!


Blahhhhh. Not the coat. Me. As mentioned in my prior post, I decided on a slow sewing project for a couple of reasons. And I know that 15 days for a piece of outerwear isn't technically a long time...it felt like forever! LOL! But also felt very low-pressure, which was needed.

I purchased this fabric - wool melton - from Fabric Mart last November in the buy the piece section. I spent $21 for 2.25 yards. When I went to NYC, I saw these buttons at  M&J Trimming and decided they were IT! I spent $3.98 per button and bought 7 (1 extra to have on hand) so they cost more than the main fabric! I got my lining from Metro Textiles.


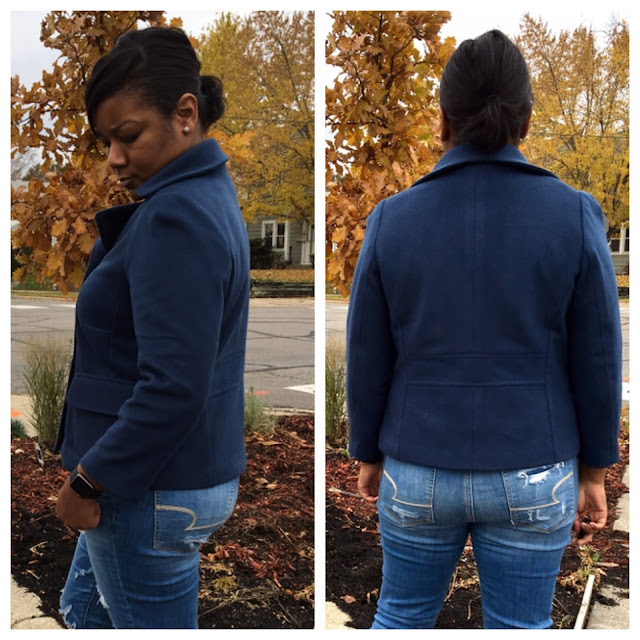
I traced this pattern in a size 42 and did a 1" FBA and ended up lowering the dior dart too much. Sometimes I notice it and it annoys me...sometimes I don't. I'm sure in the long run I won't care. On Burda tops, I normally trace a size 40 shoulder but stayed with the 42 here because, outerwear. I think it fits fine.

The sleeve measured *ok* but then, I have to always consider the intended design ease - I want to keep with the spirit of the pattern. And since I normally need to add to the bicep I decided to muslin the sleeve to decide on the adjustment.


It was okay -- not tight but I didn't want to struggle when wearing a long sleeves or a sweater underneath. I added 1" which ended up being too much. I took 1/2" out (total) from the back seam. You'll also notice that my sleeve dart is super pointy on the muslin. I ended up having to baste the dart until I got it smooth and then I stitched it and removed the basting stitches.

LOVE the back fit!!!

I love the collar and know why they had you interface the upper and under...but this melton is THICK. I should have used a lighter interfacing or only interfaced one side. The under-collar uses the same piece when really, it should be slightly smaller.

Speaking of the collar...the instructions have you attach a collar stand to each collar piece and then sew those together. The stand almost looked like it didn't fit the collar (there's this flat part on the collar) but you just have to mind your markings. On the stand, I marked in the seam allowance and lined it up with the collar...


And ta-da! Unpicking those stitches was NOT fun though.


I adore the in-seam buttonhole and decided to go with bound buttonholes for the other two. For the windows in the facing, I used the 'interfacing method' where you use interfacing instead of organza and when you turn it to the inside you can fuse it in place. I still stitched around it by machine because I'd rather be safe than sorry.

Makes me happy!!

The shoulder seam on the jacket is forward but I'm not sure why. The facing and lining has the shoulder seam in the normal position. Just a design choice??

The sleeves are new to me...some kind of a raglan / set-in hybrid?? It's 2-piece but you have the dart and it didn't need easing. Weird!

I used a raglan shoulder pad from Wawak

This is the only time I'll ever button that upper button! LOL!!! 


The pockets aren't very usable for me :-/  One, I put them too close to the flaps and two, they sit high up on the body. They can't really be lowered though...if I were making this again for some reason I'd just add welt pockets.

The entire time I was sewing the pocket flaps, I knew that the double layer of melton was too much. After getting them done, I knew there was no way they would attach neatly. So I redid the flaps with lining on the interior. I skipped the topstitching in most places on this jacket. I hand stitched the pockets to the jacket.

Kudos to Burda for their wonderful back lining piece. No finagling to ensure you have ease in back!

When I was ready to do the lining, I pinned the vertical seams of the lining and jacket together and my coat was a bit bigger than my lining. Wahhh! I can only assume that I stretched the wool out a bit during sewing/trying on. I was able to shrink it back with steam for the most part but the front of the lining just was NOT meeting the facing at the bottom. And I had already pinked my lining seams so couldn't let them out. I left it for a couple days and said, screw it. I likely won't ever even notice it.

I cut gussets and finished the area. Shrug.

Then I had it repinned, had sewed the sleeve lining to the sleeves already and was ready to sew the hem. OMG...I forgot the shoulder pads! So I had to go in there and insert them. I sat down to tack the pads in and saw this:

SERIOUSLY?!!?

I unpicked the area, resewed it and FINALLY hemmed it. I placed my inseam button and then placed the others by measuring. It was very important that they line up. When I went to button it I realized I didn't leave enough slack on the functioning buttons so I'll need to re-sew them. Wahhhh! :)

But I finished it and I love it!

I've wanted to take photos at this wall since forever. It's the side of the building of the Ace Hardware. They also had a fall display out and a sign welcoming people to take photos!


This coat has been on my to-do list for awhile and I am SO glad I finally got to it! If you're interested in this one, it's the featured pattern and has full instructions and pics.

I have the Style Arc Mindi pattern cut out so that's up next.


Monday, October 15, 2018

I sewed! I sewed!!!


O. M. G.! lol!!

Life is hectic, work is busy, I am tired, Mojo - gone. There's another piece though to my missing mojo! I mentioned in my September wrap-up that I've lost about 15lbs resulting in a lot of things no longer fitting. When I went to put away my summer clothes I separated the things that didn't fit anymore or that I was just tired of or whatever. The things that needed purging got purged! 

I pulled out fall/winter and ended up in a long try-on session as a lot of those things no longer fit either. And I think that contributed to killing my mojo. Another 15lbs and I'll likely be down another size and don't want to invest a lot into things that may not fit sooner rather than later. So I decided to sew a coat! LOL!

I've wanted this jacket from the 8/2017 Burda mag since forever. It was supposed to be one of my projects this spring but it got back-burnered.
Friday, I got home and was going to SEW. I was ready. I went and got the mag, because I knew I'd started tracing it, and could not find the tracings. I looked in a couple of spots where it could have possibly been misplaced and nothing. I was so dejected! I did not want to start over. After whining about it for awhile, I decided to get to work. 

And then I opened the pattern sheets and ta-da! My tracings were neatly folded inside the sheets. WHEW.

 
I'd traced a BUNCH and added seam allowances!

I used the dryer method to treat my fabric, which I got in a By the Piece deal at Fabric Mart. $21 for 2.5 yards of 100% wool melton!! The buttons I bought for it cost more than that!

Oh wait, after I found the pattern pieces, I couldn't find my fabric! LOL!!! And the fabric and lining had gotten separated. Sheesh!!!!

I opted to do the small parts first and started on the pockets.
 

Once I got to this point though, I realized there was no way I'd be able to cleanly stitch that flat that's doubled wool. I ended up recutting the flaps with lining vs double fabric. I also decided not to do the topstitching.

 
And I stitched those pockets by hand! I will topstitch the flap down.
(this was before steaming to set the hand stitches) 

I got the back completely assembled, the fronts adjusted (I moved my dior dart when doing an FBA and don't think I should have...it doesn't look bad but it's just a tad lower than would be most aesthetically pleasing), and the fronts assembled. I also sewed the collar unit and it's ready to attach.

  
I'm so excited about this!

On Sunday, I woke up to this:


And aside from going out for breakfast and washing a load of clothes, I did almost next to nothing yesterday. Oops! LOL! 

I still need to adjust the sleeves -- full bicep adjustment and lengthen them (they're 7/8 length as designed). I should be able to get the shell completed this week and hopefully the lining over the weekend!

It's starting to cool down quite a bit but, if you live in a cold climate, you have that initial shock when the temps drop...then you adjust. 35 isn't "cold" because we've got another 30-50 degrees to drop in "real" winter! 

So that and the fact that we have some more 40-50 degree days coming and I should get a good amount of usage this fall still...and at the start of spring ("spring") :)

Until later!

Update: WIP Pic! Still so much to do...and I was careful (I thought) and still got shine marks. I Googled suggestions on removal and will try it on a scrap. Fingers crossed. I don't know that I care though because I am loving it! :-D


Wednesday, February 21, 2018

Clare Coat Muslin...and Moving On...

I was VERY excited to sew my black and gold Clare coat.  I bought the pattern very soon after it was released and splurged on black wool coating.  

And then a long time passed without seeing any reviews. I don't mean tester versions...I mean reviews!! And THEN I sewed the Nettie. Twice. And that's when I started looking for an alternative pattern. The shoulders/armhole/sleeve fit on the Nettie was really bad on me. After version 2, I scrapped the pattern. 

But I really like this style so I decided I'd go forward. And here we are, approaching the very end of February, and this was my February outerwear project, and I hadn't done anything. I went back and looked at every version I found. I saw LOTS of sleeves that gave me pause. I read LOTS of comments about uncomfortable or tight sleeves that people felt that needed to size up or sew smaller seam allowances to fit. 

I knew deep down inside that this pattern wasn't going to be it.  I was hopeful though! I suspected it was not at all a size issue but a drafting issue. I buckled down and got the necessary pattern pieces cut out for muslining. I went to try it on and suspicions confirmed. 

I don't have photos on me because I *literally* could not lift my arm in any meaningful way to take a pic. 


I posted on IG and several people chimed in that it looks like it may need to be redrafted. Here is the complete armhole shape:

I am not a professional pattern drafter and don't even make attempts to draft my own patterns -- 
But man that is one weird set-up. 

And because I don't have that skillset, I wasn't about to try to redraft the front, side panel, back, front sleeve and back sleeve. That is the kind of thing that makes a pattern get the boot for me. I don't pay $18 for a pattern and expect to redraft it.

I immediately remembered my raglan-sleeved S2508 coat and of course, I sewed the Sewaholic Minoru which also has a raglan sleeve. In comparison, here are those garments:


But, I had already gone on the hunt for an alternative when I put this coat in queue for February.  I found and ordered a copy of the 9/2011 Burda magazine for this pattern:

ignore those sleeves...they used faux fur on the sample...so crazy.

There's also a version of it sewn as a duffle with a hood and it is ADORABLE. When I went back to plan out mods to #114...I stumbled on #103:


I really like the magazine version of this pattern! It just isn't what I want for *this* coat. So I thought I could draft the funnel collar onto this coat, leave off the flaps on front and possibly the sleeve tabs and of course sub a zipper for the snaps and welts for the patch pockets. Not much work actually.

This A-line shape more mimics what I liked about the Clare and the back vent is a bonus! 

Another thing...in making the muslin I realized I didn't actually like that the zipper was attached to the front raglan. I like the look of that side zipper but not the functionality of it. This style still works and this coat should also look just as good partially zipped or open as it does closed. 

So I was torn...overall style or possible slight improvement in fit with the set-in sleeve? Decisions, Decisions...

I posted a poll in my IG stories (that was fun!) #114 with the funnel drafted onto the neckline or #103 with the body flared a bit to be an A-line.

When I posted I was CERTAIN I was going to make #114. And it won the poll too! 71% for 114 and 29% for 103. But there's a vibe I'm getting from the raglan - very mod, 60s like - that I am digging!

I really LOVE the look of the Clare! I wish it had worked out for me!! But life is too short and sewing time too precious for me to exert that much energy. I'll just never be the person to work and rework and rework the actual technical aspects of a pattern. THAT'S WHY I BUY PROFESSIONALLY DRAFTED PATTERNS! I'm a sewer, not a pattern designer/drafter thankyouverymuch.

I don't know that I'll get the Burda done before February is out...stranger things HAVE happened :) But I'm going to get started on it tomorrow!

Sunday, November 12, 2017

Burda Challenge: 08/2017 #107

Red is hard to photograph
The sun goes down at like noon
The trail wasn't actually the best place for photos because there was lots of glaring sun


I FINISHED IT!!!! I was tired of wrangling fabric and sweating over the ironing board...and then I got the one side completely done, did the belt, and this propelled me forward.

(excuse my messy room)

I was so fixated on the red version from the mag but in the end, the other version is my jam! 


My fabric is a deep red-orange color, not a true red. I love, love, love it! I picked up just over 3 yards of this wool fleece from SR Harris for $10/yard. It is VERY thick, warm, and snuggly...but a mess to cut and wrangle around on the machine.

I used my normal Burda sizing; a size 40 neckline/shoulder and the rest is a 42. I went with the shorter length. You may have noticed the the red version is knee-length on the model but the shorter version is knee length on me! There is a 4" difference between the two; the shorter one has a 37.5" back length and the longer is 41.5".

Often times I don't add hem allowance to Burda patterns. I added a 1 1/4" allowance here - I really like the finished length! I did not add hem allowance to the sleeve.

Sewing the inset corners was tough the first time and the second half was infinitely easier!

I posted the photo on the left on Facebook as I was so proud!

I ordered a spool of Gutermann Mara 100 from Wawak and it was the perfect color - just a bit darker than the fabric. 

I used a size 14 stretch needle  and wound 3 bobbins to prep. I did all of my topstitching with the thread doubled. I finished the topstitching on the sleeve, noticed my bobbin thread was out. There was a 2" piece of thread left! Whew!! 


I'd added a 5/8" allowance but ended up sewing the back with 3/8" so that when I topstitched, there wouldn't be much excess. I serged almost all of the edges prior to sewing because of the thickness of the fabric.


I got the second side ready to topstitch and kept turning and turning...I'd twisted the front pattern piece. I had to under the side seam and when I redid it with the side panel already in place, I couldn't finish it cleanly. Boooo.

As mentioned, I really prefer it without the belt...
Can you see my belt carriers on the side??


I also do not like the scarf I made WITH the coat:


I love the scarf and will wear it...but it feels too...rustic?? with the style of the coat. This Robert Kaufmann flannel is VERY nice though! 

I figure this way, I can choose to use the belt when I need to wear it closed.

(I promise the top is even!)

I think my fabric is just a bit bulky for the belt. I feel like I need to arrange it when I cinch it in so that it doesn't look messy.

Love the sleeve length!

It's so me. I'm excited to add this to my (expansive!) outerwear collection.