Pages

Showing posts with label Butterick. Show all posts

Friday, September 27, 2024

Finished Object: Butterick 5526 and Updates

I posted HERE when I planned out this project and HERE with info on adjustments and construction. I  have to admit, I did not like it when I first finished it. I called it a "Post Office" shirt! LOL!!! I finally wore it after washing it a couple of times (I dislike when it's super crisp).

Wearing it has shown that removing all of the cap ease DOES impact the fit a little - I think it limits my mobility a bit when I bring my arms forward. But it isn't straining or pulling, so there's that. Luckily, I had a tracing and adjusted that; the original sleeve is intact.

I wore it with my aqua? mint? jeans...it also pairs well with camel, red, navy, and black. I didn't like it as much with a pair of mid-toned blue pants (post office!!). 

And after looking at the pics in the black skirt I was like, geez, I look so blocky! And yep...this skirt is too big. I can pinch like 3" out of the waist. 

I really like the sleeve more and more! I added a center seam and topstitched that seam. It looks really good. This pattern has no dart control at all...if I made it again I'd either make it a bit looser overall or do a cheater FBA. The side view shows it's flattening my chest a bit. 

Good thing this turned out well because EVERYTHING ELSE I've been working on is MEHHHHHHHHH!

I put the yellow dress  in timeout and while the Burda shorts turned out well (I'm tempted to make another pair but feel like full-on fall will immediately arrive if I do)... 


...the double gauze wasn't fun to sew and I realized I messed up the collar on the shirt. I feel mildly over it.

I understitched the facings but they are still super floppy and I have no confidence in sewing buttonholes in this fabric. You can see in this pic where I messed up attaching the collar.


I was so close to recutting the shorts but luckily, I posted about the fabric growing and someone told me it would be fine once washed. WHEW!! Apparently it grows while sewing but once I washed them, they were perfect. 


I went to insert a sleeve on the yellow dress and sewed the entire thing only to realize there was NEVER any thread in the bobbin. OY VEY! The next night, I tried again and sewed the sleeve inside out. Totally in the naughty bin now. Hmmph!

Monday, August 5, 2024

Fitting and Construction: Butterick 5526 (B5526)

So, score for me not having to cut the pattern out! For me and my myriad hand issues, this is a major win! Sometimes, cutting the paper pattern is a one-day activity because I "use up my hand" doing that task and have to wait before moving on to cutting fabric.

I'm almost 5 years post-reduction (OMG WHERE DOES THE TIME GO!?) and I'm slightly larger than I was. I could probably use a tiny FBA on things...like less than 1/2" for an additional 1" total, so I don't bother. I often just shape the side seams a little bit. 

In the case of this casual top, there is no dart control (no darts or gathers), and I intended to add a bit (3/8") to the side seam at the bust, and forgot. Ah well. It'll be fiiiine! 

(this is one of the benefits of being more experienced, I'm able to decide what to fuss on and what not to)

I did a rounded back adjustment of 5/8". This is standard for me with Big4 patterns. I open it at the neckline -- this dart is usually about half the width of the opening at the center back. You can sew the dart shut, in my case I leave it and just ease it into the collar. For some garments or fabrics, I alter the collar to fit this additional width. 

I also wanted to remove some of the sleeve cap ease and consulted two sources. 

Threads used a method by Sarah Veblen where you walk the seam and note the excess, add back an appropriate amount of ease, slice it through, add seam allowance, and sew the seam. 

I trued that bad curve when I cut the fabric

David Coffin similarly has you walk the seam, remove the excess ease, but has you sew this dart closed. 

I decided to add the seam and topstitch it for a decorative effect. 

BUT I MADE A MISTAKE. oy! I noted the excess ease but did not add back ANY sleeve cap ease. I know there's some discussion around the necessity of sleeve cap ease and while I think most Big4 patterns do include an excessive amount, I don't know that zero ease is always appropriate. Considering this is a semi-fitted, casual fit top, the amount of ease seemed over the top. So even removing it all (accidentally! haha!), does not result in a too-tight fit. 

Lastly, I don't care much about front pockets on shirts so often opt for just one, on the left. Other times, I include them both pretty much to cover the dart ends. Ymmv. The pocket is standard construction, stitch the upper part, turn it out, and then fold in the seam allowance and topstitch in place. I did note a review by Lladybird where she mentioned how high it was and I agreed when holding the pattern piece up to Lily...I lowered the placement by 1 inch. Wonder Tape is everything but for pockets, a good old fashioned glue stick works very well too!

My preferred order of construction for shirts:

  1. darts (n/a in this case)
  2. front pockets (if applicable)
  3. serge hem
  4. front placket, including turning out hem
  5. shoulder seams (sew and serge)
  6. fit side seams
  7. side seams (sew and serge)
  8. sew hem
  9. sleeves (fully assemble including cuff if a long-sleeve pattern, sew and serge)
  10. attach sleeves to body (sew and serge)
  11. cut and prepare collar and stand (I don't even cut the fabric out until this point and always block interface a piece of fabric and cut the stand from that since there's some bias in this piece)
  12. attach collar
  13. top stitch collar stand (sometimes I topstitch the collar, sometimes I don't)
  14. sew buttonholes and buttons
When sewing the placket, I traced in the fold lines on the right side of the fabric (be mindful of your marking tool e.g., marker-like tools will make a thicker line). I use my seam rule and this line to ensure accuracy. And here is a quick nod to PRESSING. It is game-changing!


At the hem, I fold it back and stitch at 5/8". I trim it to a scant 1/4", clip the fold, and turn it out. I do not poke anything in anywhere or any of that! There shouldn't be a need for poking and prodding. 

blue annotation because I forgot to take a photo of trimming

Another tip - always mind your markings. Notches and such exist to ensure pieces match where they should. The only time I'll ignore markings is when it is literally two straight pieces coming together and I know they have to be the exact same length. Whenever there is any shaping, curves, etc., I make the appropriate markings and am sure to match up. 

Here on the sleeve, you can see where I matched the sleeve to the body, exactly. 


On the collar and collar stand, I use the pattern markings plus drawing in the seam allowance (this was done with a fixion pen for accuracy) to ensure everything is sewn properly. Fold the seam allowance up on the interior collar stand before sewing, again, to ensure you are accurately stitching at 5/8". Because this is a bulky amount of fabric, I trim this seam with pinking shears after pressing it up. Be careful with trimming - you don't want to remove too much fabric and with it, the integrity of the pieces. Lastly, Wonder Tape to the rescue! Once the collar stand is attached, I use wonder tape to hold the interior stand in place. Using my walking foot and a slower speed, I topstitch the stand. I usually start in the middle so I can navigate the curves of the collar stand more easily. 


When I tried the shirt on, I hated the sleeve length! Using a scrap piece of fabric, I played around with the idea of sleeve bands and really liked the look. Deciding on a finished length of 1 3/4", I cut pieces 4 1/2" wide (adding seam allowance) and longer than the sleeve opening since it would be a little more difficult to accurately measure the sleeve in the round. I then pinned the band into the sleeve opening to ensure an accurate measurement. I used my walking foot to topstitch the band. 


I need to do the buttonholes and sew the buttons, but that's a straightforward task for my machine. If you struggle with buttonholes and your machine, be sure to read your manual and follow the directions there, run a test buttonhole or two, use tear away stabilizer if needed, and be patient! 


When choosing between two buttons, I'll stitch them on loosely like shown, and come back to it later, deciding pretty instantaneously which one I prefer. I'm going with the smaller button on bottom.

The shirting is a bit crisp, as cotton shirting tends to be. My trick to this is to add the item to my laundry EVERY time. Even if it I haven't worn it. It helps break it in a little faster :)

Watch for finished photos in a bit! 

Next up, I am making a slight detour from the plan in my head to sew up a few pair of lounge/pj shorts and maybe a nightgown or two. In 2016 and 2018, I made a bunch of loungewear and it's about time to refresh. 

I'm also knitting up a storm, working on State Fair entries(?). 

More, later!

Wednesday, July 24, 2024

Sewing Plan: Butterick 5526 (B5526)

I'll be sharing my new sewing space soon! But suffice to say, the paint, new floors, and reorganization really sparked my desire to make. 

I wanted a straightforward project, but not a fast project. I wanted to spend some time in the process, and decided on a button front shirt. I knew I wanted a more casual top (not too fitted) that was fairly neutral and could mix and match readily with skirts and pants in my wardrobe. 

I also decided on short sleeves. I recently thrifted a blue & white striped cotton shirt with long sleeves and I just don't really wear long sleeves in summer - even rolled up!

I wear this chambray version of Burda 7136 ALL the time. I made it in 2016 and it has only gotten better with time. 


I was going to go for the TNT (I've made this pattern 5 or 6 times) but ultimately decided to branch out. I searched my stash and decided on the oldie but goodie, Butterick 5526

Imagine my surprise to find THREE copies of this pattern in my pattern drawers! Oy! I got back ups to my back up! Haha!

I opened the first one, and huzzah! the size 14 was already cut out. I chose a thin striped cotton shirting from the stash. There was no label on it, so I don't have a source for it, but it's been in the stash for a while.

I'll be using Fashion Sewing Supply's ProSheer Elegance Light interfacing (HERE) and shirt buttons from Wawak (HERE). I swear by FSS interfacing. It's pretty much all I've used for about 5-6 years. I remember one year snagging a deal on some interfacing from Fabric Mart at $1/yard and it was VERY comparable to FSS. Aside from that, I keep going back for more, even as the price has increased a bit. 

Her interfacing is 60" wide (vs Pellon which is 20") and is preshrunk. It performs fabulously. I usually keep the Light, Medium, Couture, and Tricot on hand, in white and black. 

As I edit this for posting, I have the collar, buttonholes, and buttons left to do. Looking forward to this addition and sharing a bit more about the process. 


Thursday, November 4, 2021

Oldies but Goodies

I finished my cardigan! Woohoo!!

As mentioned in my last post, when I got this fabric from Fabric Mart, I knew I wanted to sew it right away, and hunted the stash for a pattern. It's a double knit, gray with a purplish undertone and lurex threads on the right side. It washed up really well! I bought 2 yards and you know FM!! The pattern calls for 1 5/8 yards and I easily have a full yard leftover. So you may see this fabric again.

Look at that fabric! :drool:

I went with an old favorite, McCall's 6844, but knew I had outgrown the size medium, but was not going to fit into a size large. I took my measurements and decided on the following adjustments:

3/8" to the front from about 1.5" below the armpit to the waist, and smoothed the seamline. The narrow shoulder adjustment is from the original pattern adjustments. Probably 1/4 or 3/8". 


1/2" to the back from shoulder blade through the hem, with a wedge at the side seam. Swayback adjustment of 1/2" and added a center back seam. 

The sleeve on this pattern is BANANAS. I think the finished measurement was 13" and I originally added 1.5". I added another 3/4" by adding 3/8" at the side seams. My bicep measured 14.75" I also added 1/2" to the sleeve head height. Due to the fabric, I ended up sewing the seams at 3/8".


I think the adjustments worked out very well! I had a slightly harder time putting in the left sleeve because my gathering stitches weren't moving easily through the fabric, but it won't bother me much.
I tried the loose sleeve on (dur, doesn't work out too well) and it seemed like it might be short so I hemmed it at 5/8" (it has a 1 1/4" hem allowance). Well, I should have hemmed it at 1 1/4"! I will likely just cut off the existing hem and sew a new one at 5/8" vs unpicking the (very well matched!) thread.

I really love it and think the color and iridescence allows it to match with SO many other colors.


Earlier this year, in May, I sewed a couple new dresses from TNT patterns and never blogged them. While I don't care for the twist front dress with the cardigan, the cardigan will work with tan/taupe/natural fabrics. 

Butterick 6621 in taupe jersey from Stylish Fabrics
I wouldn't wear *this* bra with this dress...this is my lazy bra but I just took the advantage of the daylight to take pics

Another TNT, M7465 is one of my favorite patterns ever. 
The front and back skirt uses the same pattern piece but I've created a new back piece to accommodate my behind so that it isn't super tight. 
And these suede Clark pumps are my fave!

Lastly, MY DRESS FORM IS ALMOST READY! Woohoo! This was the first rendering--it's been since tweaked and will be smoother in the final form (e.g., you can see indentations from my bra straps). 

I am so excited!!

Wednesday, December 16, 2020

Remakes: B6378 & S2369

As part of my build-a new-work-wardrobe plan, I wanted to get a few things sewn up because I have a LOT of video calls and have been bumming it most of quarantine. 

And you know my thoughts... when you need new things, in short order, turn to TNTs! I’ve made both of these several times and aside from removing my FBA on Butterick 6378, there are no material changes. 

The top is made from a rayon challis that I picked up from Stonemountain & Daughter when I visited San Francisco. I LOVE this fabric! The color scheme is so me; it’s very versatile and works with tons of bottoms in my wardrobe. 


My main adjustment to this pattern now is the 1” bicep adjustment and using whatever elastic I have on hand in the sleeves :) This time it was 3/8”. And I find such joy in the neatly finished binding! So glad my hands cooperated with me.


LOVE. LOVE. LOVE this top!!!
This version of Simplicity 2369 was made from a cotton jersey that I got from Mood. I like the fabric, I like the color, I'm not sure it was a great match for this pattern. I may stash this one away until spring. 

It's a little snug though I basted before sewing! (thanks pandemic), the color is kind of washed out on me, and I didn't like it with any of my boots. So maybe it'll fare better in the warmer months with heels/sandals. 

I also sewed this one by machine, serging after I sewed. I just find cotton knits to be thick even when they're lightweight and knew it would turn out better constructed on the sewing machine. 

The only other change from prior versions was using the buckle - hate it. I have decent scraps of this fabric and may just cut another tie and swap that out. It feels a bit outdated for me...we'll see!

tried here with a more casual boot and jean jacket. Eh. it's fine. 
Love the dress, I just don't think it's working for winter. 

Aaaaaaaand... After a wee-bit of consternation, I bought a new serger! 

For $1,000 I want a scrap catcher thingy! 
(those were out of stock too and my name is on the list. sigh.)

It's my new-job-gift to myself. It's a YAY! Our finances don't completely revolve around kids anymore! gift to myself. I was really going to go with the Juki MO-654DE; it's a really great machine. It is powerful and a lot of machine at the ($400) price point. 

I've been able to sew on Brother, Juki, Babylock, Bernina, Husqvarna-Viking sergers. Never tried a Janome or Pfaff (still want a Pfaff machine :drool:). I liked the Babylock - of course! My biggest ask was auto-tension - I KNOW everyone loves the air-threading and it IS cool! But I've never had issues with threading the serger. Before I bought this one, I timed myself (hey, I am a scientist at heart, everything is an experiment!) on my 1034D. 92 seconds. That's how long it took me from start to finish. It just wasn't a big factor for me in choosing a serger. 

After some research, I also decided the auto-tension was a nice-to-have. I just have to get to know my serger. I am on point about 80% of the time with my Brother. I've had it for so long (~8 years!), I've sewn everything on it, and I can judge the adjustments based on the fabric itself as I'm handling it. Like I said, most of the time, I'm spot on. Occasionally, I have to make additional adjustments after sewing a sample.

I tend to RESEARRRRRRRRRCHHHHHHHHH. Then, when I'm ready to buy, I'm READY. No doubts, both feet in. I wasn't fully ready but the pandemic has caused 1) some price gouging and 2) scarcity. I first visited the Babylock dealer in the summer, and they were running 6 weeks out for machines. Last Friday, she called and told me she had a Celebrate and can put my name on it and I said, YES! Then, I didn't call to finalize the order on Saturday because I didn't feel certain. But on Monday, I decided what the heck! Go for it! There's no rules! I can buy a different serger down the line if I choose! I can upgrade to another Babylock down the line if I choose!! 

I got it set-up and threaded, and ran some recent fabrics through it. I have a M6886 on my to-sew list and it'll be the Celebrate's maiden project! :-D


Wednesday, June 17, 2020

Repeats: Butterick 6330 and 6621

Dresses and tops are my wardrobe holes right now and I have been on a tear!

I made a couple new dresses before working on the time consuming Vogue 1507 top (post is written, just needs photographs!). When I just NEED to sew or really want to knock a couple things out, I'll use patterns that I've made and loved (like my last post with tops!). 

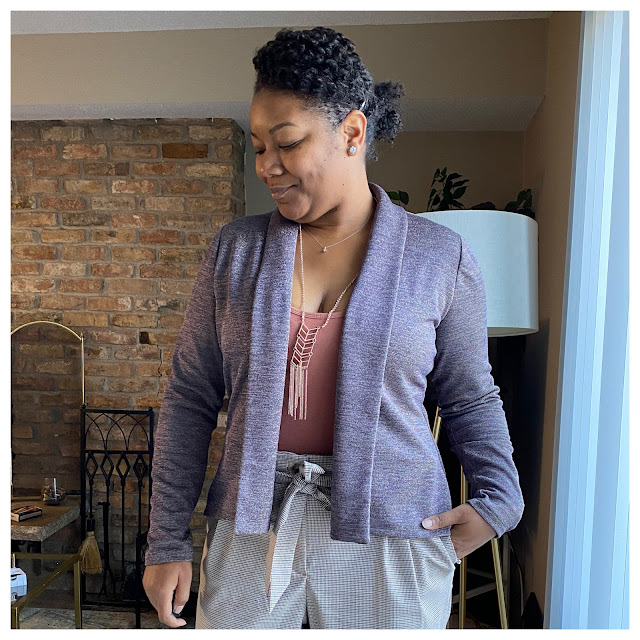
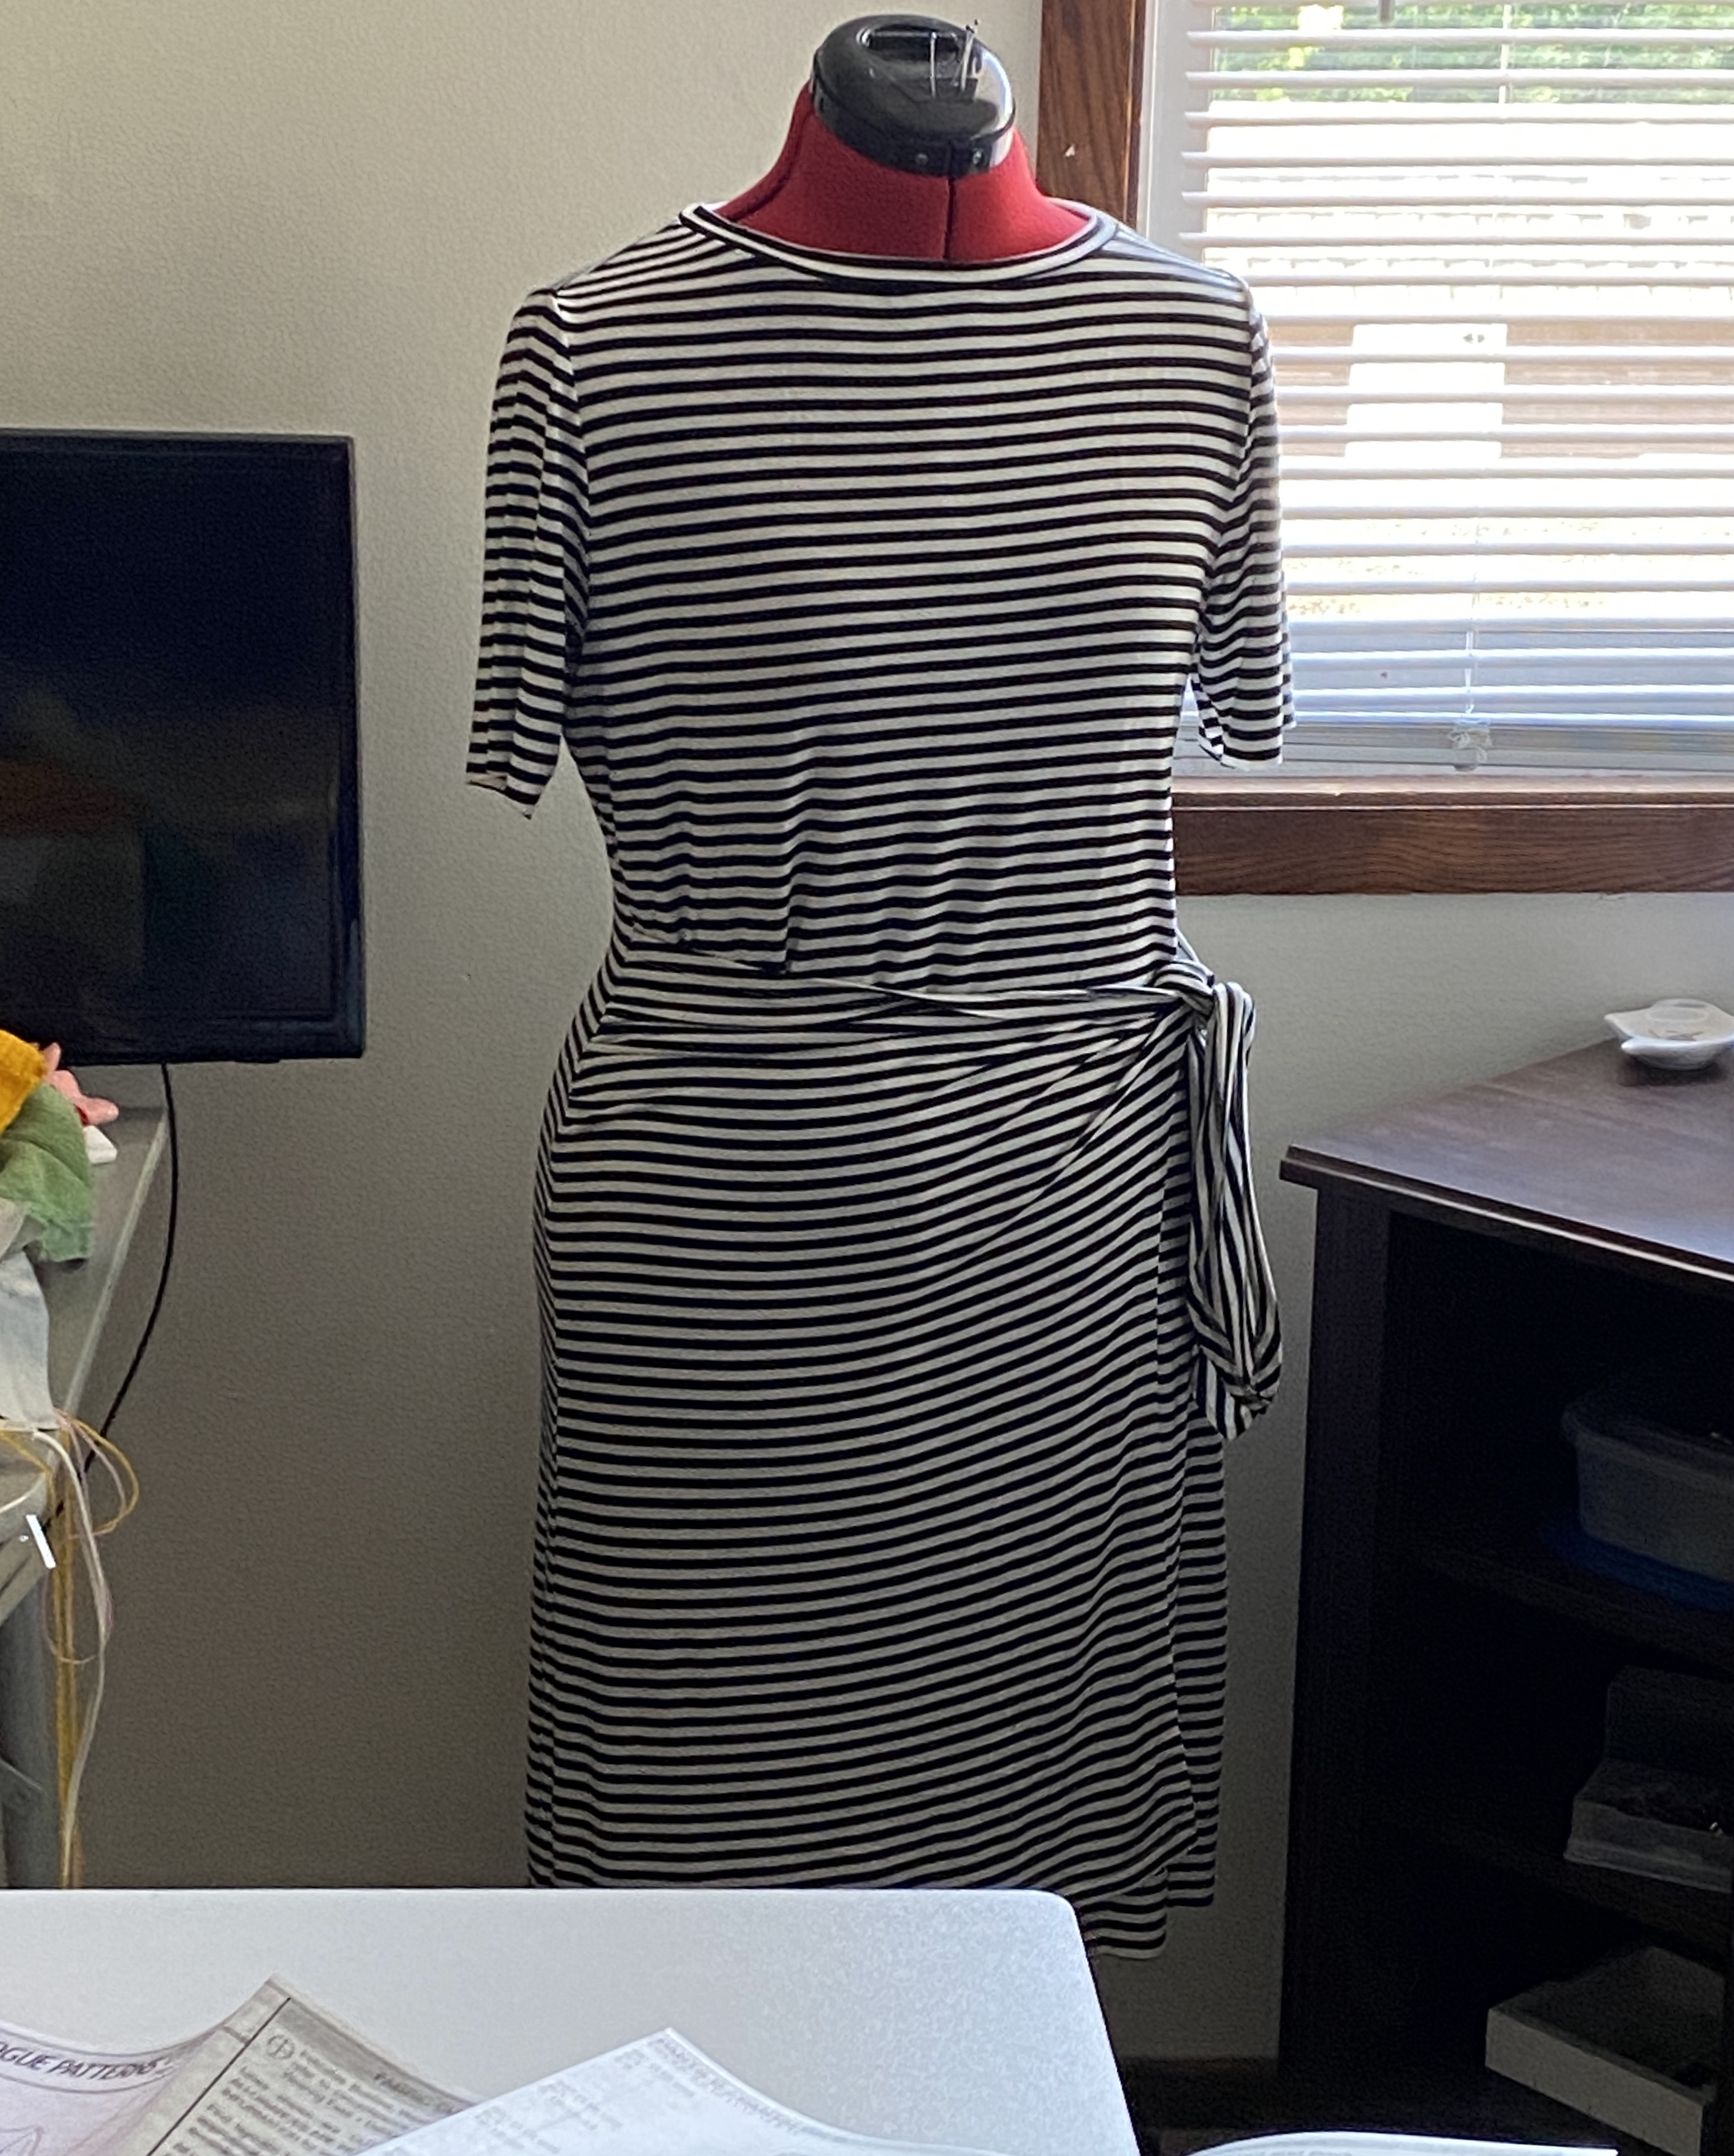
I don't have pics of B6621 on me but I've already worn it twice since finishing! :-D If you'll recall, I loved this pattern when it came out and promptly sewed 4 versions. I've sewed another last summer and this is my 6th! 

I used the same pattern - a size 14 graded to a 16 at the waist on down, with a 1" full bicep adjustment. On this one, I removed the FBA. 

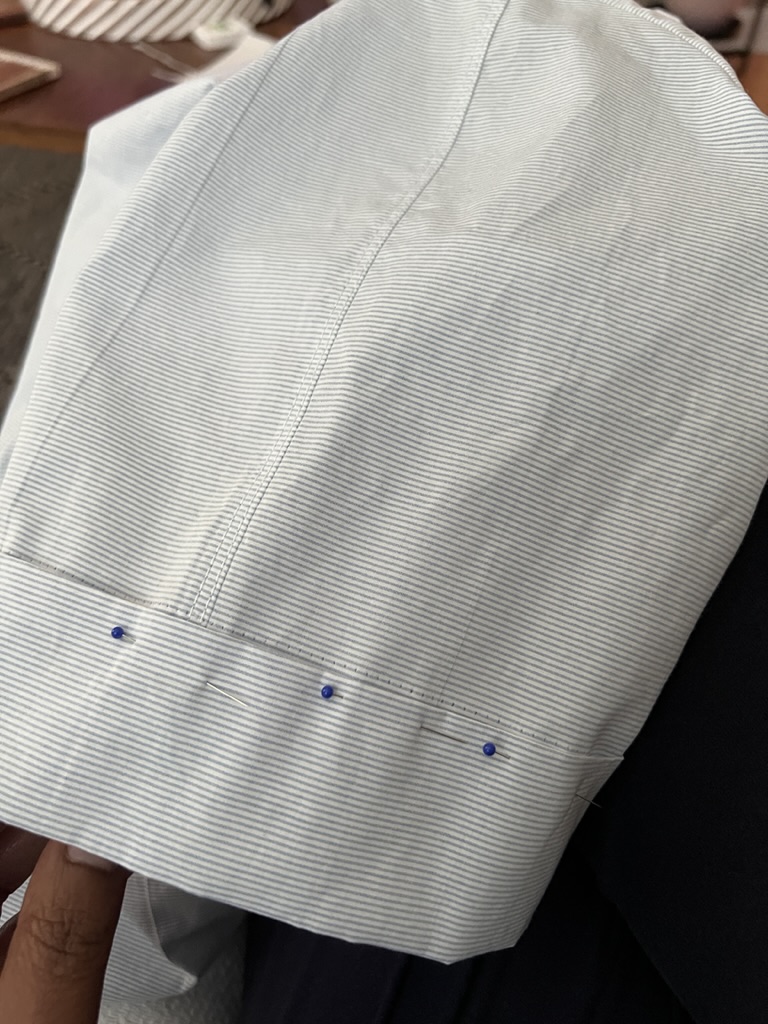
This rayon jersey is a Fabric Mart buy. I had previously shortened the neckband quite a bit and it was tough going with the wool jersey. I added 1/2" back and it went it fine. I hemmed the tie, overlay, sleeves and hem on the coverstitch. I did an okay job matching stripes (take my word for it!), and sewed the side seams and CB seam at 3/8" from the waist down. 


It's comfy and I love it!
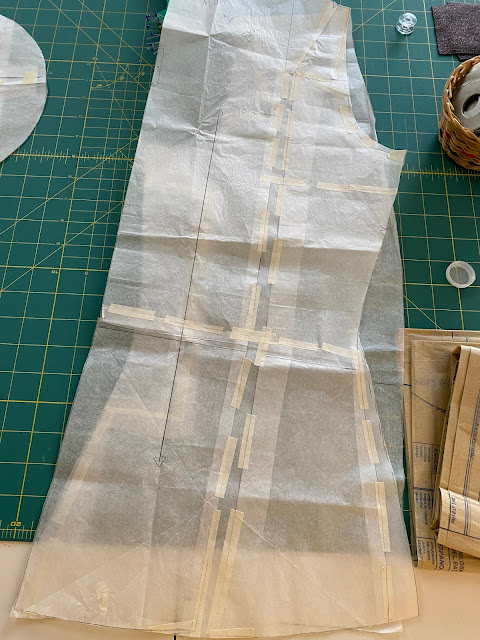
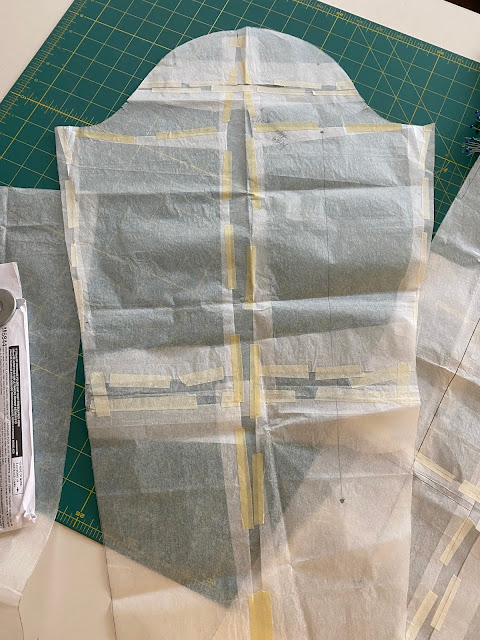
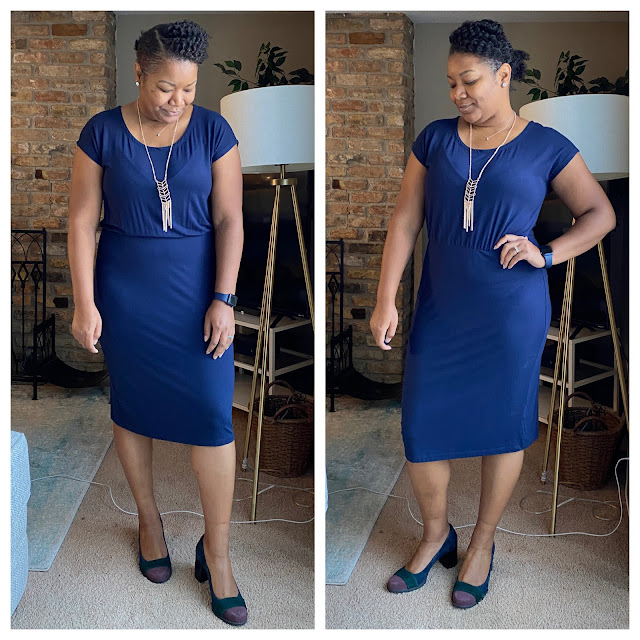
The previous B6330, blogged here, was sewn and LOVED. I made another one soon after in black but that fabric was bad. It grew and grew and grew. I washed it before hemming and it came out so distorted that I tossed it. 

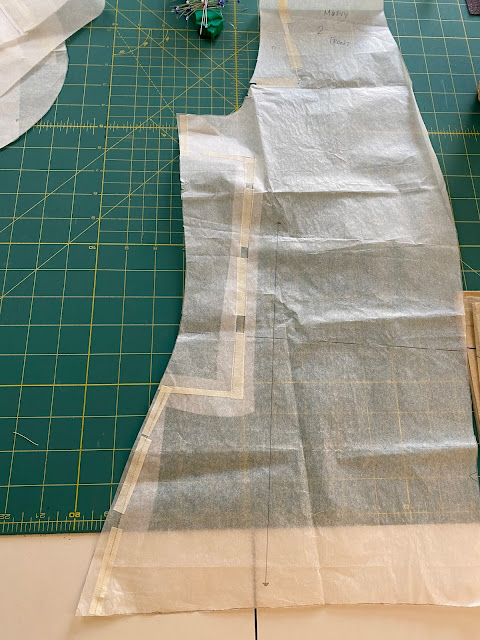
As with the prior version, I cut a size medium. I added 1" to the back skirt but cutting it 1/2" away from the fold (it uses the same piece for front and back). This does result in an unmatched bodice to skirt but it's knit and there's elastic and mehhhh it's fine. :)

I really, REALLY love the fit. This jersey was a FM precut that I previously made a cardigan from and I love it!
I added the pockets and finished the armholes and neckline with a facing(?). I cut a 1 1/4" strip of fabric, stitched it in place, trimmed and graded the seams, turned it to the inside and coverstitched. The pattern has you just turn in 5/8" and topstitch but that's just hard to do nicely on curved seams. 

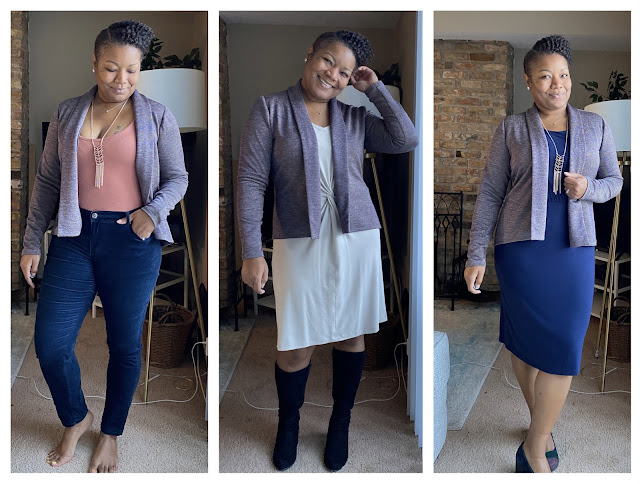
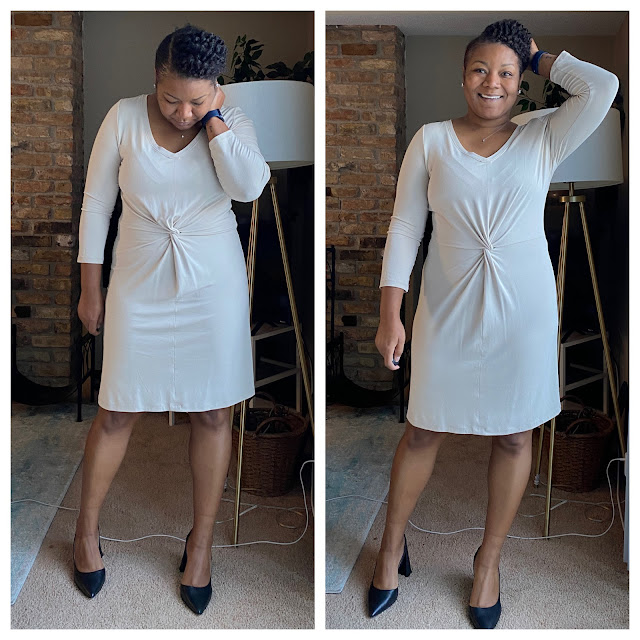
Lastly, the pattern doesn't actually include a tie, it's a bow sewn to the front but, no thank you! I cut a 1 1/4" strip and serged it, turned the tube and pressed. I didn't bother trying to sew the ends. 

Fabric Mart had a sale on their Milly odds and ends and I racked up. I took the opportunity to add these cute silver beads to my tie. Swoon. 

This dress, especially, is going to get TONS of wear this summer and into fall. It's begging to be paired with a cute jacket!

In other news...

I've been following this online knitting machine lesson and did a terrible job on this sweater :-p
That mock ribbing IS cool though!! 
The wonky front half was so traumatizing that it took me 2 days to do the other side - it was much better :) The next step was to sew the raglan seams, leaving one open and then rehang the neckline and knit the neckbinding. But then...

I FOUND A RIBBER!!!!

The main machine does stockinette and you need a ribber (or garter carriage I think) to make purls. So the mock ribbing above is made by skipping a needle (basically leaving a small float) and ta-da, mock 2x1 rib. But the ribber does REAL ribbing! Woohoo!!

So I'm going to learn to use it and do another practice sweater with actual ribbing. 

The inspector

A set of plates that aid in attaching it to the main bed was missing so I'm waiting on those. I'll clean it up in the meantime (vacuum out the dust, inspect the needles, clean it and oil it) and hopefully I'll have my plates in the next week and can get to practicing. SO exciting. 

The other technique I've been trying to learn is how to knit lace. There's a separate carriage that works in conjunction with the main carriage on the machine that does all the needle selection and transfer of stitches for lace patterns. You can always manipulate stitches manually, but I've got a good selection of built-in lace patterns. 

After trying and trying and trying I FINALLY figured it out!! I do notice some dropped stitches so I'll have to look harder at what's happening during the process (someone pointed out that it looks like a specific needle dropping so I'll watch for that). 


You don't know how many times I've stared at this swatch and smiled!