Pages

Monday, January 28, 2019

Butterick 6621--Times FOUR!

This is a pretty epic post! Lots of pics too!! :)

I was immediately smitten with this pattern when this collection was released. I could see all of them in my closet and purchased it via Club BMV as soon as there was a sale!
  • Twist Front - yasss.
  • Faux wrap front with slight boatneck - I'll take it!
  • View B was just a bonus with the waist ties.
  • Nice length
  • Center back seam
Such a great pattern!

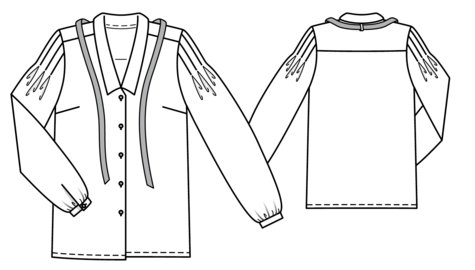
I cut a size 14 and did a cheater 3/4" FBA. I graded the hip to a size 16 and left the length as is. I curved in the center back through the waist just a tad (~3/8") and did a 1" full bicep adjustment. 

The armhole is raised slightly and extra width added.
This small difference in seam length as a result is just eased into the back.

I did a slash and spread to add a little length to center front as well.

First up was view A, the twist front. I had this cool print jersey from SR Harris. I had 2 yards and the pattern needs 1 5/8. I washed it and woah did it shrink! And it was off grain. By the time I got it ready for cutting I *just* barely squeaked it out and had to take my sleeve length where I could get it :)


The twist front is NOT COMPLICATED. At all. Don't be like me...the only twist fronts I've done previously were Burda patterns and required some thinking! On this view, I serged the center front prior to sewing it together. All other seams were constructed via serger. 


The waist seam is part dart
I just sewed this seam with a zig zag stitch and trimmed it down

Oh! Neck binding - measure your neckline and adjust based on your fabric's stretch and recovery. I had to pull mine out and shorten it several inches.

I like where and how the twist sits and the neckline came out okay. 

I've worn this one already and really like it. I want to sew a solid version AND I just bought a beautiful print to make a version for spring.

Next up was view C. Can you believe I don't own any black dresses? I had this black wool jersey, also from SR Harris. Adore the mock wrap front. A.D.O.R.E! I shortened this neck binding TOO much and it's uneven. Luckily it's black and with the plain front I'll almost for sure wear a necklace every time.

The coverstitch worked flawlessly for this fabric (wool jersey is so fantastic if you're able to wear wool!). This fabric wasn't as stretchy as the jersey from view A and I ended up sewing the side seams at 3/8" and the center back and 5/8" through the upper back, tapering to a 3/8" seam from the waist down. 

The overlay was hemmed before sewing the side seams.
I started my coverstitch on the dress hem at this seam and finished under the overlay.

The ties are gathered a little. 

I've worn this one too and it is another winner!

And THEN...I like the Ruska knot dress. It's so simple but so cool. But I really don't care for anything else in the book which made it impossible for me to shell out for it. I mean, the longer version of the Ruska is cute too but there's not a ton of design there that doesn't exist in my pattern catalog already.

I was trying on the finished view C and, my wool jersey is a little translucent. And I was thinking I'd need a slip...the front is fine because of the overlay.

Lightbulb moment. The front of the Ruska knot dress is just an overlay.

So I took the front and view C and mocked up a front with ties. Made some modifications and cut another front. That one was much closer...in the final version I made some additional changes.

This was the 2nd iteration. 
I realized it would look better with a CF seam and added that in the finished dress.

This fabric is ALSO from SR Harris! It's a lovely pine green (I think!) but it is heftier than the other two knits used. I'd initially made a facing for the tie but the fabric was too thick to be doubled and then tied so I had to rip all of that out. WHEW! Otherwise, no changes from the black version C.

I thought I was done with the pattern! Buuuuttttt, I'd kept it in my little pink basket in the sewing room :)

I regularly peruse retail stores that I like and saw this simple but cute dress at LOFT. 
still debating on tie options! I was in LOFT after this was finished and the ties are a strip of the sweater knit was sewn between the sleeve and cuff...so it was integrated into the sleeve. Drats!

I have a gazillion cuts of shirting and had my mind on this burgundy ponte. Hmm. This fabric is from...SR Harris! Doh! I bought it awhile back to make a dress but didn't get around to it. I was going to save it for pants -- it would have been better used as pants. It's super thick.

When I got ready to baste it, I was sure it would be too small. I ended up sewing 3/8" seams on the back, side seams and the sleeve seams. It's still a little snug through the bust, and I totally need a bit more room to navigate the butt (that's what the wrinkles are...not swayback)...but it does not bother me enough to not wear it! 

I  decided the striped sleeve bits should be 6" long finished and the cuff 3". I had to play around with the flare on the cuff and in the end sliced the rectangle of fabric 6 times and spread them about 1/2" apart. I believe I doubled the initial width at the hem. The split cuffs are again basically a rectangle and I decided to 'cut' in about 1.5" on each side. Worked out well!! The cuffs were basted to the flared sleeve and attached to the main sleeve in the round.


This sat for a few days because I was unsure of how I wanted to finish the neckline. Especially with the heft of this fabric. In the end, I took 2" strip of fabric and attached it. Then under stitched, pressed, topstitched and trimmed back.


And NOW, I really have put the pattern away...for a spell...I totally picked up another copy of this pattern at the most recent JA sale because this will obviously be (already is?!) a TNT.

In other news...

I have to have surgery on my hand.

I'm trying not to be too bummed out. I mean, when I initially fractured my hand, I was out of commission for two months. It may be a little longer than that...it all depends. I will most certainly take it slowwwww. He believes I will regain full use of my hand. He told me that and my response was, "Like a normal person?!?!". He said, "Yes, like a normal person." 
  • I should be able to drive about 1 week after.
  • I can return to work by that time but at best, I'll work half days the second week...at worst I'll take a 2nd week off. I have a straight desk job now so tons of computer work.
  • By about week 4-6 I should "be able to write normally". Sigh. LOL!
  • "Light gripping, pulling and pinching" until ~week 10-12. 
  • I should expect full strength and mobility between 6-12 months. Yeah, I know. I'm pretty sure that's just a cya timeframe.
It isn't scheduled yet but between work commitments -- I have a conference to attend early April and want to be a minimum of 4 weeks out for that -- and fitting into the surgeon's schedule, we'll see. Hoping for late February.

Monday, January 21, 2019

Burda 12/2018 & Some Monday Miscellany

I was all prepared to share my trio of Butterick 6621 dresses and then I saw a RTW dress that was simple but had this cute sleeve detail and I had to have it. I looked through my options and B6621 was an excellent choice! So look for the four versions of that one this weekend! :)

RTW dress from LOFT

I did get a chance to have my daughter take pics of my forever project, this blouse from Burda 12/2018:

I fell for the sleeve and the velvet ribbon bow. And I had these two (random?) pieces of ivory poly blouseweight in stash. I have no idea where this fabric came from and why I had it in 2 pieces. After getting the seam allowances added and pattern adjustments made, I laid it out and was *just* able to fit the various pieces onto the fabric. Except I somehow did not realize the collar was cut on the fold. After everything was cut out I was confused why I didn't have "more pieces". LOL! Like, but isn't there a facing? Why did it tell me to cut 2? Wouldn't I need to cut 4??

(side note: THIS is part of the reason the cutting layouts are missed...that and what pieces need interfacing!!)

I was able to find a piece of fabric large enough to cut my collar facings. Whew!


It's totally fine...Do you see my terrible slip stitching?? I have been dealing with insomnia and one day I woke up at 3:30 a.m. and after fighting to get back to sleep for 90 minutes, I just got up and went downstairs. I watched an episode of Law & Order: SVU and sewed this. Obviously I was so not awake! LOL!!!

The sleeve band stitching was done fully awake and turned out better :)


The sleeve really caught my eye. It was the opposite of fun to sew in this shifty poly. The other thing, I did not notice until late in the process that the markings were for size 36 and I was supposed to end the pleats higher for my size 40. Oops.


I ADORE the sleeves!!!!


Btw, I sewed a size 40 with a 1" FBA (slightly too much FBA). I skipped my bicep adjustment and shortened the blouse quite a bit - more on that later.
It was pretty tough to get photos of this. Wah.

The velvet ribbon is black and I <3 it.
 There is a fabric loop in back to hold it in place.

I had purchased velvet ribbon (from JA??) when I decided to make this but it was SO stiff. After Googling, I learned silk velvet ribbon was a thing! I was going to order some on Etsy and remembered that I (luckily) still have a couple of brick & mortar fabric shops here. Called the next morning and Treadle Yard Goods had rayon velvet ribbon - so much nicer! I hopped in my car and drove 15 miles for 1 3/8 yard of ribbon. Oy! I wanted 1 1/2 and when I got there she said, "Oh after the call I thought, I should have measured it..." eesh.

This top = saga.

The shifty fabric. The stiff ribbon. At one point I was doing the rest of the cutting (bands, collar, etc) and thought, "did that rotary cutter just touch me?" and kept on doing what I was doing. A few minutes later I saw blood on my finger. I cleaned and bandaged it and was all, YAY! It didn't get on my fabric! And the next morning:

I used some diluted hydrogen peroxide to remove it (mostly) and figured the rest would come out in the wash with a little stain treatment. 

When I went to set the sleeves I found a spot of blood on the front of the blouse and a smear of blood on the shoulder. Seriously. 

Setting the sleeves I had to redo parts of one sleeve about 4 times.

The facing kept flipping out -- it's 'grown on' in front with a piece that extends and needs to be sewn onto the collar. I decided to understitch that portion:

Tried it on again and, "why is this side of the collar doing funky things??" I had caught SEVERAL inches of the blouse in the understitching. 

I am SO over this top at this point and SO ready for it to be DONE! I have a mini conniption about sewing the buttonholes because of the drama and that was the one part that went FLAWLESSLY! Go figure!
Buttons are off-white shank buttons from stash

Lastly, this thing was ridiculously long! I didn't add hem allowances as I rarely do with Burda. I ended up removing 3 inches and it was another step I was not looking forward to. Lightbulb moment! 

I pressed up the 3", sewed a 1/4" hem and then used my applique scissors to trim away the excess. I then folded it up again and stitched the hem. Worked perfectly.


 I thought I was going to have to put it on timeout after all that but it's soooo cute and I just LOVE it!!

I had to share this pic of Wilson the Cat...so intrigued by the fireplace...


And I ordered a bunch of swatches from Mood for my husband's sportcoat!
slate blue cotton twill, midnight blue cotton corduroy, taupe cotton corduroy
brushed cotton twill, charcoal cotton twill, blue-gray cotton corduroy

I *really* want it to be corduroy but the brushed twill is my favorite on-screen! We'll see which he likes best when the swatches come. The taupe cord and charcoal twill are my least favorite and based on the on-screen color, that blue-gray may be too teal-ish for him.  

My 1st choice for a pattern is Bootstrap Fashion "Modern Fit 2-button Jacket". I've not had a ton of success with Lekala but the custom pattern is the obvious first choice. It should be a better starting place than a Big4 pattern. (Burda is cut far too slim for him. My lanky son? I have used several Burda patterns for him.) My other option is Vogue 8890 though I'm not 100% sure he'll fit into the size 46. We'll see!


Tuesday, January 15, 2019

Butterick 6378 & Burda 6432

I first made B6378 last April and am super surprised that it took me this long to get back to it.  I picked up this fabric in December 2017 from SR Harris and always knew I wanted to use it for this pattern. It takes me awhile to get excited to sew sheer, slippery fabrics.

No major changes from the last version:
I used my normal size 14 with the following adjustments:
1" FBA and left the dart (I intended on rotating it into the gathers at the shoulder and forgot)
3/4" full bicep adjustment
Sewed a narrow hem. The pattern hem is 3/4".

Last time I inserted elastic into the sleeve hem. I don't hate it but decided to go in a different direction this time. I gathered the sleeve and made a little cuff.


I used my featherweight black interfacing scored from FabricMart and cut the band to finish at 3/4" and about 10" in circumference.


When I sew slippery fabrics, I cut the facings and take them to the ironing board, reshape with the pattern piece, then fuse the interfacing. Somehow, while inserting my facing (or something), it was INSANELY skewed. I am not exactly sure what happened. 

I ended up serging the excess off of one side and topstitched around the opening. I figure the tie will be covering it at all times.


This was a December project. I finished it about a month ago and I think I've worn it about once per week! I love it!

There have been some great conversations going on about fit while sewing. I think the simplest concept to take from a complicated issue is, we never stop learning about fit! 

I have made many pairs of pants and they've varied in how well they fit, but I learned something HUGE with this pattern.

I cut a size 16 and did a 1 1/4" full butt adjustment, shaped the crotch curve a bit and added a little to the crotch point. The back view was not good when I basted them together. They WERE a little too tight but my primary concern was that I had A TON of wrinkles and pulling. I was unpicking basting stitches and had a lightbulb moment.

I flat pattern measured the thigh and huzzah! It was about 1.5" smaller than my thigh! I opened the inseam from mid-thigh through the crotch and to the other thigh and tried them on. I need way more inner thigh room. 
To get to the point on the right, I took less of a seam allowance on the back leg only, through the thigh:


 I'm excited to give this pattern another try with my ideas on the leg / crotch fit! I have my own method for fly zippers but this pattern had excellent (IMO) instructions! I think this is the best finish I've ever gotten!!

As you may have noticed, I removed the pockets. If you scroll up to that before-and-after, you can see how they were gaping. The messed up thing is, I had used lining fabric for the pockets and had to unpick them to use the fashion fabric, and THEN ended up removing them completely. So annoying!!

Things I did NOT like:
The narrow waistband. HATE. I'm not sure why I didn't change it when I noticed how thin (1" I believe) it finished. 

I usually DIY my belt carriers because I hate when they are too thick (to me). These are a little too wide. 

My own mistake - I bought this fabric from Metro Textiles to make a dress. I should have made a dress. The fabric isn't great as pants. When I wore the pants for the first time, they grew so much throughout the work day that I could almost pull them down over my hips without unbuttoning! I interfaced both he waistband and the waistband facing and it still collapses and is very much affected by body heat. WAH. 

 I am currently working through a Burda blouse that's trying hard to take me out! It's trying to get me!!!! I think(?) I'm almost done with it? Sometime this week :)

I have slowly been cutting Butterick 6641 out (the paper pattern). If I can get this cut out, it'll probably take me the rest of the month to finish it once the other top is done. Had more testing Monday with a follow up to my doc this Friday. Fingers crossed that we find a resolution.

Ooh! MY KAI SCISSORS ARE AMAZING!!!!!!!!!!!!

I've loved my (several pair) of Ginghers for years now. The Kai scissors I ordered are SUPER lightweight, has the bent handle, the grips are soft and all 4 fingers can fit in the grip which makes cutting easier. Yay!!