Pages

Showing posts with label Shirt. Show all posts

Sunday, February 21, 2021

Burda 1/2021 #120

I'm so far behind on blogging! GAH! And then on Saturday, it was really bright and I knew I should have gotten some photos taken but didn't. What happened Sunday? It snowed all day and was overcast. Grr. 

I sewed this pattern earlier this year for my daughter here. I knew that this Veronica Beard fabric that I'd been hoarding was a perfect pairing to the pattern.

Here's a VB jacket using the fabric 


And V9286


I don't remember the composition and it was on FabricMart as a boucle. The Nordstrom's site lists the jacket as a cotton blend tweed with the following composition: 64% cotton, 27% linen, 8% polyester, 1% elastane.

It was a really great fabric to work with! I may have enough left over for a skirt! We'll see!! 

I used my normal Burda sizing - a 40 neckline and bust, graded to a 42 waist and 44 hip. I ended up adding a CB seam to do a swayback adjustment (5/8") and add some shaping. 


It's a pretty straightforward sew. The darts. AH! It has bust darts and the sleeve has 7 darts (3 on each side and one at the hem). That was not fun. It was totally not fun in this striped, ravelly fabric. But I do love the finished product, so it was worth it!

I adjusted the belt width to fit the 1.25" D-ring I had on hand (I think the pattern called for 2"). But otherwise, sewn as per the pattern!

I've already worn it several times since finishing it. It's so cozy and fun to wear, and the stripe makes it fairly versatile with bottoms in my wardrobe. 

I have a host of finished things to blog, making a list here to help myself! :)
S2892 top
Burda 3/2011 dress
S9011 dress
Burda 1/2018 sweatshirt
S8529 sweatshirt
Burda 6990 top

My plans for February included muslining a jeans pattern for my husband. But then we found a pair that fit him really well, and I bought 2 so I'm not sure this is a priority for now. I am almost done with the golf club covers for my brother:


And, I was sewing a shirt for my son-in-law's birthday! I hope to get photos of him in it but for now, I have some detail shots. I used McCall's 6044, a TNT for many sewers, and a Brooks Brothers cotton shirting from SR Harris. 

I got these Kylie & The Machine labels from Maker Mountain Fabrics on etsy. The "You Can't Buy This" label was perfect for a gift!
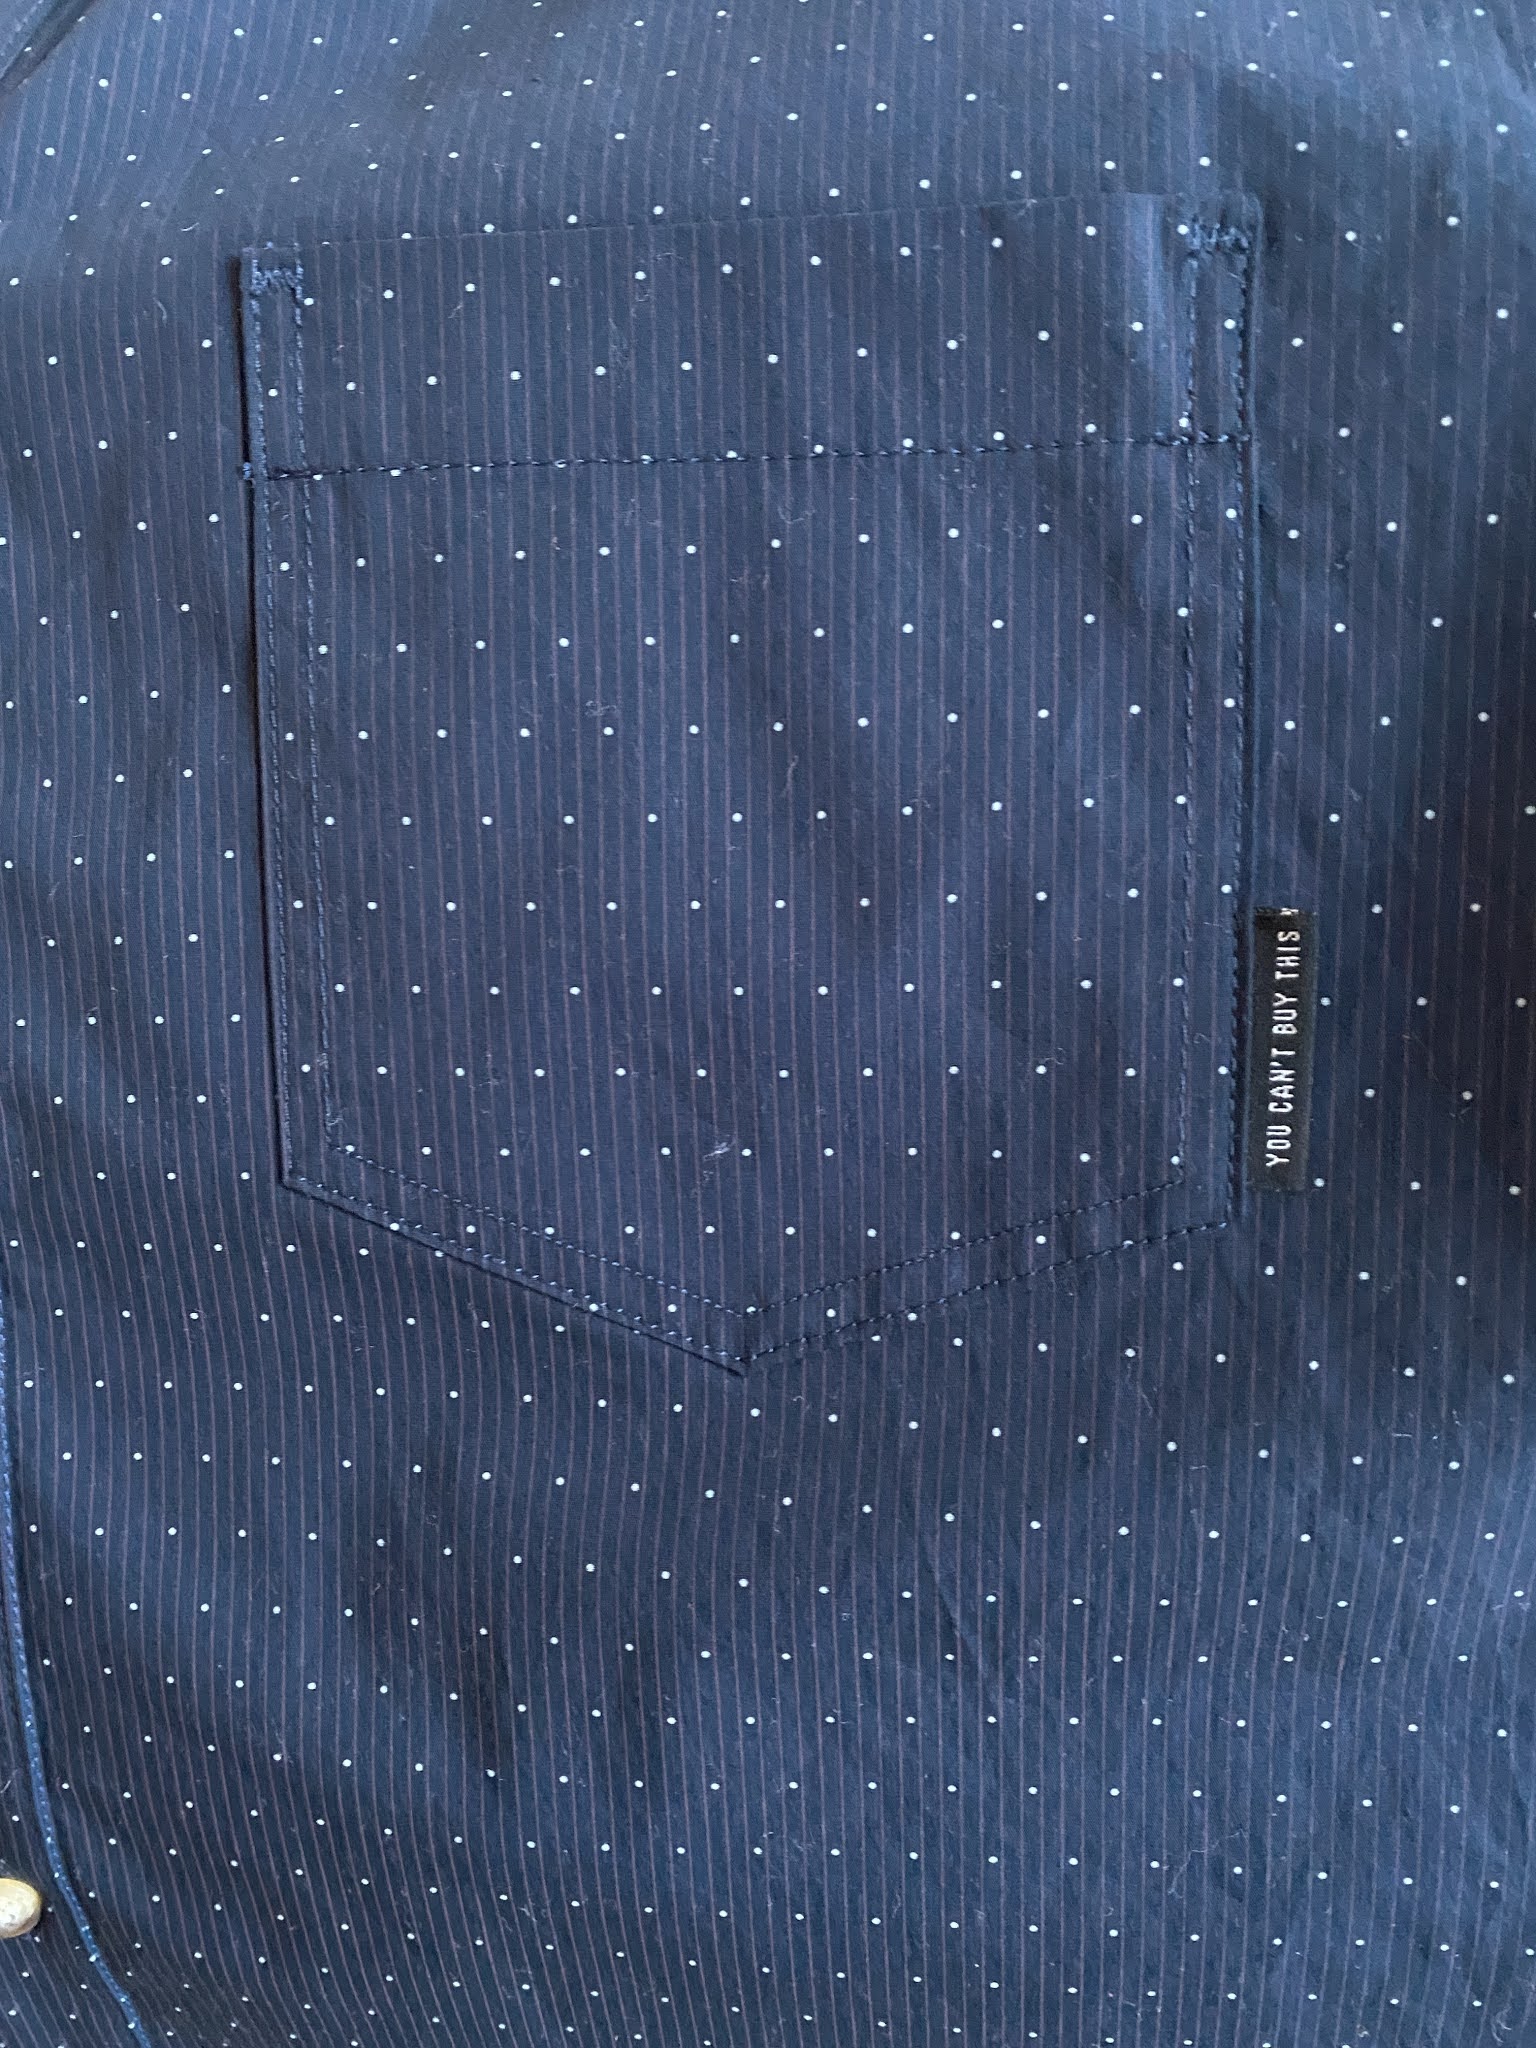
shout out to the edge-stitch foot! It's a game changer!

I used a technique from a 1986 issue of Threads (I have the archive) for the collar. It's very clean, though also, the shirting was pretty rigid and that made it a little tougher to work with cleanly.
I used french seams throughout that I then serged and topstitched. One time I did flat-felled seams but I just don't care enough to go through all of that. 

For the hem, I stitched at 5/8" then turned twice and topstitched. 

For the buttonhole side, I reversed the sewing of the band. I attached on the inside first, turned it out, then pressed under and topstitched. It adds a little bit of texture. 

Excuse the excessive wrinkles in this pic but, I was doing my final press and scorched the front right above the pocket, and I was doing all sorts of stuff to get it out. By the time I noticed these wrinkles, I had already turned the iron off :) I did press them out before packing up the finished shirt!

I very rarely do a buttonhole on the collar stand. I often find that area  little too bulky to do it well but it worked out fine this time!

For the sleeves, I stitched at 1/4", folded under and pressed, then turned up the remaining 1" hem allowance and topstitched. 

For baby, I used McCall's 6016, in the smallest size, and used snaps instead of buttons. 


The collar stand on this pattern. Gah. It took so much effort! AND, I had to actually sew ease stitching to insert these sleeves! Ugh! They really should have been able to be sewn flat. 

I have an Ottobre pattern for shirts that I'm excited to try in the future. It starts at ~2T but at the rate Bert is growing, that won't be too far away! :)

Can't believe this month is almost over!

Sunday, November 15, 2020

Burda Mag 4/2018

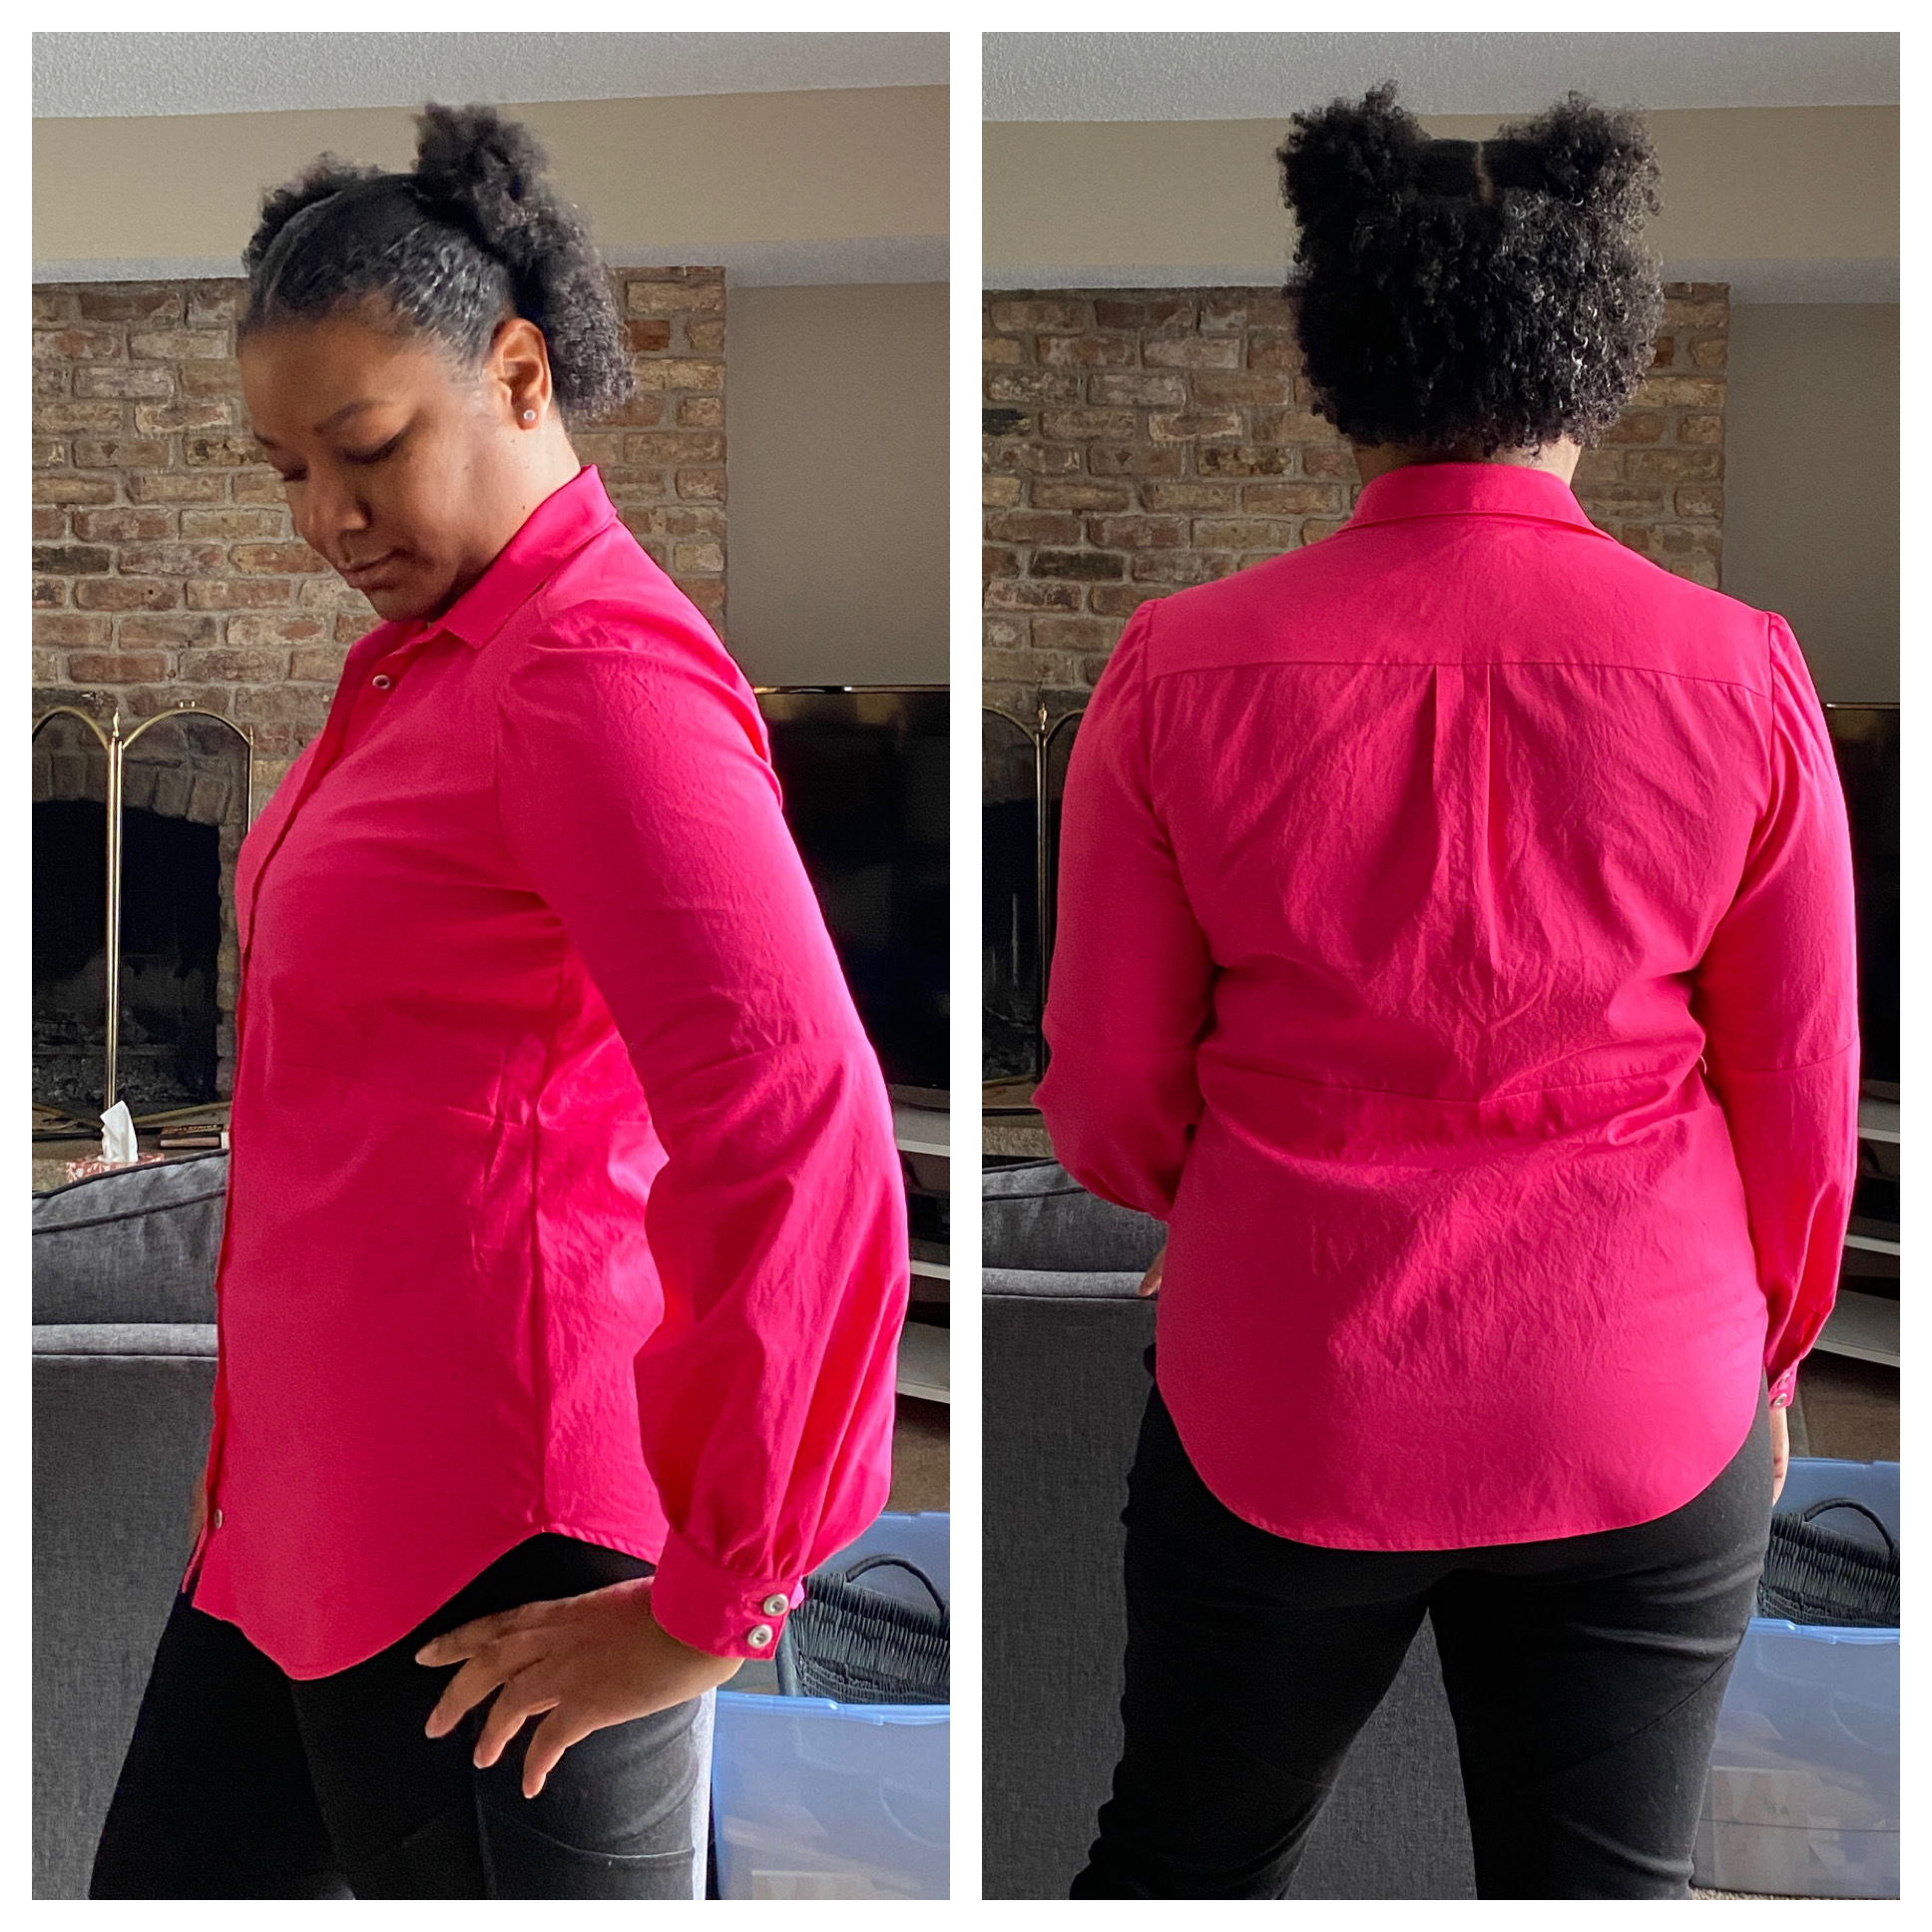
I finished this shirt awhile ago and while I love the idea of it, I'm not sure how useful it'll be in my wardrobe. It has cool features with the radiating darts, back pleat and full sleeve. But IMO that limits it's versatility. 

I used a size 40 neckline and 42 for the rest. I also did a slash and spread on the lower back piece to add to the back hip. The fabric is a cotton sateen shirting from SR Harris in a bright pink (the pics of it on me are more accurate on the color).

I've said it before but, I love constructing shirts and jeans but they're not items I wear often. DOH! 

Baste! Baste! Baste!! :)

Look at that topstitching! So satisfying!!

There was a lot of extra fabric in the back waist (I didn't get a before pic). 
I did a quick fix which really helped. It was MUCH worse.

I took out as much as possible without throwing things too out of whack. 
Ended up removing about 3/4" total at center back. 


Like the last Burda shirt I made, the sleevehead is just too much. I am pretty sure I used the right sleeve size for the shirt. I do a 1" full bicep adjustment but that doesn't affect the length of the sleevehead. The fabric perhaps didn't like being eased...IDK. I redid the sleeves a couple times but it's just so much excess that I kept checking to make sure it wasn't a puff sleeve!

I do like the lower sleeve design. There's a horizontal seam on the sleeve and the lower is gathered into the cuff.

The darts are the other star of this shirt. They look really great! I used a 1/2" silver button from stash.

Nice pattern, nice shirt, Not sure how often it'll be worn. Darn it. 

My other WIP? Eek! It's only based at the sides here but I don't think I have the room necessary to fit the hip and thigh area. 
I was so confused and then realized the other 2 times I made this pattern I used ponte and a springy crepe suiting with quite a bit of mechanical stretch. This is a 100% wool, tightly woven suiting. 

So now that's officially a UFO. 

I then started a full sweater project for myself. I did a few swatches and hit stitch count exactly and was a bit short on row count. I didn't know how to adjust the increases and decreases if I adjusted the length so I just made it as is. It seems like it'll *just* finish at my high hip. We'll see! :)


I kept forgetting to block my pattern pieces. Every night I'd have a DOH! moment. Finally blocked the sleeves and the front and back are currently blocked out. I need to seam the raglan at front and one side of the back, knit the neckband, rehang the sweater (hence the blue waste yarn) and attach the neckband and sweater. Then, I'll sew up the other raglan seam and stitch the side seams + sleeve seam. 

Woohoo!!! 

I'm hoping for sew-jo. I miss sewing but can't get motivated. Wah. Maybe have to push out a TNT. We'll see!


Saturday, January 11, 2020

Burda 04/2010 #114

I went down to the basement to look for a pattern and it wasn't there. Well, there were *several* piles of patterns and magazines in various places. A lot of them were recent additions that just hadn't made it into the pattern cabinets. Among them was 3 old Burda mags that I recently acquired. I thumbed through and fell so hard for the April 2010 issue!!

From the SMF blog. smfabricblog.com
I LOVE so many of the tops and a couple jackets and dresses and - win! I had been waffling on using one of my TNTs: B5678 or Burda 7136 or a different pattern for my striped shirt. I contemplated B5526 because I wanted something casual (e.g. B5678 was out, it's an awesome pattern but very fitted). This pattern checked the boxes! A semi-fitted style with a yoke, stand collar, cuffs, all that.

I have to take the lighting I can get. It is just too dark and cold lately :/
I settled on this striped fabric for my shirt long before I decided on the pattern. Last year after my Fabric Mart visit, I bought a bunch of shirting and I've been thinking about *this* shirt for a long time. 


I cut the pockets, cuffs and collar stand on the cross grain....and these buttons! Eek! The last JA sale on buttons was buy 3, get 3 and I just grabbed these because they were cool.

love this  image of the collar stand! :)

I'd posted a poll on Instagram about using the pattern piece included for the pocket and an oversized rectangular pocket. It was overwhelmingly in favor of the pattern pocket but I just really liked the pop of the oversized pocket!


I traced a size 40 at the neck and shoulder and graded to a 42 through the armhole and body. I added a bit over an inch at the hip (which wasn't enough and I sewed a 3/8" seam allowance through that area. 

I added 1" to the bicep and made no other adjustments.

I set the first sleeve and holy buckets! There was SO MUCH EASE in that cap. The pattern does NOT show a puff or gathered sleeve. But the sleeve was like 4" bigger than the armhole! I ended up removing some of the height off the cap but think I overdid it. I will be sure to adjust the sleeve pattern.  

The other issue was that they gave measurements to "draft" the continuous lap and THAT included seam allowance. The measurements they gave to "draft" the cuff did NOT include seam allowances. WHAT THE HECK BURDA!?!?! 

I took a slightly deeper pleat on the sleeve and sewed the cuff side seams at ~3/8". I attached them to the sleeve with a 3/8" seam allowance and thankfully, Burda drafts a pretty long sleeve. But then, with reducing the sleeve cap a bit too much, they are *just* a tad bit on the short side. Whew. 

I foresee lots and lots of wear with this one! I really like it and I think it'll be super versatile for me.


Sunday, August 26, 2018

Vogue 1323: Slowish Sewing

This was a "slow sewing" project...slow for me. I started cutting Wednesday evening and it was basically done Saturday night. I swear I was going slowly! :-p
I saw this fabric on FM and legit lost my mind. I placed this order August 6. That was my first Fabric Mart order since May 22. I usually buy enough fabric and rarely extra. I bought 5 yards. FIVE. The only other fabric I've ever bought in this yardage is black ponte. And FM being FM, they sent me about 5 2/3 yards. Gah. I think I've convinced at least 10 people to buy this fabric. LOL!


I started with my normal Big4 sizing; 14 neckline and shoulder and a 16 for the rest. Well - sometimes I do a size 14 and an FBA. Other times (like with knits), I grade out. With patterns like this, where it's fitted in the shoulder but otherwise a loose fit, I will grade out and just do a smaller FBA than if I cut a straight size 14.

I did a 3/4" FBA and kept the dart created. I did a 1/2" slash and spread on the back piece adding 1" at the hip...I could have added a little bit more. I also made my standard 1" full bicep adjustment. I've made the mistake before of looking at the bicep measurement and thinking, that's totally big enough! The finished sleeve was 16" or 16.5" for the size 16. My bicep measures about 14" and that's plenty of ease, right?? BUT, I would lose the intended fit if I didn't do the adjustment.
I have some drafting books I recently checked out of the library. I realized I am truing the grain line incorrectly or something when I adjust my sleeve. I think that's the cause of my sleeve twist over all these years! I remember when I muslined that Burda jacket and the unadjusted sleeve had no twist but the adjusted sleeve did. I'll be working on that.

 I just adore gathering into back yokes. Adore.

Another recent realization...I have used Pellon interfacing the entire time I've been sewing with no problems. The last time I bought multiple bolts (I usually buy 2-3 at a time) I went to pick up the order and really should have just returned them. It was not packaged like normal. It literally was interfacing wrapped around cardboard with plastic wrap wrapped around it! I was complaining about having issues and realized it's only been since I've been using THAT Pellon.

I ordered several types of interfacing from Fashion Sewing Supply knowing I have some plans for fall for silk and silky tops. On this blouse, I used the ProSheer Couture Elegance in white. The $9/yd has made me bypass this interfacing but boy oh boy! It is really good. I followed the instructions and it fused perfectly. Also, this interfacing is 60" wide vs Pellon's 20"...so 1 yd = 3 yd of Pellon; a bit more comparable when you think of it that way and SO much nicer.

I posted this on IG during construction...look at how CRISP that cuff is!!

The pointed front placket was a bit fiddly and it did NOT turn out for me. My bottom buttonhole is not functional. I can get it on and off without unbuttoning it at all; much easier to get it off if at least the 1st button is undone.

The reason I changed the front tab...and it's still wonky just less wonky.


Soooo yeah. LOL!!! Your sewing can still be beautiful even when it isn't! :-p

The stitching on my bands is a bit wobbly. It should finish at 1" and in some places it's 7/8" and in some just over 1". Oops. Also, I had to redo the topstitching in a few places because it was so wobbly on the inside. 
But I LOVE IT!

The pattern finishing is lovely. Of course they don't recommend the 'burrito method' but that's how I finished the yoke. Everything else is finished with French seams. The armhole was STRESSFUL!!!!!!!!!!!!!! But the 2nd one went in much easier and faster. Whew! That's the first time I've ever done that.


I want to hug my cuffs...

This fabric was A DREAM to sew and press. To cut, I used Best Press to stabilize which worked really well and especially for the small pieces - pockets and flaps, collar, bands. After I finished it I washed it to remove the stabilizer; the challis is just as flowy as it was before! 

I have my Burda 8/2018 tops photo'd and the blogpost ready but I documented every single step of this process on IG and so it had to jump the blogpost line! :) 

It was HOT AND RIDICULOUSLY HUMID out when I went to take pics and like 60% of them, my face looked like this:

so angry. lmao!!!! 


 Lastly (there's more! LOL!), I saw someone style a short, skinny scarf and thought it was so cute. Then I did some Googling and found one on Target. I went to look at their dimensions and they had it listed as 48 feet (L) x 4.5 inches (W). Uhmm. Pretty sure it wasn't 48 feet so we're gonna assume they meant 48" / 4'!

I was cleaning up and saw a scrap (doubled) that was about 30" long. I cut a rectangle as wide as possible and 25" long. I sewed the entire thing with 1/4" seam allowance, angling the ends 2". The finished dimensions are about 49.5" x 3" and I LOVE IT!!!! I wore it today and think it'll be great for fall.


Sunday, May 27, 2018

A Gift, a Fail + Randomness...

First up, my mom's late Mother's Day gift. I had some stuff happen that made me have to put it on the back burner but I was able to mail it the following weekend. She really liked it and I'm glad I chose this as I wanted one for myself :) 

V9305 was a little less interesting on the cover photo but the line drawings were nice enough to draw me in! And after Ann sewed her versions, I was sold. 

My mom loves the color brown in all shades and I decided this would be a great pattern to pair with Fabric Mart's designer linen (nayy). 

 
Ann is 5'9" and liked the length as is and it was LONG. I'm 5'5" and my mom is mayyyybe 5'2". So I knew it would need some major shortening.

I didn't want to use the l/s lines because I didn't want to chance the opening hitting too high on the body. I shortened it though the flounce by 4". If I made it for her again I'd shorten it 1" above the waist AND the 4" below.


I trued the side seam of the front and the outside curve of the flounce after folding out the excess


The neckline on this pattern is SO high. Eesh! I removed 2" on the paper pattern and ended up taking out a bunch more once it was sewn together.

My mom really hates stuff up around her neck and I didn't want to add a keyhole so she wouldn't have to fumble with buttons.


I was so glad I decided to bind the armholes instead of hemming them. It is such a nice finish.


This area came out so cleanly (ignore my extra threads)

It was a little big on her and still very long. For a long time we were the same size with similar measurements but very different composition. She also likes a loose fit (and I like close fitting clothes!) so it was pretty easy to sew for her before. She's lost weight now so I have to retake her measurements when I see her again. I can't wait to make my own!!!  Making hers allowed me to see what adjustments I need.

Fails...womp womp.

I was perusing the BMV site for missed opportunities and stumbled upon Butterick 6551. I thought it was such a cute little dress for summer and even though I had reservations about the shift on me. I'm also not a huge fan of A-line silhouettes on me but I thought mayyyyybe.

Well, it was a big ole fail.  And this is another of those times where I am over it and not looking for suggestions for this one. 

I sewed a size M with the dart lowered 1" and a 3/4" FBA. I did a full butt adjustment too (still don't have enough room). 

It looked really, really bad from the front so NO photos! LOL! The back catches up on my butt, makes me look super wide, the collar stands away from my neck. Meh.

And look how nice this hand sewing was!
AND I was channeling Carolyn and had used a piece of my Art Gallery knit for a backing for my label. Boooooo sewing fails!

Me Made May week 3!

Burda 8/2017 dress (now donated. I never liked it on me and this was just a reminder)
RTW coral sweater and Butterick 5760 TNT striped skirt
Burda 7136 chambray shirt and RTW eyelet skirt
RTW tank and Simplicity 2061 joggers (this was Sewapalooza Day!)
Burda 5/2018 top and RTW pants
Ogden Cami, RTW sweater and pants I LOVE THIS OUTFIT THE MOST!!!!!!!!!!!!! I feel like this really captures my style...or at least the style I aim for :)
Vogue 1522 top and RTW pants

Lastly, I tried my hand at dyeing for the first time! Woohoo!!!! I am thinking of dyeing this version of Simplicity 8014 dress. I made it over 2 years ago, it fits beautifully, but I don't love the fabric and have actually never worn it.


Well me being me, I went crazy and ordered a bunch of stuff for dyeing. I ordered this Dylon tropical green fabric and decided my "classic white shirt" would become a fun green shirt!

I don't wear this shirt very often. And I thought maybe I just don't like shirts much...but I think it's the *classic* part of it that isn't my fave/doesn't fit in with my style. I'm going to plan to make a new white shirt that's a little more casual. Just a little. But it didn't seem right for this top to just sit in my closet when it's a pretty nice garment!

I followed the directions and you're supposed to stir for 15 minutes. OMG THAT IS A LONG TIME!! I liked the color but then told myself I have to remember that there's excess dye and it's wet. So I left it in almost as long as suggested. It's a bit deeper than what I wanted. I should have used half to two-thirds of the dye. But I do like it! 

I followed it up with some RIT Dye Fixative then washed and dried it. It did shrink *a little* so I'll bear that in mind for any possible future projects. It was easy but it was boring because I don't have a lot of patience LOL! Next time maybe I'll bring the iPad to the kitchen and sit on a stool at the sink because whew. I was #sooverit


I must have had a chunk of undissolved dye. Drats. It's on the front but kind of off to the side. You can see the princes seam right there to the left.

I'm not sure if that dress will fit in my kitchen sink easily. I'll have to consider my options...but I do think I'll try the blue dye on the dress. Fingers crossed. Otherwise I'll have to make a new one because that dress is so cute on me!

What's up next? I have no clue. I cleaned up my fabric stash and got rid of A LOT of fabric. Two bins were "other stuff"; fleece and flannels and kid prints that I swore I'd use for gifts. I got rid of almost all of my scraps; I only kept what would fit in a 12x12 IKEA cube. And I purged some other stuff.

I'm torn between the M7745 dress (I am not with hemming and gathering all that ruffle but I want the ruffle! Why couldn't it be a 'shaped' ruffle? Why just gathered rectangles!!? Ughhhhh :)  and starting the Burda trench. Decisions, decisions :)

Monday, April 16, 2018

Burda 7136 v.5

I didn't realize I'd made this 5 times now!

v1 is no longer in my wardrobe. It was made from a tencel blend shirting, very nice fabric, but my flat-fell seams failed at one point.

v2 is decidedly "fall" colored but I still wear it. It's a wonderful flannel shirting in a plaid print.

v3 is the almost a fail chambray version that I now wear all.the.time.!

v4 was done in a green gingham seersucker. I did not care for the seersucker. I still have it but I never want to wear it, so it's in the donate pile.

I adore this one. ADORE!


When I made the first one I noted snug sleeves and made an adjustment. When I made the chambray one I almost wadded it because of the sleeves. Chopping them off to above elbow length and adding decorative tabs helped a ton. The sleeves on the gingham version were bad.

LIGHTBULB. The first version was made in 2014. This time I looked at my "sleeve adjustment".

what in the whole entire hell?!?

I don't know what I did or why I did what I did but it was WRONG. It was a super janky bicep adjustment and THAT'S why my sleeves were wonky! WHEW! I put the sleeve back together as best I could, traced off a new one and did a proper full bicep adjustment. Ahhhhh.

I also added 1" to this version. Adding length, I should have added a little more hip room (did we not JUST have this conversation!?!? Why do I forget that the junk needs more room?)

I wore it with the last button unbuttoned 

It's buttoned full here and you can see it's a bit snug on the hip. 
The left photo, and the pic below, shows off my horrible posture. Wahhhhh!


The fabric is a border print (haha! People kept commenting on "the two fabrics") from Fabric Mart. Spotted during sew camp before it was available to be sold. I ended up with 5 yards of it. What? (there's 8.5 yards left, NAYY shirting)

The border runs along the grain but after a discussion at sew camp I learned to do what you like but be consistent. So, I marked front and back accordingly and cut them on the cross-grain. The yoke and collar were cut on the cross grain as well. The sleeves, pockets and collar stand were cut on-grain. All of the pieces cut on the pink striped border were cut on the crossgrain.

I love these cuffs and the plackets. So much

The main buttons were too big for the placket IMO so I found a plain white button to use. I think it works out okay. The border wasn't wide enough for the entire cuff so I made sure it was on the interior of the cuff.


I set my pockets and looked at them questioningly and carried on. And then when I got the side seams sewn up, I realized how low they were. It is not fun to a) unpick pockets or b) sew them back on with closed side seams. Blergh. But I wanted them this time so I pushed forward!!

Everything is nicely lined up!
Pocket is cut on grain.
I did diagonal bar tacks on the pockets because why not?!


The only other departure from the pattern is button placement. I am a 34H. For serious. I never even bother to pay attention to where the pattern wants a button. I place button #1 at the fullest part and space them 2.5" apart on a fitted shirt, 3-3.5" on a less fitted shirt.  I decided to use smaller buttons on the placket and in hindsight wish I would have used the contrasting pink buttonholes there too!

Interior with burrito'd yoke, contrast interior stand and contrast buttonhole.

I mentioned on IG how quickly I got my buttonholes sewn.
1) we have established that I am a fast sewer (I do not rush, I just am that way!)
2) I have a dedicated sewing room which makes life so much easier. I marked the buttonholes Tuesday night.
3) I had about 30 minutes to kill before I had to leave home. In that time, I tested some buttonholes and (in 20 minutes) sewed all 13(!) for this shirt (7 front, 2 on each cuff, 1 on each placket).
4) my machine makes very nice buttonholes and are just a dream on cotton fabric like this shirting.

Lastly, people asked about my collar and asked for tutorials. I love my sewing peeps but I am not a teacher. I don't have "it". No one who knows me ever asks me to teach them anything...it leads to frustration for everyone! :-p

I will say that I can give some steps/tips as to what I* do (there are myriad ways to skin a cat...or sew a collar).

1) I rarely EVER staystitch but you better believe I ALWAYS staystitch necklines on collared shirts. This time I used my awesome new-to-me knit stay tape.
2) I never cut the collar pieces until I'm ready to sew them. I want to prevent the possibility of distortion as much as possible.
3) Once interfaced I trim the undercollar and interior collar stand by 1/8" where I want them to roll. I used to trim the entire thing but found I don't really need to. Around the curve on the collar stand and around the 3 "exposed" sides on the collar. This helps it roll.
4) I mark my pivot points on the collar and decrease stitch length as I approach to make it easier to stop exactly at that point. I also draw in the entire stitching line around the curve of the collarstand.
5) I PRESS(!) those collar seams open. Made SO much easier by my clapper from Carriage Corner.
6) I trim everything but not too much! I insert my thumb into the space and use my pointer to point the corners in and then wiggle until it's nice and pointy. I don't stick anything in there to push it or pull it. :)
7) topstitch the collar - The distance from the edge all depends on the look I'm going for
8) attach the collarstand to the collar. I do not press up 5/8" on the facing as instructed typically.
9) Once the collar assembly is sewn to the shirt, I trim that seam, press it up, and press the facing in place *just* over the stitching line. I secure it with Wonder Tape in a few places.
10) topstitch. DONE!

Clear as mud? :)

I searched for links but found none that encapsulated everything. But honestly, I almost never take a tutorial as-is. When I'm looking for techniques I usually find a few that look good (e.g. the finished product looks admirable, the instructions are clear, etc) and try them out. Eventually, I come up with some combination and tweak it over time. And that becomes "my" method.

When I went to Fray Check my buttonholes (which I always do before cutting them open), it was coming out very slowly. What did I do? I will tell you...I squeezed it. Of course I did!! So I ended up doing an impromptu load of laundry :-p It all came out. Yay! LOL!

"introspection"!

I'm so silly! :)

Up next, I may make a quick vacay outfit (McCall's 7757 - I bought the larger size, L/XL and the pants are HUGE. I think I'm going to use another pattern for the bottoms if I get to them) before starting the navy coat from Burda 8/2017.

And I got my quilt back!!! It's in the washer but I wanted to photograph it while there was sunlight.


I love this pattern <3

backing and binding (hand stitched this time)