Pages

Showing posts with label Vest. Show all posts

Wednesday, September 7, 2022

WIP: Burda 6/2022 Vest

I don't actually have much to show :-p

I have been itching to sew but not motivated enough to do it. I had SO much on my list for summer and didn't get much done. I'm ready to move on to fall sewing considering how slow going things have been. I decided to work on the vest/tabard from Burda 6/2022. I am using a wool suiting that I scored from SR Harris (2 3/4 yard for $8!). It's a medium weight and is perfect for this pattern. I may make a matching pair of shorts from the pattern I'm using for my daughter. 

I have pretty standard Burda pattern adjustments. I tissue fit the pattern to my dressform and so far, the changes I made seem to be working out. 

This weekend I traced, made pattern adjustments and cut the paper pattern out. Today, I started cutting the fabric out -- I cut the fronts, side fronts, back and tabs. I interfaced all the bits that needed interfacing. Then I got ahead of myself and sewed one of the front and side fronts together - I forgot the pocket!!! DOH!

Looking good!! I LOVE this color!

Still have tons to do...but I hope that I can finish the outfit and the jackets for the babies before the end of September. 

In other news...

I WON FIRST PLACE IN THE MINNESOTA *~STATE~* FAIR!!!!!!!

Y'all! I was too excited! And if you follow my IG, you know this already! LOL!!

I have Blue. Ribbon. Socks.!!

Here is the Rav page for them: Blue Socks

I ALSO placed for my sweater (3rd place)!
Rav page HERE


I was about to melt trying this on for pics though! LOL!!! 
The wool is toasty warm! Can't wait til December!


Joy.

Is it possible to correct my posture at this late stage in life? LOL!!!
Also, these jeans are MY FAVORITE and their from American Eagle and I laugh every time someone says a store is "too young". Pfft. Buy what fits/works for you!


The judges commented on the different stripes on the sleeves - they called it very attractive! And they noted how well the stripes were matched :pats back:
I lost points on the marled ribbing - which was not a design choice, it was a mitigation. I'm happy with it though, but was frustrated that it pooled differently on the second half. 
Also, they didn't like my band of light pink on the right sleeve...but I always add some little tweak or detail to things that are just for me. 

I also placed 3rd for the girl's ballet sweater (photo HERE, Rav project page HERE)


I am so grateful for the wins and proud of myself for entering (I almost talked myself out of entering!). I can't wait for our next MK meetup so I can hear all about other's projects and wins. <3

I finally finished up the sideways knit that I'd been blogging and it's CUTE! Woohoo!


Tuesday, October 3, 2017

PR Sewing Bee: Burda 12/2015 #107


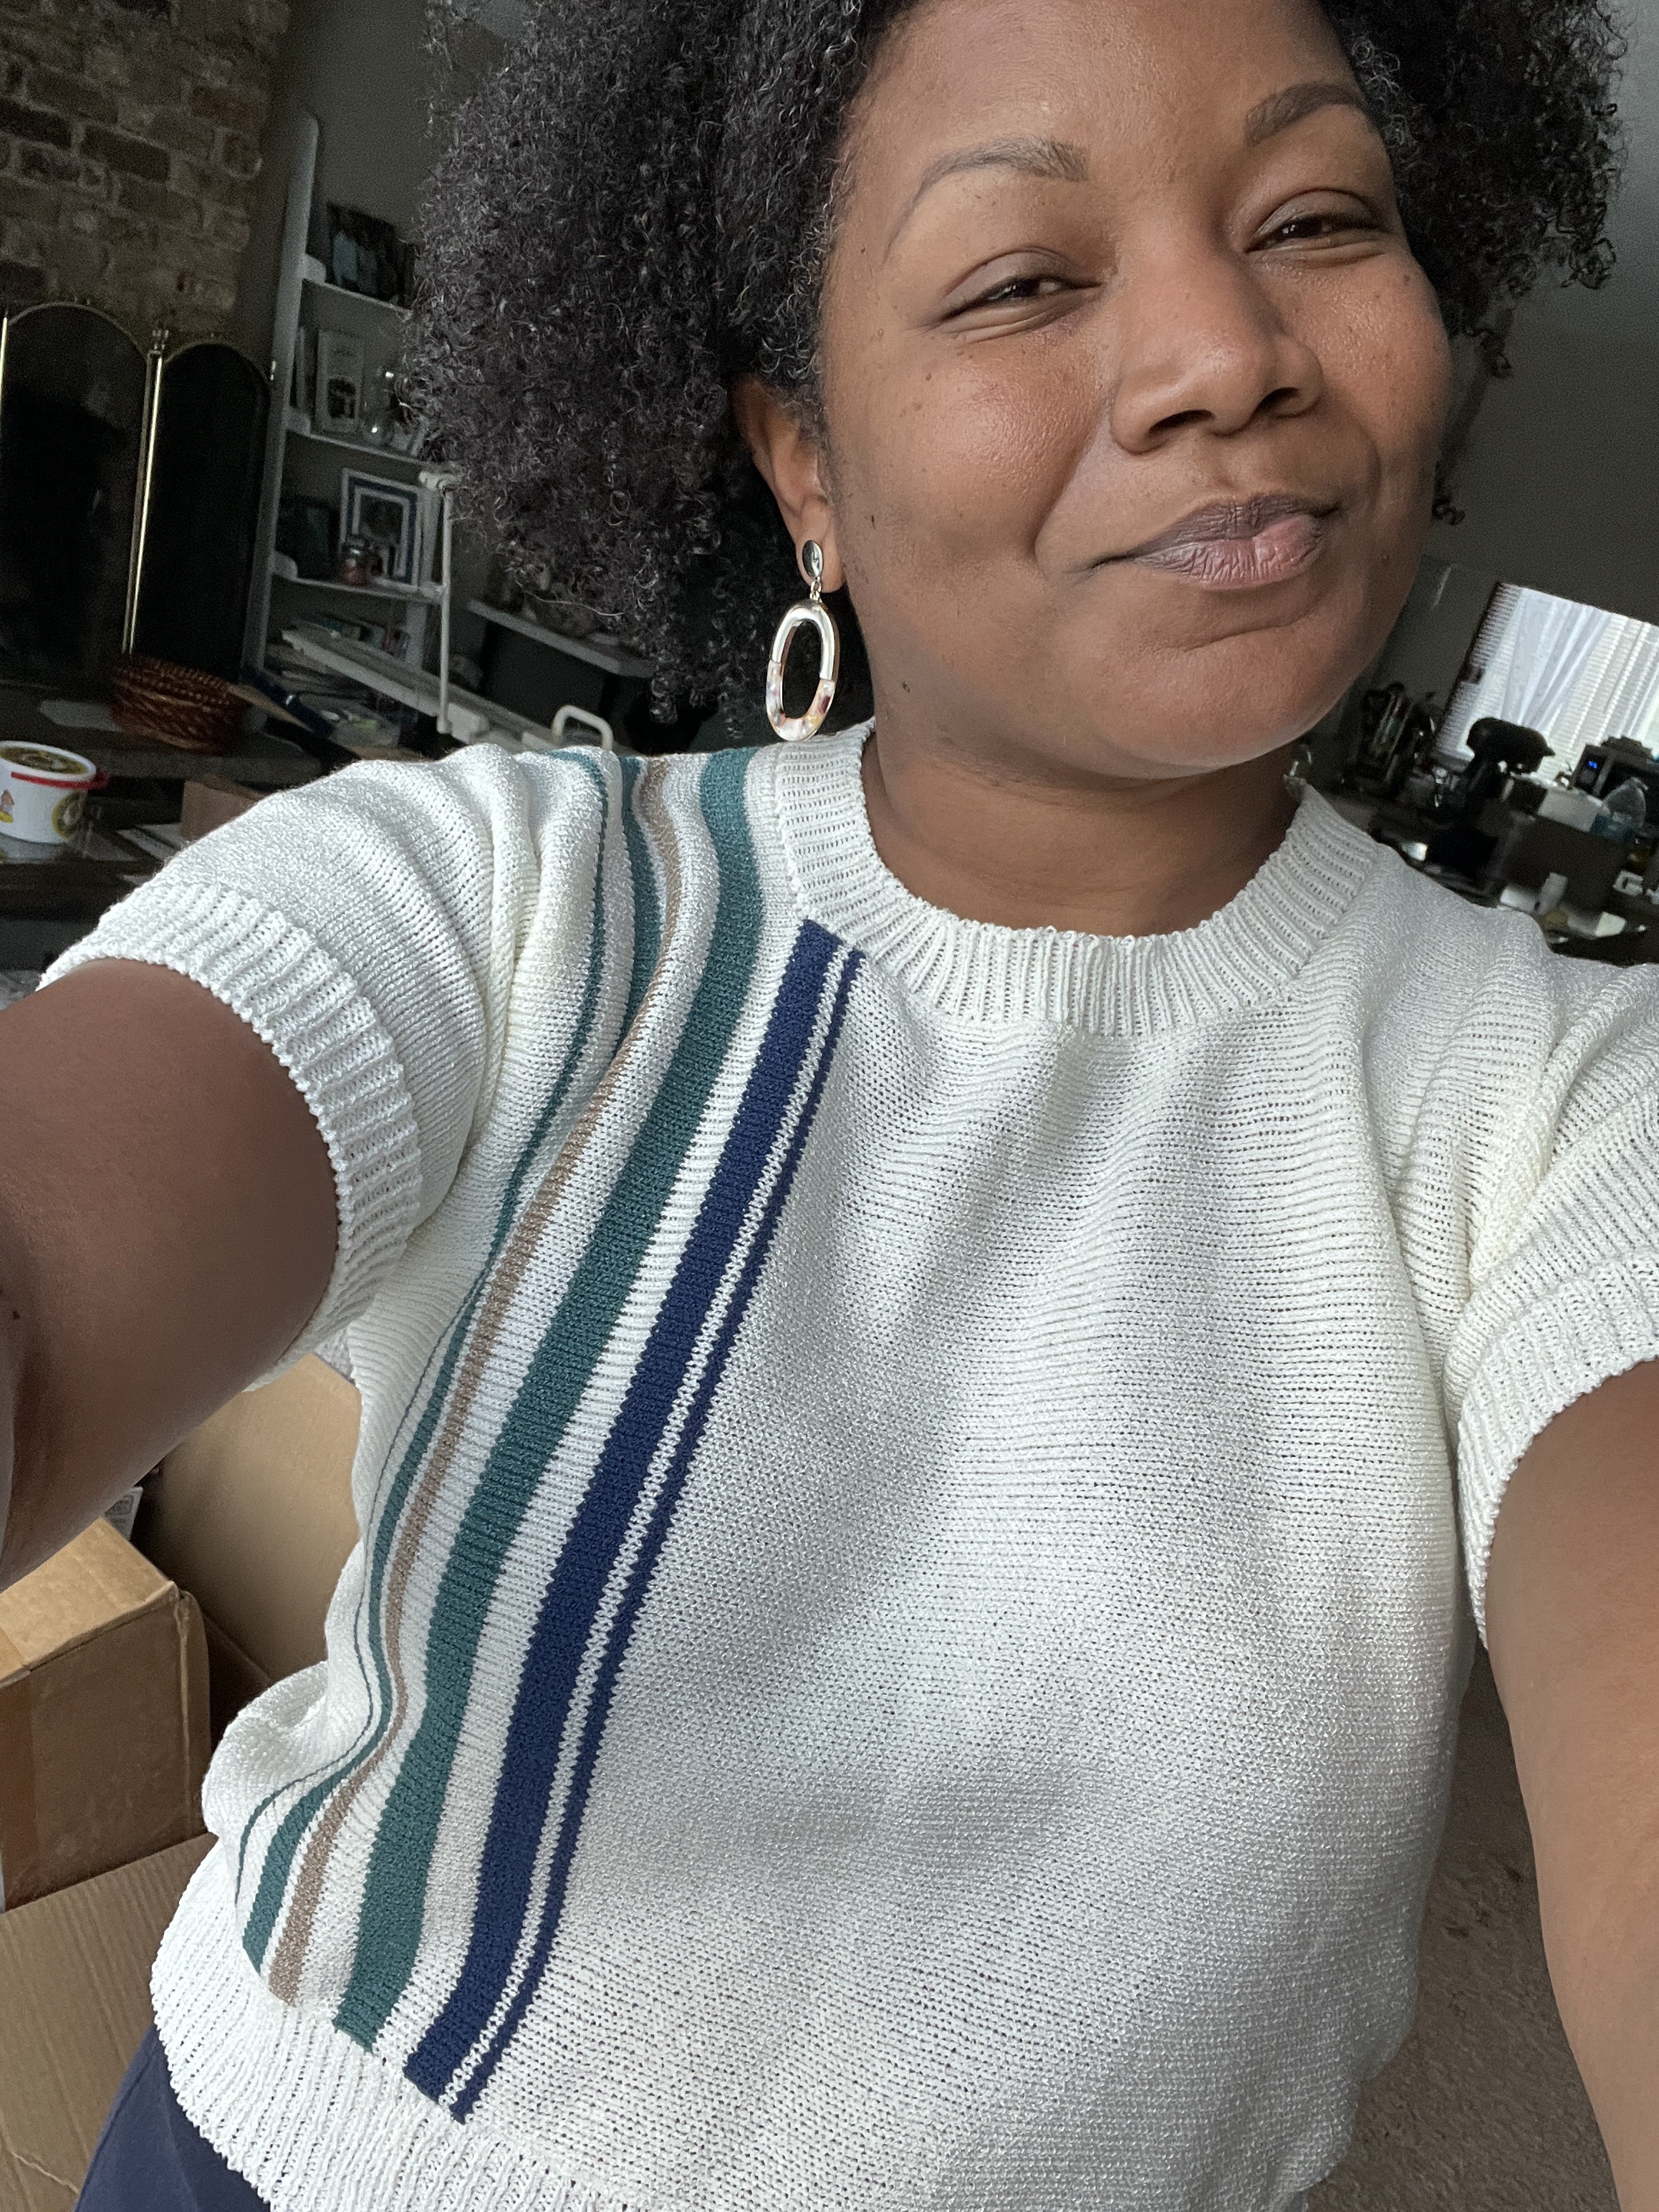
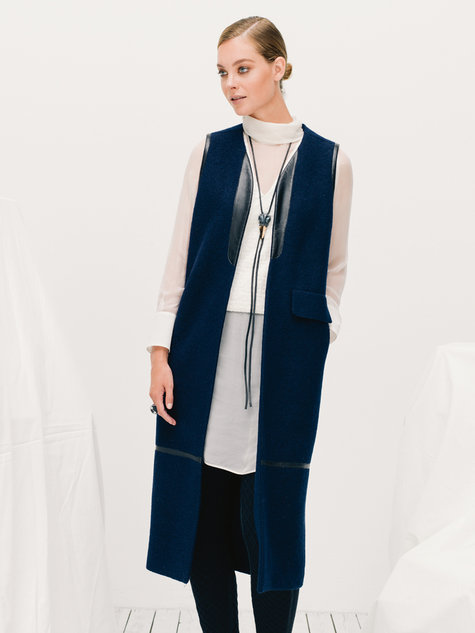
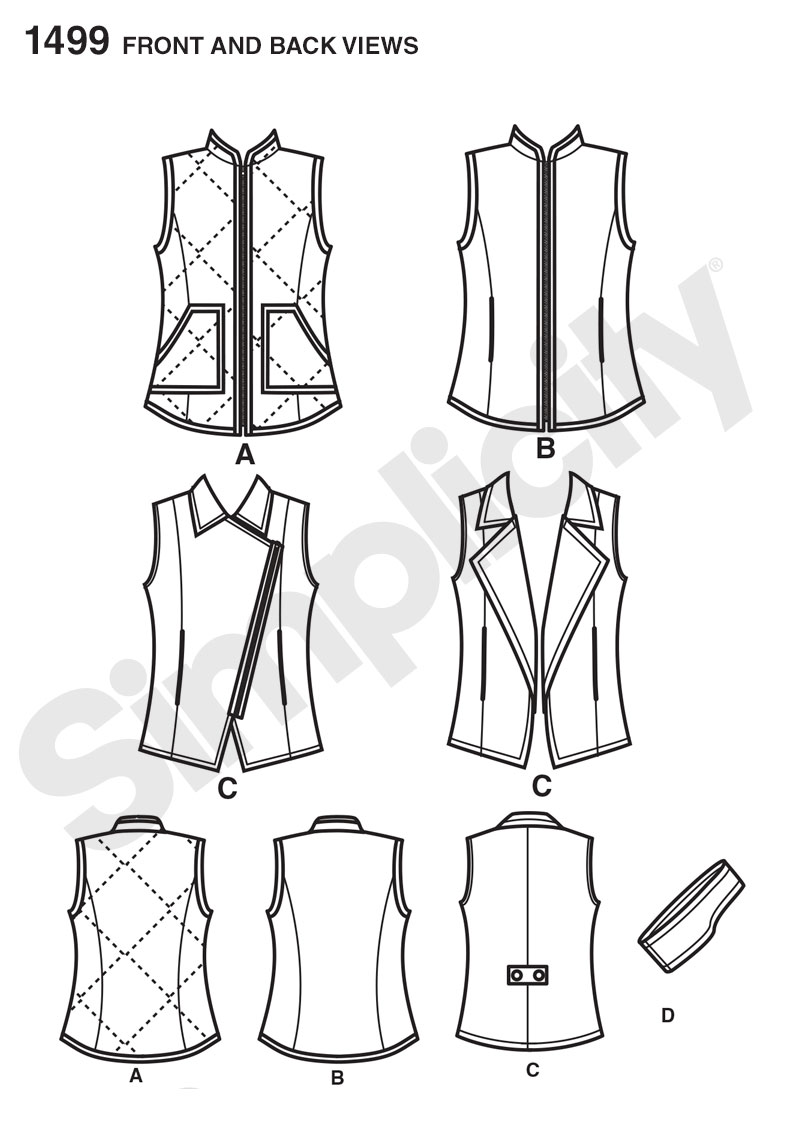
This round was a struggle! I had decided on a vest, poured through my paper pattern collection (on PR) and through the BMV catalog. I really wanted to make Vogue 1510 but there was no pattern sale in sight. To the Burda catalog!


I knew that making this reversible would be doable. I knew I was going to use the denim and searched the stash for a compatible fabric. I needed something that would coordinate with the black piping and bias binding at armholes and hems and was wavering between camel and olive. I then saw the coat from my last post and took to Amazon to find appliqué. When I found these, I knew I had to go with the olive.


I ordered these on a Wednesday, they were supposed to arrive Friday. They did not and I had to cancel that order and order a new set Friday night with guaranteed delivery Sunday. They did come Sunday afternoon - huzzah! I spent a lot of time on placement and then started stitching them by machine and it felt cumbersome. So I somehow decided hand sewing would be easier. Oy. Don't do that.

Can you see my stitching? :)
Shout out to Carolyn! I knew I had to be aware of finishing the connecting area of my piping. 
It's so neat <3


I'd cut the pattern in a size 40 based on "omg so much ease!" and umm, yeah. I should have cut my normal 40/42 graded to a 44 in back. Sigh. I'm sure the doubled fabric isn't helping. Anyway, the denim was actually constructed first but we'll get back to that!

I decided to skip the pleather on this side so it wouldn't get too bulky through the front (denim + suiting + 2 layers of pleather + piping!). Again,  concerned about bulk, I eliminated the inseam pockets on both sides. I decided on welt pockets for this side and then accidentally placed them according to the line for the flap on the pattern. They are too high to be comfortable. Bleh!!!

As I was placing the appliqués, I decided to sew the pleather band per the pattern to tie in the black binding and piping. I then hand sewed all those appliqués in place, switching between green and pink thread, and was quite pleased with it. It wasn't until I attached them that I realized the denim is too heavy as a backing for the suiting. The other way is fine.

You can see it's just a bit heavy looking

On the denim side, I had a lot of ideas! I decided to create this draped back and had split the back piece and extended the lower back. It turned out that the denim was far too stiff for that. I had to undo the topstitching and side seam stitches and remove the excess from both sides.


Because I'd used hardware in my prior two entries, I wanted to incorporate some in this one too. D-rings were the way to go! I'd used a back pocket from my son's old jeans and decided that fabric was perfect to create the ties for this back piece. It's worn denim so it's very soft and when I serged the ends, I just LOVED the effect.


The pleather pieces are NOT lopsided - Lily is! lol!!!


I was going to make a zippered welt on the other side but didn't have a zipper in stash that really worked. Lightbulb moment! I went back to the jeans and unpicked the zipper and used that! It is a perfect match to the vest!

It isn't in good working order -the zipper is very stiff and catches- so I didn't make it a usable pocket.


I bound both hems (separately) with the same bias tape as the armholes.


I am very happy with both but LOVE the denim side. Love. Love. Love. I am going to separate them. I knew this before I finished and had full intentions on using a longer stitch on the fronts and armholes and forgot! OY!


The best part of the Bee is that I've been challenging myself to think outside the box. I'm glad that I still can say I have only made things I'd actually wear. The time crunch means yes, there are tweaks I want to go back and make...but so far, all of my pieces are quite 'me' and fit into my wardrobe. 

We'll find out about advancing to round 4 on Saturday!

Tuesday, March 14, 2017

Simplicity 1499 Vest


This pattern is at least 3 years old and there are a decent number of reviews. Primarily on the quilted version since that was (is?) such a popular RTW style. But view C had the bones of what I was looking for. Score!


I had the smaller envelope and went with the size 14. I decided not to do any FBA or anything and I thought the princess seam was more of a style line. I should have lowered the bust point a tad. Ah well. I don't mind it being "too small" technically through the body. I want it open and it hangs as I envisioned it. I did sew 1/2" side seams after getting it mostly assembled.

The collar instructions are weird. I don't know why they didn't just include a back facing. Booooo Simplicity. So that area isn't very clean on mine.


I also decided to add princess seams as style lines in back to mimic the front. Again, too, too proud of myself for this.  These are the types of details I would look for and buy a whole new pattern.

I decided to topstitch all the things

LOVE <3


I went with inseam welts which seem so straightforward but always cause me a tiny bit of head scratching. I used a navy and white polka-dot cotton for the pocket bags. Beware, these are some T.I.N.Y. pockets. 


The armholes include a 3/8" seam allowance. I cut strips 1.5" wide and applied it to be visible on the outside. It's a very subtle detail but it just works for me!!

As you can see in this photo, I'd attached epaulets. But then decided I didn't like them so I removed them. 

Fabric is a cotton twill from Fabric Mart. Not so easy to cut, very easy to sew/press/topstitch. 


Excuse my leggings. I worked from home the end of the day and had a "OMG I HAVE DAYLIGHT!!" moment and decided to get pics.

 If I had any reason to sew it again I would lower the bust point, narrow the shoulder a touch and draft a back facing. 

Really love this one though and it'll make a fab addition to my wardrobe.


Sunday, January 29, 2017

Finished: McCall's 6886 and 7476

I posted here about wanting to try Rhonda Buss' cold shoulder mod tutorial on M6886 and I had this cool striped double knit in stash. Black and white stripes = classic!! And the stripe pattern was begging for something figure hugging. Light stripes at bust and hips (because yes please on those areas being accentuated!!) and dark stripes at the waist. And because I am still anti-long sleeves, I went with a shortened length here.


This pattern is cut 14/16/18 - 14 neckline and shoulders, 16 bust and waist, 18 hip. I'd initially used 3/8" seam allowances and went back through and took it in another 3/8" so a total of 1.5" all around. I keep forgetting I get a little swayback puddling in this dress but don't want a CB seam. I will do a cheater adjustment next time.

My stripes matched before I went back to take it in. Oh well.


I plan to use this pattern with mod for the contest; I will use the crew neck though instead of the scoop. Next time I will take just a PINCH from the top of the sleeve. It was slightly loose and I did a hack job when taking it in to pull that sleeve in closer to my arm. And I'll cut the shoulders in a little. Otherwise I really like it and it is a fun dress!


One problem - this fabric is WARM. So it's for winter. For sure. I'm a tiny bit bummed because I ordered a navy/white colorway at the same time and for me, navy/white stripes scream summer. But this fabric will be much too warm in any summertime garment.

Rhonda's instructions include everything so be sure to head over and check it out if you want to make your own! (nayy)

For the vest (which was actually made first!), I had the smaller envelope and went with a size 14. I did a slash and spread because we know I need extra butt room! I also needed more sleeve/arm room and will add there should I make this again. I love it, but not sure how many knit vests with cut-on sleeves I need ;-) I have seen cute versions with the collar but because I am a bit rectangle-y front on I always worry about the possible bathrobe look. So I'm glad I left the collar off.

I prefer it open


I really enjoyed making this. The patch pockets are a nice size, the band/facing went on perfectly ... it just went together well. The buttonhole was a challenge on my machine, even with the area interfaced (both sides).


I discovered I prefer it over sleeveless/short sleeves even though my initial plan was to pair it with long sleeved tops/dresses. I like the length and have worn it twice - with a dress and a skirt that hits just a few inches below the hemline.

If you were thinking about this one I'd definitely say give it a shot!