Pages

Showing posts with label Top. Show all posts

Friday, September 27, 2024

Finished Object: Butterick 5526 and Updates

I posted HERE when I planned out this project and HERE with info on adjustments and construction. I  have to admit, I did not like it when I first finished it. I called it a "Post Office" shirt! LOL!!! I finally wore it after washing it a couple of times (I dislike when it's super crisp).

Wearing it has shown that removing all of the cap ease DOES impact the fit a little - I think it limits my mobility a bit when I bring my arms forward. But it isn't straining or pulling, so there's that. Luckily, I had a tracing and adjusted that; the original sleeve is intact.

I wore it with my aqua? mint? jeans...it also pairs well with camel, red, navy, and black. I didn't like it as much with a pair of mid-toned blue pants (post office!!). 

And after looking at the pics in the black skirt I was like, geez, I look so blocky! And yep...this skirt is too big. I can pinch like 3" out of the waist. 

I really like the sleeve more and more! I added a center seam and topstitched that seam. It looks really good. This pattern has no dart control at all...if I made it again I'd either make it a bit looser overall or do a cheater FBA. The side view shows it's flattening my chest a bit. 

Good thing this turned out well because EVERYTHING ELSE I've been working on is MEHHHHHHHHH!

I put the yellow dress  in timeout and while the Burda shorts turned out well (I'm tempted to make another pair but feel like full-on fall will immediately arrive if I do)... 


...the double gauze wasn't fun to sew and I realized I messed up the collar on the shirt. I feel mildly over it.

I understitched the facings but they are still super floppy and I have no confidence in sewing buttonholes in this fabric. You can see in this pic where I messed up attaching the collar.


I was so close to recutting the shorts but luckily, I posted about the fabric growing and someone told me it would be fine once washed. WHEW!! Apparently it grows while sewing but once I washed them, they were perfect. 


I went to insert a sleeve on the yellow dress and sewed the entire thing only to realize there was NEVER any thread in the bobbin. OY VEY! The next night, I tried again and sewed the sleeve inside out. Totally in the naughty bin now. Hmmph!

Monday, September 9, 2024

Sewing Plan: Style Arc Monty Shirt and Burda 7/2017 Shorts

That's a mouthful of a title! But using the full pattern name makes things more searchable in the google :)

If you've been following my sewing adventures of the NL6692 dress (Plan here) on IG, you'll know that I officially HATE sewing this pattern! There are some annoying aspects of the pattern, combined with the shifty rayon challis, and it just hasn't been an enjoyable experience. However, it looks cute on, so I persevere!

I got a stash influx from a knitting friend (almost all natural fibers) and I immediately pulled out a few pieces of fabric to sew. 

A silky cotton woven, a linen (enough for shorts), and a cotton and/or linen(?) double gauze (?)

We had a high of like 65 on Saturday, so fall is on the way! But, I also know it will for sure warm up again, so I decided to go for it and make another summer addition to the wardrobe. 

I wanted to make a 2-piece set and settled on this short pattern from the Burda 7/2017 issue right away. I will probably exclude the trim that's sewn to the side seams and serve as a sort of tab. I definitely plan to include the cording with beads though! Very cute!!


In my very humble opinion, the Russian site is the best organized for viewing magazine issues and line drawings. 

This is a direct link to search by year and month, and view the full photos for each issue: Russian site by year
But THIS link...far more helpful!! Tech Drawings by year

This links to all of the at-a-glance sheets of the tech drawings from 2022 with links to each year back to 2014. I stopped subscribing after 2022 so I don't have the link for 2023, but I'm sure it's there. 

It took me awhile to decide on a shirt but I knew I wanted a loose fitting, somewhat boxy, button-front top and :lightbulb:! I remembered I had the Style Arc Monty.

Style Arc, like Burda is one of those pattern companies that just works for me. From their site, "Style Arc patterns are drafted for a B bust cup size and a height of 167cm (5'6")."

Personally, I think they draft for a slightly narrower shoulder too. Now, I get fussy about their instructions (I've found a mistake or two), but the draft works and their designs are always fresh.


I'll be using Fashion Sewing Supply's Tricot knit interfacing in white, and buttons I bought from M&J (who is going out of business!!!) on my 2018 trip to NYC. I also have beads in my stash from a Fabric Mart order some time ago. 


Monday, August 5, 2024

Fitting and Construction: Butterick 5526 (B5526)

So, score for me not having to cut the pattern out! For me and my myriad hand issues, this is a major win! Sometimes, cutting the paper pattern is a one-day activity because I "use up my hand" doing that task and have to wait before moving on to cutting fabric.

I'm almost 5 years post-reduction (OMG WHERE DOES THE TIME GO!?) and I'm slightly larger than I was. I could probably use a tiny FBA on things...like less than 1/2" for an additional 1" total, so I don't bother. I often just shape the side seams a little bit. 

In the case of this casual top, there is no dart control (no darts or gathers), and I intended to add a bit (3/8") to the side seam at the bust, and forgot. Ah well. It'll be fiiiine! 

(this is one of the benefits of being more experienced, I'm able to decide what to fuss on and what not to)

I did a rounded back adjustment of 5/8". This is standard for me with Big4 patterns. I open it at the neckline -- this dart is usually about half the width of the opening at the center back. You can sew the dart shut, in my case I leave it and just ease it into the collar. For some garments or fabrics, I alter the collar to fit this additional width. 

I also wanted to remove some of the sleeve cap ease and consulted two sources. 

Threads used a method by Sarah Veblen where you walk the seam and note the excess, add back an appropriate amount of ease, slice it through, add seam allowance, and sew the seam. 

I trued that bad curve when I cut the fabric

David Coffin similarly has you walk the seam, remove the excess ease, but has you sew this dart closed. 

I decided to add the seam and topstitch it for a decorative effect. 

BUT I MADE A MISTAKE. oy! I noted the excess ease but did not add back ANY sleeve cap ease. I know there's some discussion around the necessity of sleeve cap ease and while I think most Big4 patterns do include an excessive amount, I don't know that zero ease is always appropriate. Considering this is a semi-fitted, casual fit top, the amount of ease seemed over the top. So even removing it all (accidentally! haha!), does not result in a too-tight fit. 

Lastly, I don't care much about front pockets on shirts so often opt for just one, on the left. Other times, I include them both pretty much to cover the dart ends. Ymmv. The pocket is standard construction, stitch the upper part, turn it out, and then fold in the seam allowance and topstitch in place. I did note a review by Lladybird where she mentioned how high it was and I agreed when holding the pattern piece up to Lily...I lowered the placement by 1 inch. Wonder Tape is everything but for pockets, a good old fashioned glue stick works very well too!

My preferred order of construction for shirts:

  1. darts (n/a in this case)
  2. front pockets (if applicable)
  3. serge hem
  4. front placket, including turning out hem
  5. shoulder seams (sew and serge)
  6. fit side seams
  7. side seams (sew and serge)
  8. sew hem
  9. sleeves (fully assemble including cuff if a long-sleeve pattern, sew and serge)
  10. attach sleeves to body (sew and serge)
  11. cut and prepare collar and stand (I don't even cut the fabric out until this point and always block interface a piece of fabric and cut the stand from that since there's some bias in this piece)
  12. attach collar
  13. top stitch collar stand (sometimes I topstitch the collar, sometimes I don't)
  14. sew buttonholes and buttons
When sewing the placket, I traced in the fold lines on the right side of the fabric (be mindful of your marking tool e.g., marker-like tools will make a thicker line). I use my seam rule and this line to ensure accuracy. And here is a quick nod to PRESSING. It is game-changing!


At the hem, I fold it back and stitch at 5/8". I trim it to a scant 1/4", clip the fold, and turn it out. I do not poke anything in anywhere or any of that! There shouldn't be a need for poking and prodding. 

blue annotation because I forgot to take a photo of trimming

Another tip - always mind your markings. Notches and such exist to ensure pieces match where they should. The only time I'll ignore markings is when it is literally two straight pieces coming together and I know they have to be the exact same length. Whenever there is any shaping, curves, etc., I make the appropriate markings and am sure to match up. 

Here on the sleeve, you can see where I matched the sleeve to the body, exactly. 


On the collar and collar stand, I use the pattern markings plus drawing in the seam allowance (this was done with a fixion pen for accuracy) to ensure everything is sewn properly. Fold the seam allowance up on the interior collar stand before sewing, again, to ensure you are accurately stitching at 5/8". Because this is a bulky amount of fabric, I trim this seam with pinking shears after pressing it up. Be careful with trimming - you don't want to remove too much fabric and with it, the integrity of the pieces. Lastly, Wonder Tape to the rescue! Once the collar stand is attached, I use wonder tape to hold the interior stand in place. Using my walking foot and a slower speed, I topstitch the stand. I usually start in the middle so I can navigate the curves of the collar stand more easily. 


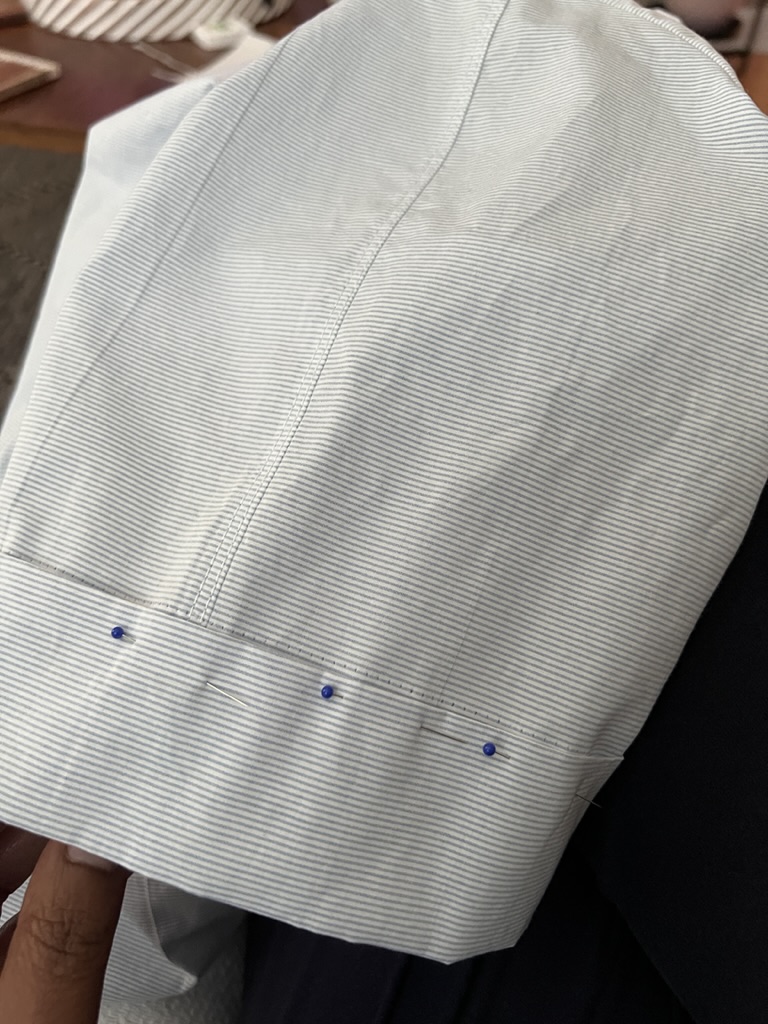
When I tried the shirt on, I hated the sleeve length! Using a scrap piece of fabric, I played around with the idea of sleeve bands and really liked the look. Deciding on a finished length of 1 3/4", I cut pieces 4 1/2" wide (adding seam allowance) and longer than the sleeve opening since it would be a little more difficult to accurately measure the sleeve in the round. I then pinned the band into the sleeve opening to ensure an accurate measurement. I used my walking foot to topstitch the band. 


I need to do the buttonholes and sew the buttons, but that's a straightforward task for my machine. If you struggle with buttonholes and your machine, be sure to read your manual and follow the directions there, run a test buttonhole or two, use tear away stabilizer if needed, and be patient! 


When choosing between two buttons, I'll stitch them on loosely like shown, and come back to it later, deciding pretty instantaneously which one I prefer. I'm going with the smaller button on bottom.

The shirting is a bit crisp, as cotton shirting tends to be. My trick to this is to add the item to my laundry EVERY time. Even if it I haven't worn it. It helps break it in a little faster :)

Watch for finished photos in a bit! 

Next up, I am making a slight detour from the plan in my head to sew up a few pair of lounge/pj shorts and maybe a nightgown or two. In 2016 and 2018, I made a bunch of loungewear and it's about time to refresh. 

I'm also knitting up a storm, working on State Fair entries(?). 

More, later!

Wednesday, July 24, 2024

Sewing Plan: Butterick 5526 (B5526)

I'll be sharing my new sewing space soon! But suffice to say, the paint, new floors, and reorganization really sparked my desire to make. 
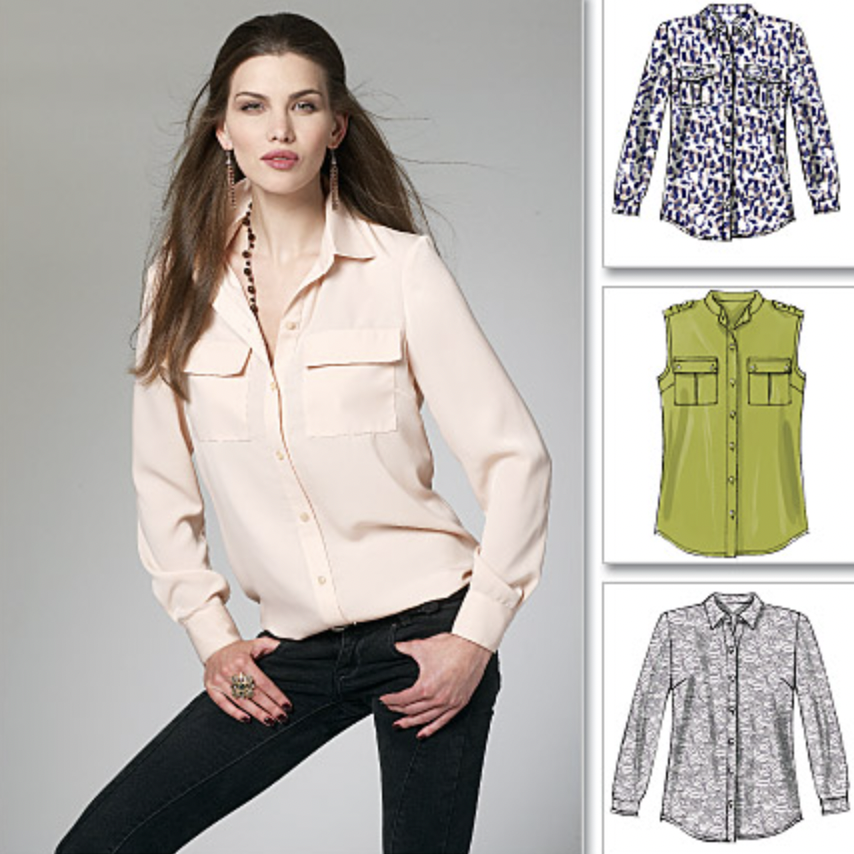
I wanted a straightforward project, but not a fast project. I wanted to spend some time in the process, and decided on a button front shirt. I knew I wanted a more casual top (not too fitted) that was fairly neutral and could mix and match readily with skirts and pants in my wardrobe. 

I also decided on short sleeves. I recently thrifted a blue & white striped cotton shirt with long sleeves and I just don't really wear long sleeves in summer - even rolled up!

I wear this chambray version of Burda 7136 ALL the time. I made it in 2016 and it has only gotten better with time. 


I was going to go for the TNT (I've made this pattern 5 or 6 times) but ultimately decided to branch out. I searched my stash and decided on the oldie but goodie, Butterick 5526

Imagine my surprise to find THREE copies of this pattern in my pattern drawers! Oy! I got back ups to my back up! Haha!

I opened the first one, and huzzah! the size 14 was already cut out. I chose a thin striped cotton shirting from the stash. There was no label on it, so I don't have a source for it, but it's been in the stash for a while.

I'll be using Fashion Sewing Supply's ProSheer Elegance Light interfacing (HERE) and shirt buttons from Wawak (HERE). I swear by FSS interfacing. It's pretty much all I've used for about 5-6 years. I remember one year snagging a deal on some interfacing from Fabric Mart at $1/yard and it was VERY comparable to FSS. Aside from that, I keep going back for more, even as the price has increased a bit. 

Her interfacing is 60" wide (vs Pellon which is 20") and is preshrunk. It performs fabulously. I usually keep the Light, Medium, Couture, and Tricot on hand, in white and black. 

As I edit this for posting, I have the collar, buttonholes, and buttons left to do. Looking forward to this addition and sharing a bit more about the process. 


Tuesday, December 6, 2022

Sewing WIP - Style Arc Alexi

I wanted a fitted, zip-front turtleneck and spent a long time thinking about how to do it. I was super over-complicating it. Finally, it dawned on me that a 1/4 zip fleece is basically the same concept, and I found a pictorial which was exactly what I was thinking. Doh.

I had to search high and low for my printed copy of this pattern. I KNEW I'd printed it, but could not find it anywhere.  I'd given up and went into the spare room I'm using as an office, intending to print another copy. Ah! There's another bin in this closet! It was right on top - YAY! 

I haven't sewn a Style Arc pattern in a long time and was a little disappointed when I saw that the size 14 was printed. I've always used a size 12 on top with them and thought I'd have to reprint it (spoiler alert - the 14 is the right size!). It took FOREVER to assemble it - an entire Dateline episode! - and I was really annoyed that the front and back were full pattern pieces - aka a waste of paper. 

I traced everything off, made a 1" bicep adjustment on the sleeve, and called it a night. And then I couldn't find the traced collar piece! BLEH!

This morning, I got started on cutting everything out. I knew the collar as drafted was too tall for what I wanted. In a softer jersey, it would double fold or puddle around the neck nicely, but I was using this firm ribbed knit and inserting a zipper. I decided on a 3" height and then, for some unknown reason, changed it to 4". Sigh. You know where this is going, right? 3 inches would have been perfect. 

I have a lovely, full stash of zippers and this 11" brass zipper with cream tape was perfect. I only wish I'd double-checked the collar height once I had it cut out because I could have shifted it down an inch, easily. 

I marked the center line on the pattern front and fused a 1 1/8" wide strip of tricot interfacing to the wrong side. Cut it down the center and angled to the corners (like with welt pockets), and used Wonder tape to hold it all in place. The zipper insertion went FLAWLESSLY!

The collar scrunches down because 4" is a tad too tall :( but it's still cute!! I need to topstitch the zipper and then I'll be ready to get the rest sewn up. 

I recently finished a dress from the same fabric and I adore it. This fabric was a Fabric Mart find this spring at $3.99 a yard (I snagged 4 yards). There's easily another top worth - ha! Hopefully I can model them, soon.

Here is my recently finished knit sweater :-D


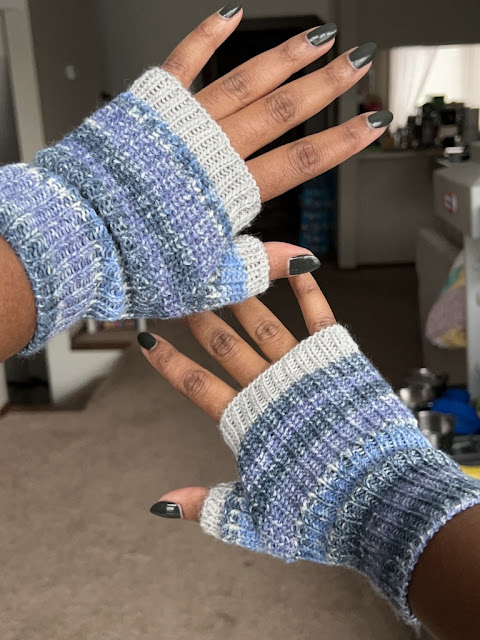
I've also been knitting some gifts and can't wait to share them. Here is a pair of fingerless mitts I snuck in for myself, using the same yarn from my State Fair socks :-D

I knew it would be a close call and yet I was determined to make foldover cuffs. I knitted the first one completely and started the second one. I got to row 72 (of 104) and ran out of yarn. So I frogged them, counted up the total number of rows knitted (because I needed thumbs, too!) and adjusted my pattern. I would have had *just* enough of the patterned yarn to do them in full, but I like the contrast ribbing too :)


Speaking of those socks...I bought a shadow box to frame the socks and my ribbons. Right now, I'm just checking the layout, but I love it! Can't wait to get this mounted. 


I want to sew my blue pants, but also pants with zippers are a real no-no right now. I'm not sure if it's worth spending my energy there, if I can't fit them properly. Maybe I'll give it a bit longer. I wore real pants today to run a few errands and my incisions were very angry with me. oy!

There are a couple of skirts I'd like to sew and a couple of tops, too. I go back to work on the 19th and those first two weeks back will be 3-day weeks (WHEW!) so, I may be able to eek out a couple more garments before the year ends.

OH MY GOSH I CANNOT BELIEVE IT IS ALMOST 2023!!!!


Wednesday, November 23, 2022

Catch up post...

Before surgery, I sewed this McCall's knit top - M7836. I don't know where I got this ponte from but it is really nice and while I like the top, it wasn't the right choice. I'm not sure how much wear the top will get. 


I don't remember all (any?) of the details, but I am sure I did a swayback adjustment and adjusted for my large bicep. I think I shortened it too :)

I finished the Ottobre jackets for the boys. 
They really turned out amazingly well!!

There were some pre-surgery knitting projects - a vest and some hats that I donated:


Because Lily is me, you can see that the armhole is a bit too wide. 

I suck at poms

This one was better :)

knitting a hat in 45 minutes is very rewarding...
I donated 6 hats total. 

I'm not sure that I'll return to Instagram. I'm just not interested in Reels. If I see one more thing "thrown" at the camera, I'm going to chuck my phone. Plus, all of the sudden movements (jerking, flashing images, etc) is a nightmare for me and sometimes makes me physically ill. So I just stay away most of the time. 

Also, I finished my sweater today (Rav page)! I have membership on the Knit It Now site and it allows you to create custom patterns on demand. There are base patterns, you enter your desired measurements and stitch gauge, and it creates a pattern:


This is a simple bateau/boatneck so the front and back are basically rectangles, creating a drop shoulder. BUT, with this one, the front neckline is very slightly shaped so it doesn't come all the way up your throat :) I decided to add a little fair isle to the sleeve using the machine electronics. I used one repeat of the pattern, which was 44 rows. On the first sleeve, it popped up 44 and I stopped, I was supposed to knit one more row and forgot that the machine will ping when it has completed a repeat. I got it right on sleeve 2 so they don't match but, who will know besides me and y'all?! :-D

I made one other mistake, I changed the armhole drop. I don't know why I did this. DOH. I made it 8.5" which is a 'normal' drop and this drop shoulder style would have necessitated a lower sleeve drop. Blergh. It's still wearable and I really(!) like it, so I will definitely update it and knit another version in the future. 


Sunday, November 20, 2022

McCall's 6436

Lots of stuff happening and most recently, some major surgery. I'm recovering quite well and have a finished object to share! Not on my person because I am not presentable! But, Lily is me so you can see how well the fit is on this shirt. 

I bought this cotton/rayon blend shirting from Fabric Mart in the spring to make a casual shirt (it washed up so nicely, I ordered 4 more yards to make a jumpsuit). I really did intend to make something with a yoke and back pleat for a casual style, but looking through my stash, McCall's 6436 spoke to me.

It has several pocket options, epaulettes, a 2-piece sleeve and cup sizing. It should be labeled a tunic because it is LONG!!!

M6436

I cut a size 16 A/B cup. I fit the pattern on my Beatrice form and made the following adjustments:

  • shortened 1.25" between the waist and hip
  • narrowed shoulder 3/8"
  • lowered bust dart 1/2"
  • added 1" to neckline opening and adjusted collar and stand to match (I have a large neck! But this was a tad bit too much. I added 1/4" to front and back. Next time I'll add 1/4" to back and 1/8" to front for a total of 3/4")
  • 3/8" high round back adjustment
  • sewed back seam of sleeve at 3/8" through the bicep


It has vertical back darts and shaped side seams but manages to not be super fitted. 

I usually cut pattern pieces out as I need them, especially if I am not worried about being short on fabric. I chose the inverted pleat pocket with flap and cut out the pocket pieces and front piece. I cut out the button bands and interfaced them. I marked the seam allowance of the inside edge at 5/8" and then trimmed it down before pressing it. (This fabric took every marking tool extremely well! Wax chalk, Frixion pens, my disappearing ink pen, wax paper...it was all good. I did use tailors tacks in a few key places.)

The next day, I cut out the back piece and sewed the darts, and shoulder seams. I also started the sleeves by cutting out and interfacing the cuffs.

Next, I cut the sleeve pieces out, and constructed one sleeve. I also sewed the side seams and hemmed it (by serging and doing a double turned 5/8" hem). The following day, I constructed the second sleeve and cut out and sewed the collar. 

The collarstand and collar construction was the last thing I did! LOL!!! It's so tedious but so critical to get it right! 

I made my markings after interfacing the stand to be sure everything matched up - I always draw in the stitching line along the curved edge. I also mark and press up the seam allowance of the interior stand. Another good tip - sometimes less is more when it comes to grading. It is critical not to trim things down too much or it's hard to fold it all up neatly inside. 


Next up was sleeve insertion. This fabric washed well, pressed amazingly well, took markings well, topstitched nicely...it DID NOT want to be eased! Oy! Now, this sleeve doesn't have a ton of ease which is nice, but the top portion does need easing in and it took a little work and restitching to get them in nicely.


I only had 9 of these buttons but they were really the right choice...so I used a different button on the sleeve cuffs. Shhhhh. No one will know!


I am really happy to have this in my wardrobe!! The fabric is fluid enough that it can be tucked, it can be tied, it can be worn open or closed. I'm very happy with it!


My current  knitting WIP is a drop shoulder sweater with a bit of fair isle on the sleeves.