So, score for me not having to cut the pattern out! For me and my myriad hand issues, this is a major win! Sometimes, cutting the paper pattern is a one-day activity because I "use up my hand" doing that task and have to wait before moving on to cutting fabric.
I'm almost 5 years post-reduction (OMG WHERE DOES THE TIME GO!?) and I'm slightly larger than I was. I could probably use a tiny FBA on things...like less than 1/2" for an additional 1" total, so I don't bother. I often just shape the side seams a little bit.
In the case of this casual top, there is no dart control (no darts or gathers), and I intended to add a bit (3/8") to the side seam at the bust, and forgot. Ah well. It'll be fiiiine!
(this is one of the benefits of being more experienced, I'm able to decide what to fuss on and what not to)
I did a rounded back adjustment of 5/8". This is standard for me with Big4 patterns. I open it at the neckline -- this dart is usually about half the width of the opening at the center back. You can sew the dart shut, in my case I leave it and just ease it into the collar. For some garments or fabrics, I alter the collar to fit this additional width.
I also wanted to remove some of the sleeve cap ease and consulted two sources.
Threads used a method by Sarah Veblen where you walk the seam and note the excess, add back an appropriate amount of ease, slice it through, add seam allowance, and sew the seam.
I trued that bad curve when I cut the fabric
David Coffin similarly has you walk the seam, remove the excess ease, but has you sew this dart closed.
I decided to add the seam and topstitch it for a decorative effect.
BUT I MADE A MISTAKE. oy! I noted the excess ease but did not add back ANY sleeve cap ease. I know there's some discussion around the necessity of sleeve cap ease and while I think most Big4 patterns do include an excessive amount, I don't know that zero ease is always appropriate. Considering this is a semi-fitted, casual fit top, the amount of ease seemed over the top. So even removing it all (accidentally! haha!), does not result in a too-tight fit.
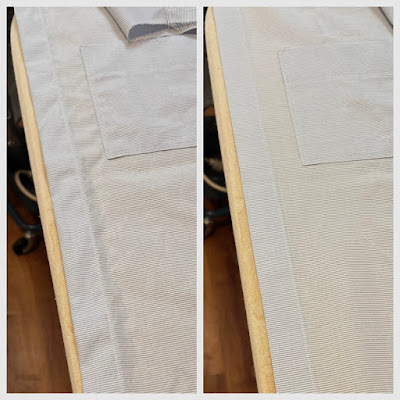
Lastly, I don't care much about front pockets on shirts so often opt for just one, on the left. Other times, I include them both pretty much to cover the dart ends. Ymmv. The pocket is standard construction, stitch the upper part, turn it out, and then fold in the seam allowance and topstitch in place. I did note a review by Lladybird where she mentioned how high it was and I agreed when holding the pattern piece up to Lily...I lowered the placement by 1 inch. Wonder Tape is everything but for pockets, a good old fashioned glue stick works very well too!

My preferred order of construction for shirts:
- darts (n/a in this case)
- front pockets (if applicable)
- serge hem
- front placket, including turning out hem
- shoulder seams (sew and serge)
- fit side seams
- side seams (sew and serge)
- sew hem
- sleeves (fully assemble including cuff if a long-sleeve pattern, sew and serge)
- attach sleeves to body (sew and serge)
- cut and prepare collar and stand (I don't even cut the fabric out until this point and always block interface a piece of fabric and cut the stand from that since there's some bias in this piece)
- attach collar
- top stitch collar stand (sometimes I topstitch the collar, sometimes I don't)
- sew buttonholes and buttons
When sewing the placket, I traced in the fold lines on the right side of the fabric (be mindful of your marking tool e.g., marker-like tools will make a thicker line). I use my seam rule and this line to ensure accuracy. And here is a quick nod to PRESSING. It is game-changing!
At the hem, I fold it back and stitch at 5/8". I trim it to a scant 1/4", clip the fold, and turn it out. I do not poke anything in anywhere or any of that! There shouldn't be a need for poking and prodding.
blue annotation because I forgot to take a photo of trimming
Another tip - always mind your markings. Notches and such exist to ensure pieces match where they should. The only time I'll ignore markings is when it is literally two straight pieces coming together and I know they have to be the exact same length. Whenever there is any shaping, curves, etc., I make the appropriate markings and am sure to match up.
Here on the sleeve, you can see where I matched the sleeve to the body, exactly.
On the collar and collar stand, I use the pattern markings plus drawing in the seam allowance (this was done with a fixion pen for accuracy) to ensure everything is sewn properly. Fold the seam allowance up on the interior collar stand before sewing, again, to ensure you are accurately stitching at 5/8". Because this is a bulky amount of fabric, I trim this seam with pinking shears after pressing it up. Be careful with trimming - you don't want to remove too much fabric and with it, the integrity of the pieces. Lastly, Wonder Tape to the rescue! Once the collar stand is attached, I use wonder tape to hold the interior stand in place. Using my walking foot and a slower speed, I topstitch the stand. I usually start in the middle so I can navigate the curves of the collar stand more easily.


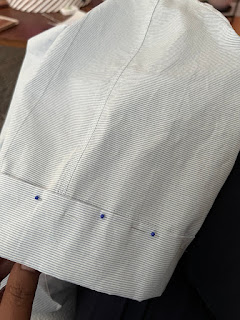
When I tried the shirt on, I hated the sleeve length! Using a scrap piece of fabric, I played around with the idea of sleeve bands and really liked the look. Deciding on a finished length of 1 3/4", I cut pieces 4 1/2" wide (adding seam allowance) and longer than the sleeve opening since it would be a little more difficult to accurately measure the sleeve in the round. I then pinned the band into the sleeve opening to ensure an accurate measurement. I used my walking foot to topstitch the band.
I need to do the buttonholes and sew the buttons, but that's a straightforward task for my machine. If you struggle with buttonholes and your machine, be sure to read your manual and follow the directions there, run a test buttonhole or two, use tear away stabilizer if needed, and be patient!
When choosing between two buttons, I'll stitch them on loosely like shown, and come back to it later, deciding pretty instantaneously which one I prefer. I'm going with the smaller button on bottom.
The shirting is a bit crisp, as cotton shirting tends to be. My trick to this is to add the item to my laundry EVERY time. Even if it I haven't worn it. It helps break it in a little faster :)
Watch for finished photos in a bit!
Next up, I am making a slight detour from the plan in my head to sew up a few pair of lounge/pj shorts and maybe a nightgown or two. In 2016 and 2018, I made a bunch of loungewear and it's about time to refresh.
I'm also knitting up a storm, working on State Fair entries(?).
More, later!


2 comments:
Your shirt looks great! Definitely one of those pieces that you can wear with a lot of things and super versatile in a wardrobe. This pattern has been on my to-sew list forever - it always looks so fantastic when everyone else sews it, and I swear getting a button down shirt pattern to fit me is my white whale, but I'm going to make it happen.... eventually. I'm definitely taking notes about your pattern adjustments and I will see if I can look at some of the fitting resources you mentioned.
Thanks for walking us through your shirt making process. I bought some cotton panels that I want to use to make some new shirts for fall & winter so reading about your process was helpful!
Post a Comment