Pages

Showing posts with label Pants. Show all posts

Tuesday, January 18, 2022

Burda 2/2013 #143

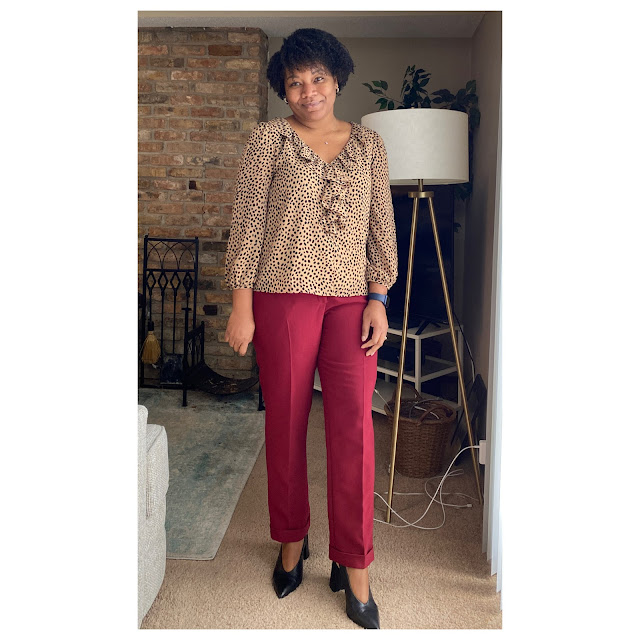
Have I mentioned how much I love Burda plus patterns for my lower half? well I dooooooo! :)

I was doing wardrobe assessment number 317 an realized that while I have a lot of pants -- I have 6 pair of black pants (they are all different silhouettes, leg shapes, fabric types), 4 pair of blue pants, 3 pair of camel/tan pants -- they are different, but there's so much repetition in color! 

I first sewed a Burda plus pant pattern back in 2017, HERE. That crotch curve was such a great match that I often check the Plus section for pants. The only problem is, they very often call for stretch wovens which is kind of annoying. Bleh. 

I have a lower left shoulder and higher right hip

I had a pair of ponte pants in a similar color awhile ago but they never fit quite right (not enough crotch depth), so while I wore them all the time because of the color, they just weren't comfortable. And as my sewing and fitting has evolved, I absolutely refuse to wear uncomfortable clothing. 

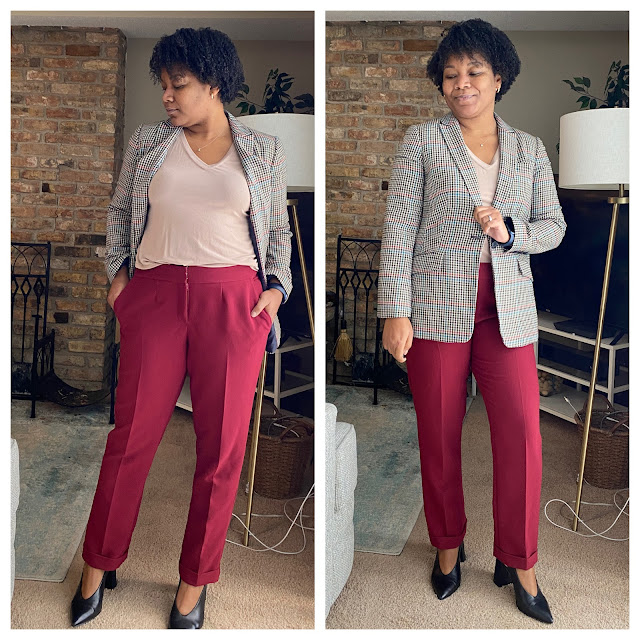
I'd located a couple sources of ponte in this shade but on an impromptu trip to SR Harris recently, I saw this suiting and jumped on it! Initially I thought it was a little too thick, but it works SO well. I was very tempted to go back and get more to have in stash should I decide on a jacket or wider leg pants in the future. So far, I haven't caved :)

I started these right before Christmas and they got to the basting stage at prime-PMS bloating time. I have a serious knack for this, it's crazy! On December 27th I started feeling bad and on December 28th I tested positive for Covid. So this is a 2021 project (I have yet to sew anything for 2022!).

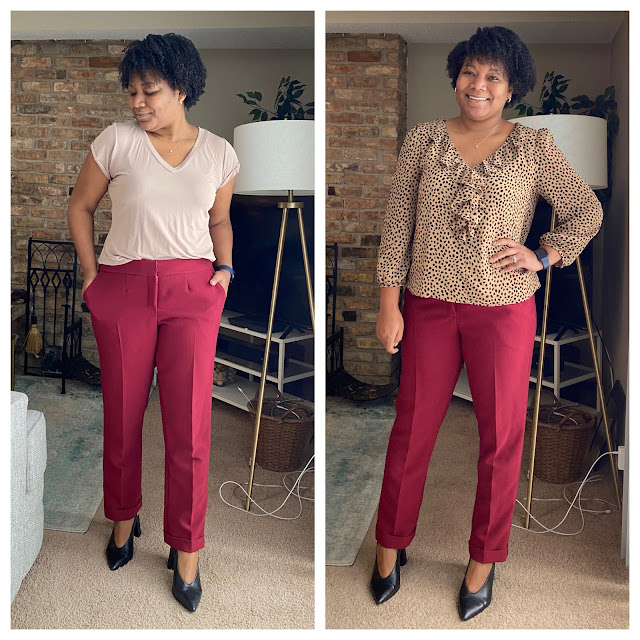
I cut a size 46 with a 44 front crotch. I also decreased the leg width and now, I can't remember by how much! I measured a couple of ankle-length, cuffed trousers, searched online and found leg widths for a few pair of pants, and then narrowed it based on that. I'm thinking I removed 3/8" from each seam, or a total of 3". 

What makes these pants REALLY awesome? I used the Singer Reference Library, Sewing Pants that Fit to construct them. GET ACTUAL SEWING RESOURCES WITHOUT DEPENDING ON PATTERNS FOR CONSTRUCTION INFO!!! Sorry for yelling in bold. 

But for real. The more you expand your knowledge, the better sewer you will become. You will be able to construct as instructed by the pattern designer, or you can sub in something equally or more(!) suitable. 

For the cuffs, I pinned the hem up to the desired length. I ended up removing 1/4" when serging the raw edge. I then folded up a 2 5/8" hem, blindstitched this hem, then folded up 1.5" and tacked at the inseam and side seam. 

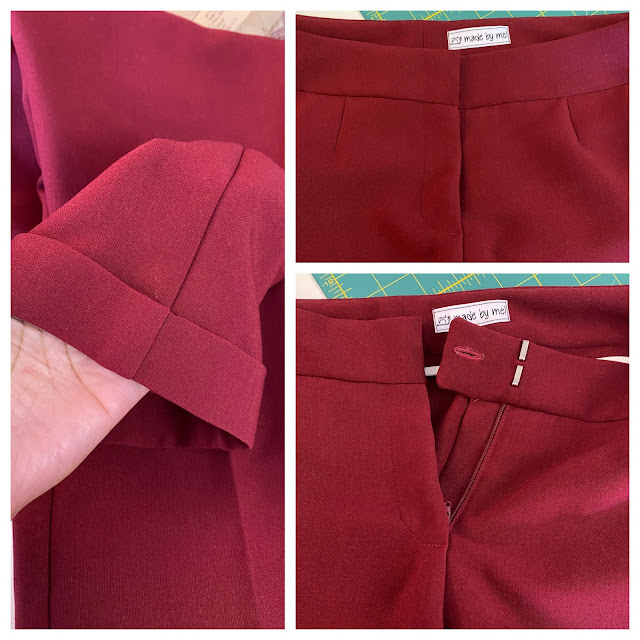
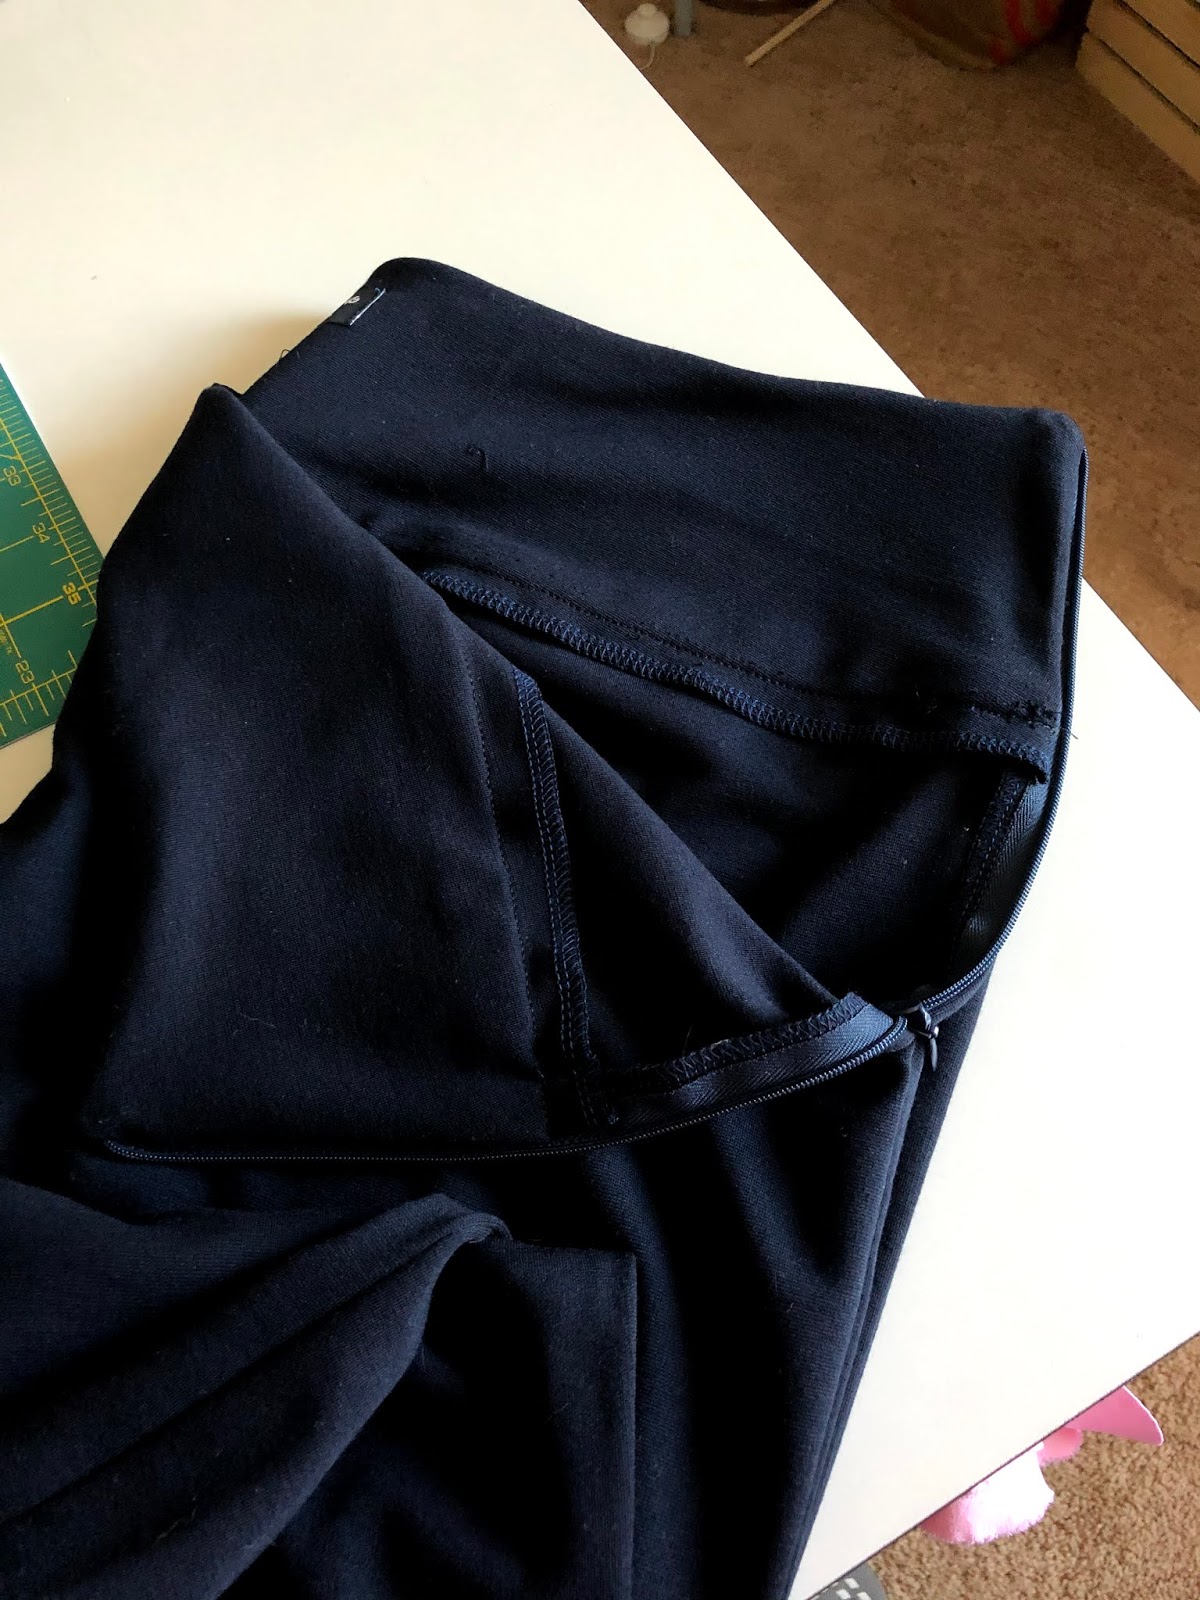
The pockets, the fly front, the waistband...all of it turned out so, so well. I ordered no-sew trouser hooks on eBay and while waiting for them to arrive from overseas, I ordered some from The Sewing Place. They are larger/more heavy duty and the sets that I received later are a match for my RTW pants. And of course, the day after I decided to go for it and insert them, the sets from eBay showed up. They have to be inserted prior to finishing the waistband as you stick the prongs through the fabric, add the backer, and fold in the prongs (I used a needle-nose plier).  My waistband was a bit narrower than my RTW pants so that's something I'll keep in mind for the future.

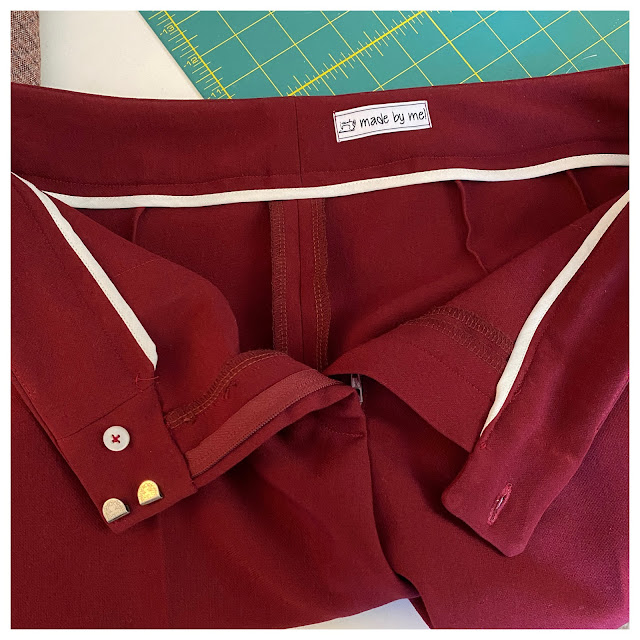
I also decided to add double-fold bias tape to the facing AND took the time to insert it properly. :-p -aka- in 2 passes. I stitched it to the right side, folder over and pressed, then topstitched. It's so much better than my lame attempts to try to keep the facing sandwiched between the bias tape for the entire length of the facing!

I decided to do the fold over on the front waistband and it took me forever to figure it out - COVID brain!! I got it all pinned out and it was nighttime and I refused to cut the excess. WE DO NOT CUT FABRIC AT NIGHT! Lol!!! The next day I was able to tackle it and finish up the pants.

And this pattern will for sure become my TNT trouser pattern. Adjustments to make for the future:
-allowance for high right hip
-tweak front darts
-tiny extension on the back crotch point to resolve those small folds at the upper inner thigh
-adjust waistband and facings to allow for the fold over style
-trace off another copy with a slight bootcut

I am SO excited to have a pair of pants this color in my wardrobe!! I think I'll be wearing them VERY often :)

Friday, December 11, 2020

McCall's 6796 and Burda 12/2016

I actually finished these pants way back in March! Right after I made the navy blue pair in ponte. I wore them today with my new McCall's top so - yay! Photos of both!

Now vs. Then (and look at my 'fro!)

I really like this pant! Flat front, side zipper, straight/slightly tapered leg...easy to sew and wear! On the ponte pair I'd taken 3/4" side seams and sewed 1/2" side seams on this pair (seam allowance was 5/8"). 

I didn't make any other changes from the blue pair: size 44, removed 3/4" from the CF and added 1" to the crotch extension in back. I had some wrinkles at the thigh but they're far more pronounced in the suiting than they were in the ponte. I have to adjust the shape of that crotch curve. 

They are a little more tan than camel which makes them a bit less versatile in the wardrobe. Fabric is a wool suiting but I'm not sure where it's from. It's been in the stash for a bit.

M6796 is an older pattern. I'm pretty sure I sewed it in the first year or so after learning! I love the top though and it had details I wanted. I used the remnant of fabric from this dress (M7358: one of my faves!)

I cut a size 14 and did a slash and spread at the hip to add 1/2" in front (+1") and 3/4" in back (+1.5") for a total of an additional 2.5" at the hip. I did a 1.5" bicep adjustment -- I used the Singer method and did 3/4" on each side. Somehow, I thought it was supposed to be 3/4", undid it and changed it to 3/8" on each side. Aaaaaaaand, biceps were too tight. Where the sleeve hit made it look a little worse than it actually was (it was tight but not uncomfortable but it appeared too tight) so I added bands to the sleeves. It works!

Also, this fabric had a bit less stretch than I remembered. Like, I checked SEVERAL times to make sure I had cut the pieces in the right direction. So that didn't help the sleeve fit or the collar going in. It's a little rippled in front and on one side in back. Booooo. 

Oh! And when I remember to do it, I make a forward shoulder adjustment on tops and dresses and it makes such a big difference! I forgot this time. Ehhhhhhh.

You can see the shoulder seam sitting wayyyy back at the sleeve side vs. neckline. 
Will definitely update the pattern to fix that.

I liked this color combo together though I'd like it more of the pants were a deeper camel color but it worked and this necklace was the perfect way to tie it together. 

This week I said goodbye to my employer of 5.5 years (that's the longest I've EVER worked anywhere), and embarked on a new journey! Cleaning out my office was bittersweet and I know the transition was made just a tiny bit easier by being at home for so many months. 


There were some great people here and that fact (plus the <6 mile commute) kept me here longer than I should have been. My new company and position are both AWESOME! It's a fast-paced, high-energy org and I am really able to better use my skills, and I'll get some fantastic resume builders here (and make more money!). 

This (and I'm sure the bit of stress of leaving / starting anew) led me to BUYING ALL THE THINGS. I bought fabric (after JUST patting myself on the back for not having purchased since July). I bought stuff from Wawak (but I NEEEEEEDED that Gutermann thread chart!). I bought organizational bits for my Cricut stuff and my new workspace (hence the changeup of photo location and you now get to see the terrible structural decisions of this townhouse, LOL!). 

I ordered from Stylish Fabrics for the first time and will review once I've washed and sewn with the fabric. I will say that while it's a nice weight jersey, "heavyweight" and "ultra heavyweight" feel like misnomers. I'm not complaining though! I reserve the right to later :-p

Fabricmart had $1 shipping, which is basically free, and I saw this suiting, which I had to have! :)


It's a viscose/poly/lycra in a beautiful blue and black pinwheel (reads as houndstooth) pattern and feels lightly textured. I plan to make a dress from it!


The last time I almost bought fabric, this was in my cart.  It's a crepe knit but it's very lightweight and slightly translucent. I planned to make TNT M6886 and I know my black slip works with it so I may go forward with that plan. 


And this brocade suiting sealed the deal on the purchase. I was only able to snag 1 yard but, that's enough for an awesome skirt!

I just finished up another older pattern, S2892. This is one of the first patterns I ever bought (like, seriously in the first 20) and I sewed it back then (not well, LOL!) and wore it until I couldn't. I had to grade the pattern up to make it work (I did it though - yay!) and I'm excited to finish it.  

Thursday, May 21, 2020

Style Arc Clare Pant Muslin

This wasn't intentionally a muslin...at some point I decided maybe it'd be a wearable muslin...but nah. And I'm not 100% sure I'd remake the pattern. Mayyyyyybe.

I like Style Arc's design and drafting. They are on my $hit-list for their crap instructions now. I'm not sure I'll be in a hurry to buy more patterns from them and certainly nothing too complex. 

1. - The illustration shows a pleat that's just folded out and basted but the instructions say to stitch the pleat.


2. - The way the front is constructed is really bulky and this fabric was *just* barely opaque and had a lot of drape. If I decide to sew this pattern again, I may eliminate the pockets. I could reduce the height so they are caught in the foldover band but not also folded over. However, they are VERY narrow - deep but narrow so I'm not sure how useful they'd be. 

3. - Why would you stitch through the elastic?? If I decided to sew it again, I'd just make a casing and keep the gathering to the side front and back.  Oh, and my pattern says to use elastic that is 1 1/5" :sideeye: I don't know if they intended 1 1/4" or 1 1/2" but the fold-down waistband is just under 2" so I went with 1.5" elastic. 

I've been going back on forth on sloper drafting. I am lazy and not super interested in drafting, but I NEED a sloper for my upper body and of course it would be super helpful for the lower. 

Oh, this fabric? atrocious. That's what moved it from garment to wearable muslin. It's a poly suiting from Fabric Mart. I'm not anti-polyester entirely but this stuff just SHRED the moment I cut it. 

Anyway, I then decided to go for it by matching the crotch curve of the pattern to my "fishbowl" exactly. (I talked about that here).  So I matched the curve of my body to the stitch line of the back pant piece.


(poorly) annotated below so you can see the changes


I lined up my crotch point with the patterns and I would have needed to go SO deep into the pattern and knowing I need more crotch extension and room through the inner thigh, I split the difference and extended the crotch point 1" and scooped/reshaped the crotch curve. As you can see, this takes away a lot of width so I've added back at the side seam. 

BUT otherwise... IT WORKED!!!!!! Woohoo! 

My addition at the side seam isn't quite right. It's too curvy too soon -- which is obvious now! On my body, the side seam pulls just a bit at the fullest part of my butt (look at the wavy butt lines!). and there's excess fabric up top. 
I hadn't pressed my seams because - full muslin at this point

The difference between left and right here is that I have the front rolled over the full width of the elastic. I need to shorten the front rise considerably if I make them again! :-p This is totally my natural stance, unfortunately! LOL!! But the good thing is...no weird fabric collapsing at the back thigh.


I cut out the back pattern piece even though it looked "weird". Remember all that L vs J crotch curve stuff from back in the day?

Well...all that and I went right and cut the front out! Without adjusting it to my fishbowl. DOH!. So the front is way, way too long. 
Red - my body vs. black - the pattern crotch curve

What I hadn't noticed is how similar this pattern was to Burda 2/2017. I swear pretty much everything exists as a Burda!!! 


Oh well...I got the pattern during a sale and paid about $6 so...maybe I should give them another go since I know what to do. And maybe this time I'll use linen ;-)


Don't forget we're going to be starting our Tops That Pop! challenge as of June 1. See this post for more information! Also, I realized after the fact that I labeled it a summer challenge - really, it's a challenge to make new tops so friends down under, please feel free to sew along and make some new tops for the upcoming winter months!

Currently, there is a Style Arc sale of 20% off (yes, I know, I don't take back my ragging on their instructions but the patterns tend to work out!). Mimi G has pdf patterns on sale for $3. Style Sew Me has select patterns available for $5. I am also in contact with some other Indie pattern brands to see if they're willing to sponsor the challenge and offer discounts on top patterns. More soon! 


Wednesday, March 25, 2020

Social Distancing Sewing

On Friday, March 6th, Minnesota confirmed it's first covid-19 case. On Friday the 13th, we were up to 14 and I decided I was working from home. On Tuesday, my company officially input a WFH plan and by Wednesday (3/18) we were up to 77 cases. I think we're nearly at 300 now. 

Many have commented how they aren't "worried" about getting sick. I am absolutely worried about getting sick. I understand statistics, I also see 30, 40, 50 somethings becoming critical or dying. I am risk averse, I don't want to chance getting sick because its likely I'll overcome it. I'd rather not find out! So I've been at home. 

Last weekend I got some groceries from Trader Joes (which they were only letting a couple people in the store at a time!) and went by my machine knitting instructor's house to pick up yarn (that she'd left in a bag on the portico!).  

Otherwise, I've been working -- My job is largely reactive so I've had a few days that were pretty quiet -- and snacking (haha!) and sewing!!!

I've been wanting to use up this navy ponte from Ginny's since I bought it and had that fail of a pattern from Burda. I decided to go for it with this Burda plus pattern from the 12/2016 issue. It's meant for stretch wovens (grr Burda and always requiring stretch for the plus pants!!) so I figured this mid-to-heavy ponte would work well.

I traced a size 44, removed 3/4" from the CF rise and added 1" to crotch extension in back. I ended up sewing the side seams at 3/4" vs. 5/8".

I don't normally add hem allowance to Burda except for pants. I'd added 1 1/4" to the pattern and ended up removing 2" and sewed a 1 1/4" hem. Love the finished length.

Not much detail to show on these - invisible side zipper, deep yoke that was understitched and ditch stitched. 
Then I made McCall's 7975 - the ever popular twist front top. It turned out very cute but I didn't like the construction. There's a u-shaped bit that you have to hem. That's INSANE. Then you hem the entire front, stitch it, then hem the back, then sew the side seams. Meh. I'm almost certain the fabric is from Fabric.com but it's been in the stash for awhile.

I used a size medium, standard for me, added 1" total to the back hip via a slash and spread, and did a 1.5" bicep adjustment. The finished sleeve was only 13"!  Geez! The neck binding went in well (often Big4 drafts them too long).
I  had a small gap of skin showing and ended up tacking the twist and hand sewing a bit of the seam leading into the twist. Hard to get close enough at the sewing machine.

The twist is nice!

hand tacking

Next up was a cardigan that is in timeout. I hope to finish it -- the band has to be topstitched down and is fine on the straight sections on lower front but I cannot get the angled areas stitched nicely on this ribbed super-stretchy knit. This fabric laughs at the walking foot.

M7476

Then Simplicity 2255 was up next with this 1 1/4 yd cut of swiss dot cotton I scored for $4 from SR Harris. I've made this pattern a few times before. The first time I made it I could NOT understand the mandarin collar and just did bias binding on the neckline! Ha!!
paired with the navy ponte pants and a RTW jacket
I couldn't get pics without the blinding sun. Shrug!

I sewed a size 14 and undid the (HORRIBLY EXECUTED AND INCORRECT) FBA.  I also added to the hip line via slash and spread - 3/8" in front and 3/4" in back (I could use a bit more hip room). I also did a 1/4" forward shoulder adjustment. 


I finished it with a narrow hem, bias binding on the armhole and a bunch of topstitching. I wanted some yellow buttons but...sewing from stash! I figured if I really wanted to, I could swap the buttons out later. But I love these buttons (I have a ton of em! LOL!)

I finished up the Burda dress that I'd muslined in my last post and it is AMAZING and I LOVE it! Hope to get pics soon!

Monday, February 3, 2020

Pattern Review: Itch to Stitch Capelet

There is (yet another) discussion in the sewing community about Indie patterns and quality. I've been burned quite a few times and as such, tend to stick with Big4 and Burda, as you likely know.  But, I can be tempted and sometimes, the design or price will get me :)


I did not think this capelet was anything groundbreaking or especially novel. I'd been meaning to buy M7846 and liked that the ItS had "sleeves".
But, it was on sale and I figured, what the heck! Well, it was on sale via Itch to Stitch but I ended up paying a little more buying it through Pattern Review. I hate being asked to register on a site just to buy a pattern.

The pattern is sized XXS - XL. I have read a couple tester's blogs where the say the final pattern had 2" added to the front. I wonder if the pattern photo is pre-lengthening??


I'm not sure how tall the designer is but I found it super long on me. Fabric choice will also play a part though. Fabric with a lot of drape will hang a bit more than a more rigid fabric and this sweater knit is definitely drapey. I shortened mine 2 inches front and back tapering to nothing a few inches from the raglan seams. I then realized that only the front was changed from the original length. Oops. I should have left the back alone.

Another positive about the pattern itself is that it was layered. I was able to print my size only - a medium - and that always makes tracing off a bit easier. I looked at the instructions to be sure the "sleeves" were created as I thought - and they were. Also, I sewed them up an additional 2 inches (despite not changing the length at the seamline). I will admit to being mildly agitated by the pattern pieces having a foldline, a grainline, and some squiggly line indicating the stretch of fabric. It's unnecessary/overkill IMO. One of my smaller gripes with Indie pattern companies. Sometimes, they seem to do something *just* to be different from the larger, commercial patterns.
Otherwise, construction is just as straightforward as you'd think. Sew the raglan seams, sew the collar seam, attach the collar, hem, stitch in the ditch to create sleeves. Done. Of course, the hemming is the time consuming bit here! I just pressed up the 1/2" hem and sewed it with my coverstitch. I do not like the stitching in the ditch on a drapey knit.
I made a high round back adjustment on my latest make and am thinking this pattern would have benefited . Otherwise, I think the fit is great.

This sweaterknit was picked up a couple (2? 3?) years back at SR Harris. I liked it in store and then every time I went to grab it, it seemed WAY too bright for me. I'm still not 100% sold on the color combo but we will see if it gets wear. I'm working on a pair of slim Burda pants from that ponte I picked up at Ginny's which I think should pair well with this. This post was written awhile ago. I don't care for the fabric and the pattern I thought I'd use for my nice ponte is OUT.
Next time, I'd definitely use something with a touch more body (but not ponte IMO) and will remove a bit of the sleeve flare (slash lines then overlap and true the hem line).

Someone asked in my last post about wearing it with a coat. I'm not certain how that would work out! LOL! This is one of the reasons that I'm not sure I would sew this again. Since I live in a cold climate, there just are few opportunities for cape/capelet type garments. Late fall and early spring which can be like a BLIP on the calendar.

Jumping in on this post with my 3rd pair of Style Arc Sandra jeans. I sewed these in a size 16 because that's what size I used previously. I ended up sewing them with side seams varying between 5/8" and 3/4" instead of the 3/8" (really 10 mm) included in the pattern.

I have no clue where the denim is from :/ but it's decent! A mid to light weight, no spandex, and a nice, deep blue.
my husband can be a prankster!!
And even though I'd previously drafted a contoured waistband, this pair gapes at center back. I had them almost completed so I did the elastic trick...measure the back between belt loops, cut the elastic 2 inches shorter (this is an individual measurement), insert it and stitch it in place through all thickness. Cover the stitching with the belt loops. Luckily, I caught this BEFORE I put the belt loops on so I didn't have to remove/redo bartacks. You can see the elastic in the back in this pic:


There's a lot I like about this pattern and some things that give me pause. I think I'm going to plan to muslin the Workplace Social Claryville jeans in the next month or so.


Sunday, January 19, 2020

All in a Day's Work


Our local group was supposed to get together on Saturday for a sew day and then a blizzard struck Friday afternoon into Saturday afternoon so it was canceled.

I'd been so excited for it (I am always excited for our meetups) so I decided I'd still have a sew day. It was cold, it was snowing, the winds were out of control and I wouldn't be going outside anyway. Plus, I'd prepped everything so it was ready to go.

I'd decided that I'd take my serger instead of sewing machine and work on loungewear, and that I'd work around areas that needed a sewing machine or my cover stitch until I was back home. When the storm hit I figured, why change the plan?! So I went for it! :)

I've been meaning to sew M7061 for FORever. It has so many positive reviews and I just kept putting it off. In 2018, I ordered this precut from Fabric Mart (those are seriously some of THE best pieces of fabric I've owned!!). It is Ann Kelle for Kaufman cotton spandex (95%/5%) knit. Can you believe I paid $6.40 for 4 yards?!?! I washed it up awhile ago and just hadn't gotten around to it. Oh, rookie mistake: I didn't notice til I had cut like 60% of my stuff out that I'd forgotten to remove the label. Luckily, I was able to cut around it.

DOH!

LOVEEEEE.

This is one of *those* patterns. 1) It has XS-M in one envelope and L-XXL in another. I needed a medium top and large bottoms and luckily, I'd purchased both sizes. 2) All the views for the top? ALL overlaid. I HATE when they do that! The short, straight seam for A, the longer, curved view C, the dress length view D and curved dress length view B. GRRRR! I end up cutting off at C, saving the longer bits from the dress length views and then folding up for view A.

Adjustments:
I've been thinking about fitting more and one (simplistic!) rule I keep reminding myself of is to put the fabric where I need it. My chambray Vogue blouse is done and on that one, I'd added at the side seam for the hip, as I've often done. It's still snug across the butt and sticks out at the hip. My "hip" measurement is larger due to my butt so I added the most fabric where I need it most!

I did a slash and spread in back and added 1" (2 inches total). I also added a wedge at the side seam on front and back of 1" (another 2"). The hip on the medium is 41.5 on that longer view and my hip is 44", so that wasn't going to work.


The sleeve was SOOOO slim!! Eek! I've been using the Singer Sewing book bicep adjustment because it adds less width throughout and doesn't lower the sleeve cap but I needed the extra through the sleeve so I went traditional adjustment and added 1.5".

I cut the front  and took the inseam out to the XXL, tapering to nothing at the notch. This was a bit too much at the inner thigh. I figured I'd take the chance because its loungewear. Also, I ended up removing 5/8" from the CF tapering to nothing at the side seam after sewing the grey shorts.


On the back, my back crotch curve most closely matched the XXL. I added 1" to the inseam to get the back to match. I also smoothed out this inseam line below much more when cutting out the fabric.


I will adjust the CF to remove 5/8" via a wedge. I will remove some of the crotch extension and inseam width. On the back, I will remove some of the inseam width and do a small wedge (I can see the heart pattern on the back pants dipping just a bit).
For this set, I used a cotton knit from JoAnn, one of their Doodle prints. I fell for the unicorn print and didn't research. OY!!! Well, I measured my 2 yard cut because I don't trust JoAnn's cutting (I bought via order pickup). It was 2 yards. Great! I washed and dried it and when I pulled it out, I could tell it was shorter. As I started to lay everything out, I was *just* barely going to squeak out the pieces and remeasured - 1 yard 25 inches. It shrank 9 INCHES! I went to research after the fact and several people complained about shrinkage of 4-5 inches per yard. I hope this doesn't mean I've lost 1/3+ yds off of my 3 yard cut. Grrrr.


I intended to add the hood but didn't have enough fabric for it! I'd already decided I wasn't going to add the hem bands to the bottom and sleeves. 

I finished the neckline with a facing. I cut a band that was 1 1/4" wide, stitched it in place, graded the seams, turned to the inside and topstitched with my coverstitch. I inserted this flat but once I sewed the band on, I sewed the other shoulder seam and then coverstitched it in the round.


The waistband doesn't include any elastic - DO NOT do this unless your fabric has great stretch and recovery!! You can insert as a casing or stitch the elastic in. I first saw this on someone's blog many moons ago and then Kwik Sew 3115 (I think?) included these instructions.

After cutting out the waistband, I traced the fold line in place and zig-zagged the elastic in place on the interior of the waistband. It's the width of my natural waist and light tension was needed to fit it into the waistband length. The hem was finished with the coverstitch. 

The heart shorts were sewn the same way (they were sewn first actually!) and I did include the side slits. waiiiiiittttt!!! The marking for the slits is technically above the crotch level of the shorts! LOL!!!! Yeah, no. 

Anyway, the work to make the slits is extra and unnecessary so I probably won't do it again. It's not anything difficult but the side seams were serged first, hem corners made, side seams stitched, then hemmed. Eh. Not worth it!

I did use 3-thread coverstitching for the first time making the looper threads visible. 

I love it and feel confident using this stitch more often on casual wear!

(messy zigzagging on the side slits)

The pants went together so ridiculously fast. I sewed on the first hem band upside down after looking at it, pinning it, flipping it, pinning it, looking at it again. Oy! LOL! Also, based on the fit of the shorts, I ended up sewing the side seams at 3/4".


I love the fit!!! 

For the top, I was confused on the collar for a minute for some reason! But I just followed the directions and it was fine. 

Before I ever started this, I was drawn to red for the thread selection and the only options that worked as a drawstring in stash were white or red. The red really POPS and I love it.


My machine wasn't loving straight stitching on this fabric but the zigzag turned out well!

After topstitching this in place I hated the puny stitching and went back and did the two horizontal lines of coverstitching. 

For the top, I had enough hip room but still ended sewing a slightly smaller seam allowance through the sleeve until around the elbow and through the bust and waist on the top. I removed the 3rd thread and used a traditional coverstitch to hem the top.
I feel so ridiculously warm and fuzzy over the heart set! It really is a joyful print! And it's warm and soft and snuggly!
I think I sewed a total of 7.5-8 hours making these 5 pieces. Everything had been cut out prior to Saturday.

I purchased a second cut of Doodle fabric to make the onesie from S8502 but I'm hesitant until I see how the grey set wears. And, I still need another hoodie. I have a black and white polka dot sweatshirt knit that I hope to get to sooner rather than later.

What's next? I did not even think about going in the sewing room today! LOL! I think I'll pull out my McCall's 7982 muslin so I can get those sewn, and I need to get back to S8948.