Pages

Wednesday, August 29, 2018

Repeat Offender: Burda 8/2018 #113 x2

Hahaha. Apparently my blog titles are just full of corniness now?? :-)
L: poly crepe knit panel from Fabric Mart
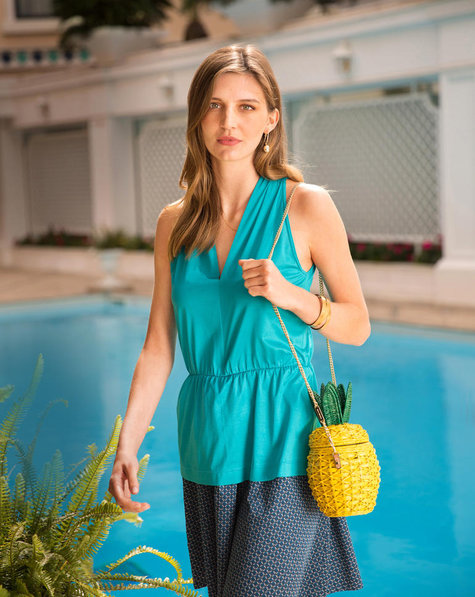
R: ITY knit from SR Harris

Audrey over at SewTawdry posted her version of this pattern and made me go WHAT?! That pattern was in the August issue??  She had modified it to remove the lower "peplum" (hardly) and elastic waistline and it took on entirely new life!


I'd just gotten my Fabric Mart order and had this beautiful panel of a crepe knit and had to have THAT top in THIS fabric! I traced a straight size 40 (to fit neck/shoulders) because I knew I'd need an FBA. I found a heavier ITY knit to use as muslin in my donate pile that the silly movers moved even though it was in the donation pile. grr.

Right away I did a 1/2" swayback adjustment (there is a CB seam but it didn't have a ton of shaping), lengthened it 6" beyond the waist marking and raised the armhole 5/8" based on Audrey's mentioning that they were low.

After muslin #1 I did a 3/4" FBA, lowered the armholes back down to the original line and added an additional 2" to the length. I'd also sewn the full 5/8" seam allowance.

I sewed muslin #2 with 5/8" under the arm and then tapering to 3/8" the rest of the way. I'd sewn the 'v' up another 2-3" on muslin #2 but then realized I didn't really need it. Muslin #1 was so low because it was just too small over all; not enough bust room.

Also, based on muslin #2 I realized two other things:

1) I needed the 0.5cm from shoulder to bust that is removed for the petite sizing -- I actually added 1/4".
2) When I rotated part of the FBA into the pleat, I changed the angle of the shoulder. It was wrong on the muslin and v1 and I couldn't make out in my head how to fix it on paper. On v2, I ended up adding directly on the fabric how I thought it should be and it sort of worked. Once the pleat is folded out, the angle works, but the pleat isn't matching up "perfectly". I'll have to think about that a little more.
   These two are actually the same length! 
You can see it fits better through the armhole, bust and waist on the second muslin.

My fabric cut wasn't long enough for a full back piece! :)
Here, on version1 the side seam was really curved.

After making all of the adjustments, I'd gotten it all laid out on my table and was not about to disrupt it to place paper underneath so I just used painter's tape to hold it and traced over it to create the new pattern piece.It works! LOL!
  
I rotated part of the dart into the pleat and because I wanted to add more length overall, left the ~1" at the dart, added 1" below the waist and added 2" in length to the back piece. 
(I actually wonder if it should be just a little bit longer...)

Lastly, I couldn't understand how they wanted the shoulders connected and tried a few times unsuccessfully. I reached out on IG and Allison sent me pics of how she was doing hers. I had tried that and it didn't work either! And on the finished tops, the back facing doesn't really line up with the shoulder seam. BUT, when it's on my body, it stays put so I may not worry about it too much.

On version 1, I started to bind as instructed but really liked the look of the band and lack of topstitching. So I removed that and cut bands. I made the mistake of using the same measurement and had to unpick in order to ease the armhole in/not have floppy bindings. I ended up with a tiny hole on v1 that needed fixing.


I really like the cut in shoulders that results from the French binding they want you to use...but I also those pads of fat on my upper back - it's probably the only part of my body I'm actually self conscious about! - so I like the coverage of the bands, plus I can wear a regular bra.

 Both were sewn with 5/8" seam allowance under the arm tapering to 3/8" for the rest. Both received a double-turned hem and bands to finish the armhole.

I tried v1on with a few things Sunday night and on my lunch on Monday, went to SR Harris to find another knit for v2! I prefer the Burnsville location for everything BUT knits. The flagship store has SO many more options. But I do like this print.
 
Maybe an inch longer?

jacket is NL6481

So from Friday to Monday, I sewed the blue tie sleeved top, then the darker version of this top, then the grey tie sleeved top, then the brighter version of this top. Whew! :)

I cannot promise these patterns won't make it back on the blog!

Sunday, August 26, 2018

Vogue 1323: Slowish Sewing

This was a "slow sewing" project...slow for me. I started cutting Wednesday evening and it was basically done Saturday night. I swear I was going slowly! :-p
I saw this fabric on FM and legit lost my mind. I placed this order August 6. That was my first Fabric Mart order since May 22. I usually buy enough fabric and rarely extra. I bought 5 yards. FIVE. The only other fabric I've ever bought in this yardage is black ponte. And FM being FM, they sent me about 5 2/3 yards. Gah. I think I've convinced at least 10 people to buy this fabric. LOL!


I started with my normal Big4 sizing; 14 neckline and shoulder and a 16 for the rest. Well - sometimes I do a size 14 and an FBA. Other times (like with knits), I grade out. With patterns like this, where it's fitted in the shoulder but otherwise a loose fit, I will grade out and just do a smaller FBA than if I cut a straight size 14.

I did a 3/4" FBA and kept the dart created. I did a 1/2" slash and spread on the back piece adding 1" at the hip...I could have added a little bit more. I also made my standard 1" full bicep adjustment. I've made the mistake before of looking at the bicep measurement and thinking, that's totally big enough! The finished sleeve was 16" or 16.5" for the size 16. My bicep measures about 14" and that's plenty of ease, right?? BUT, I would lose the intended fit if I didn't do the adjustment.
I have some drafting books I recently checked out of the library. I realized I am truing the grain line incorrectly or something when I adjust my sleeve. I think that's the cause of my sleeve twist over all these years! I remember when I muslined that Burda jacket and the unadjusted sleeve had no twist but the adjusted sleeve did. I'll be working on that.

 I just adore gathering into back yokes. Adore.

Another recent realization...I have used Pellon interfacing the entire time I've been sewing with no problems. The last time I bought multiple bolts (I usually buy 2-3 at a time) I went to pick up the order and really should have just returned them. It was not packaged like normal. It literally was interfacing wrapped around cardboard with plastic wrap wrapped around it! I was complaining about having issues and realized it's only been since I've been using THAT Pellon.

I ordered several types of interfacing from Fashion Sewing Supply knowing I have some plans for fall for silk and silky tops. On this blouse, I used the ProSheer Couture Elegance in white. The $9/yd has made me bypass this interfacing but boy oh boy! It is really good. I followed the instructions and it fused perfectly. Also, this interfacing is 60" wide vs Pellon's 20"...so 1 yd = 3 yd of Pellon; a bit more comparable when you think of it that way and SO much nicer.

I posted this on IG during construction...look at how CRISP that cuff is!!

The pointed front placket was a bit fiddly and it did NOT turn out for me. My bottom buttonhole is not functional. I can get it on and off without unbuttoning it at all; much easier to get it off if at least the 1st button is undone.

The reason I changed the front tab...and it's still wonky just less wonky.


Soooo yeah. LOL!!! Your sewing can still be beautiful even when it isn't! :-p

The stitching on my bands is a bit wobbly. It should finish at 1" and in some places it's 7/8" and in some just over 1". Oops. Also, I had to redo the topstitching in a few places because it was so wobbly on the inside. 
But I LOVE IT!

The pattern finishing is lovely. Of course they don't recommend the 'burrito method' but that's how I finished the yoke. Everything else is finished with French seams. The armhole was STRESSFUL!!!!!!!!!!!!!! But the 2nd one went in much easier and faster. Whew! That's the first time I've ever done that.


I want to hug my cuffs...

This fabric was A DREAM to sew and press. To cut, I used Best Press to stabilize which worked really well and especially for the small pieces - pockets and flaps, collar, bands. After I finished it I washed it to remove the stabilizer; the challis is just as flowy as it was before! 

I have my Burda 8/2018 tops photo'd and the blogpost ready but I documented every single step of this process on IG and so it had to jump the blogpost line! :) 

It was HOT AND RIDICULOUSLY HUMID out when I went to take pics and like 60% of them, my face looked like this:

so angry. lmao!!!! 


 Lastly (there's more! LOL!), I saw someone style a short, skinny scarf and thought it was so cute. Then I did some Googling and found one on Target. I went to look at their dimensions and they had it listed as 48 feet (L) x 4.5 inches (W). Uhmm. Pretty sure it wasn't 48 feet so we're gonna assume they meant 48" / 4'!

I was cleaning up and saw a scrap (doubled) that was about 30" long. I cut a rectangle as wide as possible and 25" long. I sewed the entire thing with 1/4" seam allowance, angling the ends 2". The finished dimensions are about 49.5" x 3" and I LOVE IT!!!! I wore it today and think it'll be great for fall.


Friday, August 24, 2018

PR Mini Wardrobe Contest 2018

I consistently attempt an entry for the wardrobe contests year after year...sometimes I get it done and other times... :)


I just try to make it work within existing sewing plans and if it doesn't then, I won't make something *just* for the contest. I had gotten pretty good about not doing that and then was so frustrated with myself for doing it for the Sewing Bee. Too many wants, not enough time.

The contest rules were announced yesterday (I think?) and it runs September 1 through September 30th. This year, the contest challenge is to create a 5 piece mini wardrobe that combines to make a minimum of 6 outfits. So based on that and my early fall plans and another challenge/sew-a-long for September, here is my mini wardrobe.

 
Only the striped crepe is the actual fabric...the others are representative :)

Burda sweater in a black sweater knit
Butterick top (made previously) in a striped crepe, will modify the sleeve to have a flouncy bit of some sort :) I like flouncy bits!!
Birkin Flares in a medium wash denim
Vogue top in a red crepe; I plan to eliminate the back button closure (will just sew that seam up) and instead of the back strap, I'll make long! wide!! ties so it ties in back at the neck.
Butterick mini in a black Telio ponte

Outfit possibilities:
Sweater + Jeans
Sweater + Skirt
Sweater + Striped top + Jeans
Sweater + Striped top + Skirt
Striped top + Jeans
Striped top + Skirt
Solid top + Jeans
Solid top + Skirt

 
The theme is supposed to be something about work...or something? IDK...I will wear most of these to my regular office job LOL! The red top and oversized sweater will depend on how casual they appear on the body. 

Are you doing a mini wardrobe?


Tuesday, August 21, 2018

Twice as nice: Burda 7/2018 #119

When I made S8601, I really liked the view with tie sleeves but liked the tie front more and thought the two together might be overkill. But I made that in a stretch cotton poplin, which is my nemesis. IDK why that fabric exists! :-p I got rid of it. Loved the top, despised the fabric. I'd planned on making the tie sleeved version and mused about making it in a jersey. And then this Burda was released! Huzzah!


If you have the magazines and haven't yet taken the plunge, I always recommend looking at the 'sewing lesson' patterns and sewing that if it's to your liking. This pattern is featured in the July issue. Benefits are that the pattern pieces are MUCH easier to trace because they're solid, overlayed on the spaghetti lines and the instructions are more comprehensive and include pictures. It's a pretty simple pattern to make though!


I went with my normal Burda sizing and cut a hybrid 40/42. On the first (blue) version, I did a little cheater FBA directly on the fabric.

Add to ss and a small amount at cf

I forgot on the grey version and my CF rides up just a little bit. I also think it is more noticeable because this rayon/poly fabric has far less drape than the blue rayon jersey. Also per usual with me and straight-sized Burda, I added no hem allowance to the top (I did add it to the sleeves). Someone on PR commented that the top was "really short" and at ~5'1", they had to add nearly 3". Weird.

I closed up the armhole slit quite a bit. I happened to have the back piece out and lowered it 3"...then matched up the front (they won't be the same because the back sleeve is longer!) and marked the new spot on the front sleeve. Finally, I never use the pattern's neck binding as I find they are often (not always but often) too long. I measured the neckline opening and cut my binding at 80% of that. The ties are finished with facings and otherwise, it's fairly straightforward to sew!


I just love it!!! After I finished the top from 8/2018 (which also has a 2nd version! LOL!), I immediately cut out the grey one.

I added lingerie straps 
(thanks IG sewing friend! LOL!!! I called them bra strap holder thing-a-ma-bobs!)

Sleeve tie facings

And because I'm silly....
I call this 'contemplation of the dead petunia'

and 'I can't help but be nosy'

and 'Yasssssss, girl!'

Both fabric cuts are from the stash, prior purchases from Fabric Mart. The skirt is M6654 and my jeans are from LOFT.

I really needed sleeved tops in solid colors and sleeveless tops in prints. I found a beautiful chartreuse silk (weave unknown) at SR Harris in the $6 bin but didn't look at the roll. It was actually $10 and not $6...but I'd had them cut 3.5 yards based on the $6 price tag! I decided to leave it. Now I'm thinking I really should have just had them cut back to the 2 yards I NEEDED for my top -- the extra 1.5 was because it was BEAUTIFUL and really popped against my skin and would have made a lovely shell or something down the line. I may go back and get it. Blergh!

Next up is V1323 in a lovely print rayon pebble challis.

My Birkin Flares and M7547 are stalled because I always manage to start sewing pants mid-cycle and I bloat like crazy (hello fibroids and ovarian cysts!) and so I'll get back to those next week! :-p

My fall plans have been completely revamped because I saw ONE. THING. that took me in a whole different direction...isn't that how it goes?!

Until later!


Saturday, August 18, 2018

On The Run II: McCall's 7728 and Simplicity 8466

Epic post of epic-ness...


Let's start by saying I will never NOT attempt to see JAY-Z or Beyonce when they tour the midwest. Beyonce is an amazing performer and I will continue to see her any time I can! But at heart, I am a rap head. And am about 72% there for JAY and the other 28% for Bey :-p I have loved rap music for as long as I can remember!

In 1988, shortly after turning 9(!) I would sneak and listen to NWA's Straight Outta Compton. Like, boombox literally on '1'. (I still listen to Straight Outta Compton!) The first album I ever purchased was later that summer, MC Lyte's Lyte as a Rock. IDK why my parents let me buy that one...maybe because she was a woman they thought it was 'safer' rap??  hahaha!  At any rate, I'm 30 years in and about 95% of the time, you can catch me listen to rap over anything else. My dad just asked the other day what kind of music I usually listen to...and said, "do you still listen to rap like that?" YES! :-p

And JAY-Z. Ahhhhh. We're going to pretend like the Kingdom Come album doesn't exist but aside from that...just greatness. Rap greatness. So OTR and OTR II is like, ooh some Beyonce magic! But I'm really there for Jay. Shhhhh. Don't tell the Bey-hive!

I knew I was going to sew something for the concert because OF COURSE I am! I initially bought M7728 with the intent of using the bodice and adding a simple gathered skirt--just a cute summer dress. Then I started thinking about a top + pants which led to this top + skirt combo which first, was going to be a frankenpatterned dress. WHEW.

M7258 bodice with S8466 skirt

I really liked this Mimi G pattern when it was released. There was a similar Burda that I've debated buying for a long time...slightly different but overall feel is similar.  And, once I muslined the bodice, I REALLY loved it and decided it would be a top. It looked super cute with high-waist jeans and a casual (tercel twill) jacket. I couldn't find my high-waist jeans OR strapless bra (either in the hamper or the laundry! LOL!) so you will have to bear with bra-straps and navel sightings. You'll survive...maybe!

Muslin 1:
Cut size 16 with no adjustments. Decide I need an FBA, more waist room, armhole tuck.


Muslin 2:
I have no pictures because it was SAD. I did a 3/4" FBA and it came out HUMONGOUS.

I went back, undid all of the changes except the 3/8" armhole tuck (I'm moving my zipper back and forth between these muslins and it's so irritating!), and put the first muslin back on.

Lightbulb. I do need more waist room, but the bodice is standing away because it's too big. I took a pretty big tuck out of the front neckline; 1/2" on each side. YES! This makes so much sense. I cut a straight 16. My correct pattern size is 14 with FBA and sometimes I'll grade from 14 to 16. IDK why I didn't cut a 14!

Went back and straightened out the side seam (I'm not that curvy through the waist), adding 1/2" to the the side seam at the waist- LOVE!


My zipper is 9" and I debated lengthening the top or adding a band to get the rest of the length needed. I decided to split it and added 1" to the length and finished it with a 1" band. The top was then way too long. It looked odd. So I decided to try my hand again at shortening the metal zipper. I've tried a whole bunch of times and have just never had the strength.

I Googled a bit and someone suggested using jewelry snips (idk what they're actually called). This worked EFFORTLESSLY!!! So I don't have to worry about shortening them anymore - YAY!

The top is fully lined with Bemberg (it feels good but I'm not as crazy about this stuff as others seem to be - it's a beast to cut and sew) and I made self-straps instead of using trim (trim, seriously?) I wanted them to finish at 3/8" wide and cut them at 1 3/8", sewn with 1/4" seam allowance. Turning these almost took me out. The Ankara is so 'sticky' and I almost gave up. My bodkin was no help and I had to turn to the bobby pin method - it worked though!

This was taken immediately after washing. 
I under stitched the bemberg but it wanted to roll back out around the cups anyway! It was fine once I pressed it again. 

brastraps! avert your gaze!!

You know the rumor that Apple screws with your phone as it gets older/new models are released?? 
My phone is just haywire so often. I swear I was clicking to take side/back photos and THREE different times I went aside and there were NO photos of the back/side! I gave up...I just wanted to show how low the back sits on M7728...but it still provides bra band coverage.

For the skirt, I swear I looked at the finished measurements AND measured the waistband pieces. And cut a 16. I thought I was going to need to insert gussets for a second there. I did have to recut my back waistband and facings. The upper part of the yoke is supposed to be slightly gathered. I had NO EXTRA ROOM for this gathering! I added about 1" to the back waistband since I eliminated the gathers.
it still works!

so sunny!!

I tried *a little* on matching everything. This was a double border print and I cut the skirt panels on the crossgrain, completely eating up that 6 yard cut of fabric. You can see that while the front doesn't match perfectly across, the motifs are at least lined up horizontally.

No attempt to match the upper but on the lower skirt, 
I wanted to ensure the border started at the same place.

The pockets are unnecessary fiddly IMO. Maybe in a solid they'd pop? But pleat and sew a dart in the lower corner and then pleat the upper corners when you attach them...and bleh. I removed all the extra and just did a pleated pocket. I did mess up though and matched the width to the flaps (they should be *just* slightly smaller) so I had to make it work and squeeze them in. It's fine though because of the print.

The corner where the lower gathered portion meets the front yoke/band is the only difficult part of this pattern. I marked the seam lines, reinforced, clipped and still couldn't get it nice and square. On the first side, I ripped and redid it but then I think I weakened that corner by ripping out stitches. Again, it's fine though because super busy print.

I never use pattern pieces for carriers. I like to cut a 1 1/4" piece, serge on end, fold in the raw edge 3/8", fold over the serged edge, and topstitch 1/8" away from each edge. I skipped the self tie because of the busy print. I figured my leather belt would look much better. I added my label and a strip from the selvage <3

Lastly, whenever I'm making buttonholes, both sides of the fabric gets interfaced. I like to make the area as stable as possible (on the pocket flaps, the uninterfaced side has a strip of fusible where the buttonhole went in). The buttons are the last of the shell buttons Carolyn sent me awhile back. And I didn't have enough so the waistband has a different button.


I'm really digging this outfit and the separate pieces!!

I think I'll be wearing this skirt A LOT! I can totally see it transitioning to fall and winter too.
I just got excited at the thought of my off-shoulder bodysuit or tissue weight turtleneck with tights and updated 'combat' boots. YAY!


Navel alert! 

I'm so nosy. I 'bout died when I saw this pic. These people were minding their own business but I am so.nosy.! LMAO!!! So I had to include it. I'm definitely going to be the neighborhood watch lady...(you know that one super nosy old lady that knows everything about everyone!)


The concert was AH-MAZING!!! And I just loved this outfit. I felt pretty regal and stand-outish :) And I was comfortable too...well until we'd reached the point where we'd been standing/walking for ~6 hours. My almost 40 year old self can't hang tie 2 a.m. anymore!