Pages

Sunday, December 31, 2017

McCall's 7688 and December Wrap-Up


I bought this pattern because my daughter wanted a ruffle front top. If I had known it was just top-stitched to the front I may have just drafted the ruffle onto the well fitting Ottobre sweatshirt for her!

But no worries. I was torn between this pattern and the loose fitting raglan sweater with ruffles from the 12/2017 Burda magazine. This one won. I didn't have a fabric I thought would work well with the Burda. Although I was very excited about this one, I think the pique is a bit too stiff for the ruffles.


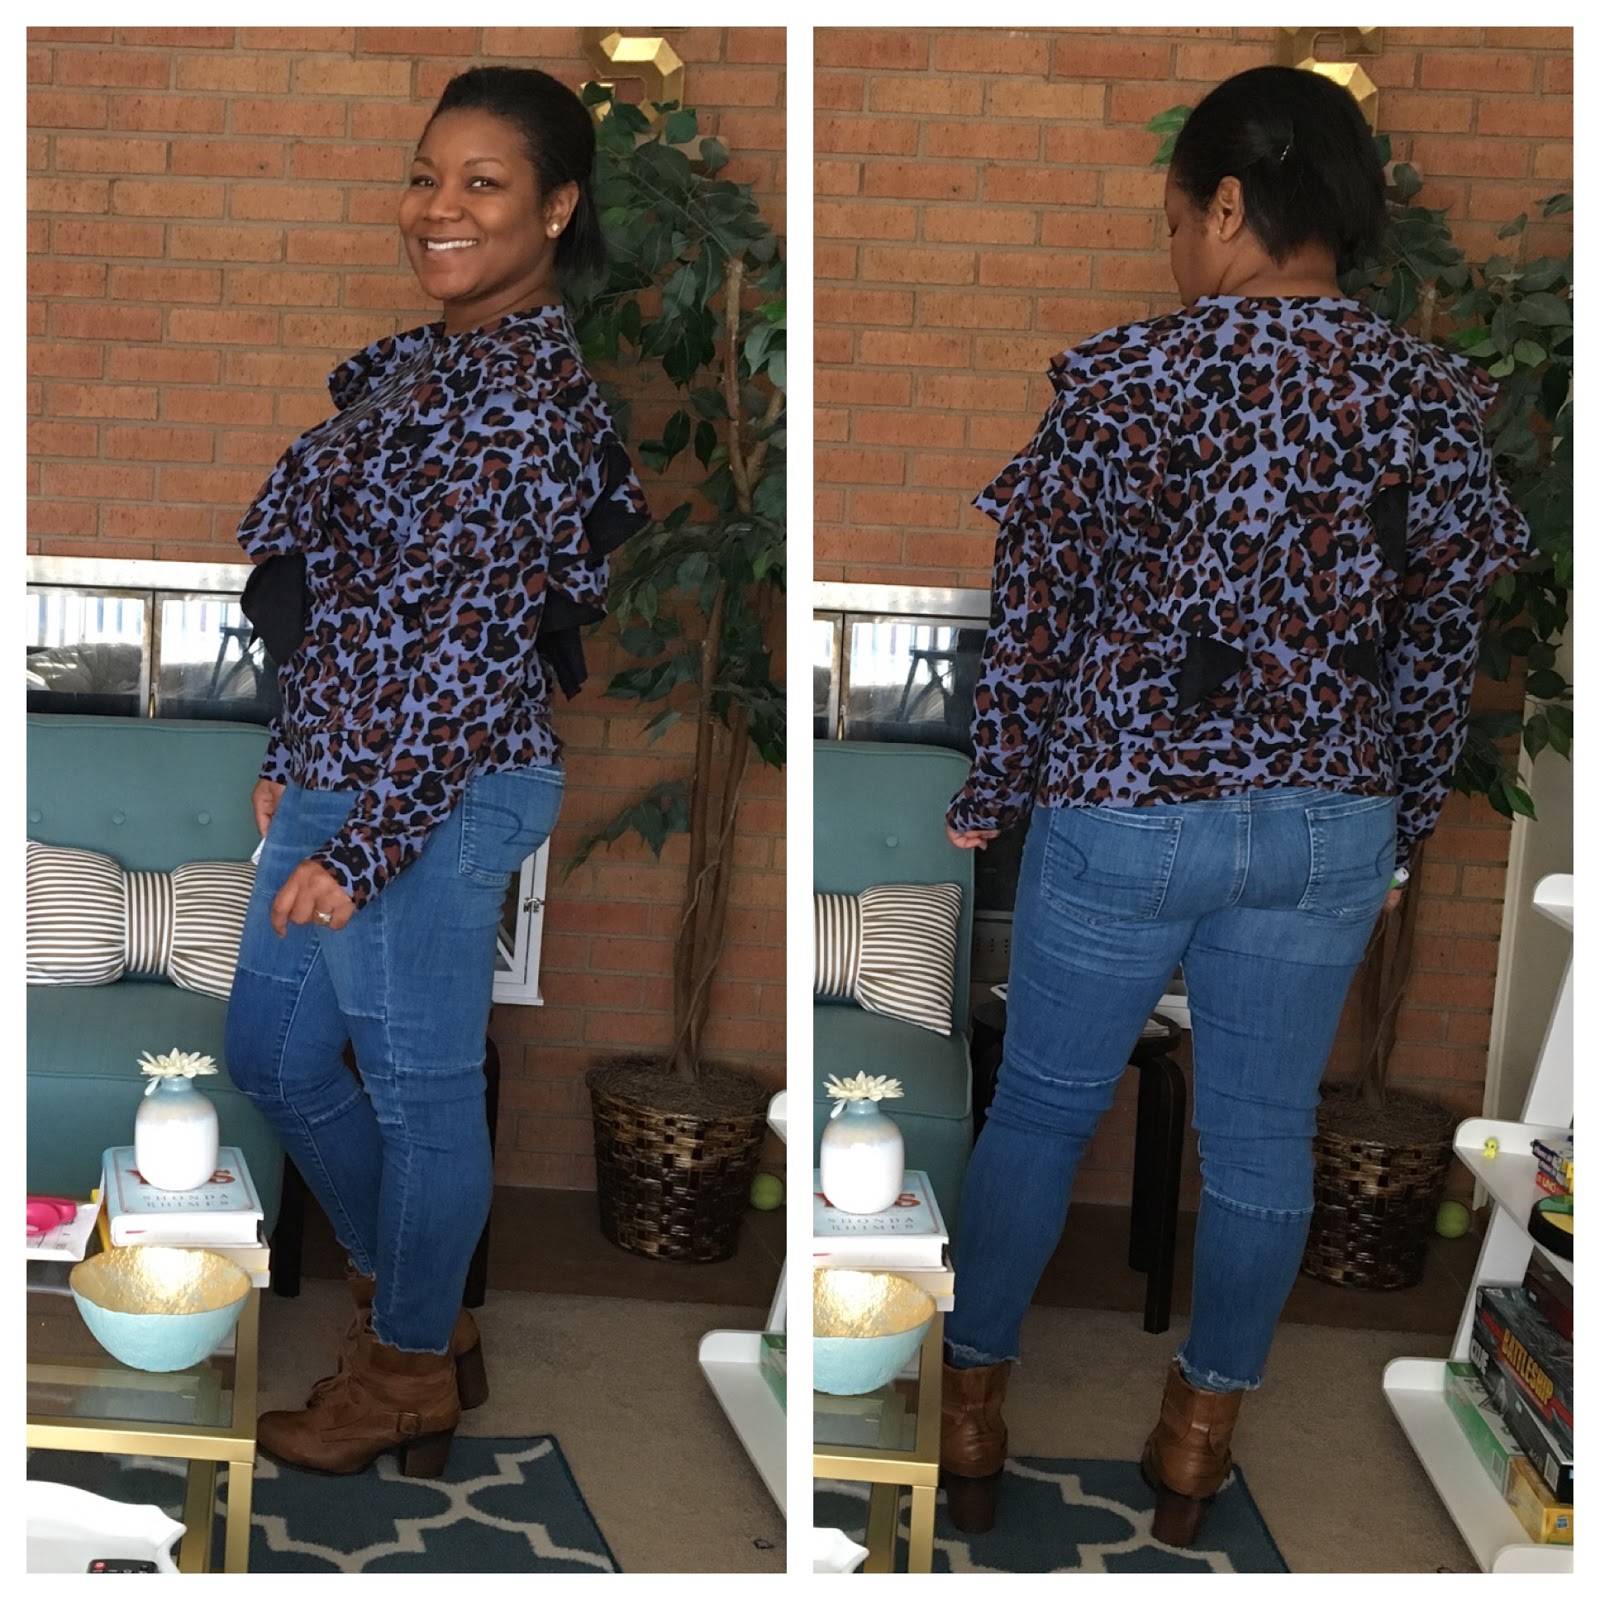
I used a size Medium which is typical for me with s/m/l patterns. I added 2" to the hem band ( just moved it back from the fold) because I didn't want it gathered into the band.

The instructions have you stitch the ruffle onto the front, wrong side to right side, leaving a raw edge. No. Thank you. I don't mind a raw edge on the 'loose' end of the ruffle but didn't want it that way on the body of the top itself. I marked the stitching line and then marked a line 3/8" away (the ruffle has a 3/8" seam allowance) and used that to line up the edge. I then topstitched it in place right sides together and pressed. Because this is a cotton knit, that worked fine, I did not need to topstitch in place.

I found the neck binding to be a tiny bit wide and the neckline too high but otherwise, I like the fit.  I don't dislike it, I just think it's a lot of look for me. I LOVE THE PRINT! And the pattern is fun...I just think it needs more drape. But I'm not counting it out yet. We'll see if I reach for it. I am now considering removing the bodice flounces and just leaving the sleeves. We'll see!


Yesterday, I said to myself, you should take pictures today...it's so bright... Where is the sun today? The sun is gone. GONE.  Sigh.

****************

I've sewn ALL THE THINGS this month! I was talking with a sewing buddy and said, I did other things, I SWEAR! I went to see 2 movies, I binge watched 2 shows with my daughter (The Mist & Black Mirror), I hung out with friends and family...and I sewed A TON! :)


  • Burda 3/2013 pants in plum suiting
  • New Look 6530 top and skirt in navy Ponte (UFO - wah!)
  • Burda 10/2017 sweatshirt in blue sweatshirt knit
  • McCall's 6886 dress in black sweater knit
  • Simplicity 8424 leggings in blue cotton jersey and grey cotton jersey (to be reviewed)
  • Simplicity 8424 top in denim-blue knit (tbr)
  • Burda 6659 joggers in navy french terry and grey star print French terry (tbr)
  • Butterick 6427 tee in black cotton jersey (tbr)
  • McCall's 6886 top in animal print pique knit
  • Butterick 5760 skirt in black wool blend suiting lined in pongee 
  • Burda 7107 (also 3/2012 magazine) in green wool jersey
  • Vogue 9032 pants in black wool blend suiting (tbr)
  • Burda 11/2007 blazer in black wool blend suiting lined in pongee (WIP)
That's a whopping 16 items! Eek!!! You'll notice the color palette of my loungewear was very simple. Since most of that was serger/coverstitch work I wanted to minimize the changing of threads. I still want to make a black pair of leggings and the grey hoodie from the January 2018 Burda mag. I had other pieces on the list but I don't *need* them so they'll have to wait.

I am IN LOVE with my black suiting pieces!! My lining for my jacket is partially constructed; I am a little under the weather so it's taking longer to finish. I have one more item for this mini collection. 

Dark and almost useless teaser pic:

hahaha! :)

Favorite: I have too many favorites to list this month! The 3-piece suiting wardrobe, the green top turned out better than I anticipated! The star-print joggers - LOVE.  The loungewear has been perfect...A great month and successful sew-cation!

Fails: NL6530 is not looking good. Well, the skirt is amazing and may be my new TNT knit skirt. I may have to scrap the top which makes me sad :( 

Accomplishments: I am in awe of myself with my finishing on V9032. Can't wait to share them! Also, I persevered something SERIOUS with the Burda jacket - more on that when I review it. Also, the fact that I have reworked the NL6530 top TWICE. That is very unlike me.  I'm going to try one more thing and then it may go bye-bye.

Now I have a crazy backlog of stuff to review, I need to lay out my goals and plans for 2018 (also my 5th sewing anniversary! yay!!) and my January plans are simple: Finish the blazer, sew the hoodie, and sew Burda 6853. I am traveling this month and I have my certification exam at the end of the month so I doubt there'll be a ton of sewing. 

Until later...

HAPPY NEW YEAR!!!!!! 

Friday, December 29, 2017

Burda 7107 and a TNT: Butterick 5760

Don't you love a good TNT pattern? This is my 8th version of B5760-6 of the prior 7 are in my wardrobe still- the other one was ruined when I washed wool fabric that I intended to dry clean. The top is made from a wool knit from SR Harris. It felt like a jersey but after washing and drying, I discovered it was a dreaded tissue knit. (noooooonoonooonooooooo! LOL!) It was fine, just takes a little more patience.
obviously it is tried on just for photos here because it is BEYOND FREEZING in the tundra!!! :)

I cut a size 42 and did a 1" bicep adjustment and sewed the horizontal seam at 3/8". This top is SHORT! I mean, it's obviously meant as a layering piece but still. (ooh, I wonder if it would work over a dress!) The hemming...on and on and on for forever! Even with the coverstitch I found this tedious. I didn't have a great option for thread choices, even in my regular stash. So I just left the black in the needles and change the looper to olive. I figured the black might clash a bit too much with the density of the looper thread vs the needle threads.

I felt like I couldn't cleanly finish the transition from bodice to tie and ended up taking some hand stitches there.

The sleeve opening is teeny-tiny. So small. But they aren't tight.

DO NOT stretch the back neck binding! LOL! The front has a cut-on facing, I chose to finish it like you would a cowl top. 

It was on my dress form for two whole days before I tried it on!! I liked it but was worried the ties were too fussy based on me trying repeatedly to tie it on Lily. I figured it out though. 

The bands form the lower portion but also the ties, but there's no opening in the side like a true wrap. You have to wrap it below everything in back and bring it back around. 

The top has darts in front and back and is close fitting. I've had this on the radar for FOREVER and am so glad I finally sewed it even if hemming it took a veritable eternity! 

The skirt. Gahhhhhh. The skirt comes with a slit. The piece is shaped the same as a vent but they just have you sew it open, not like a traditional vent. Also, the skirt is straight and not a pencil. So, there was one lined version where I didn't sewn the slit at all; and another where I hand-sewed the slit and sewed the lining to the slit. This time I decided to properly sew a vent and line it.

The skirt tried to take me out y'all.

I have often waxed poetic about Colleen G. Lea of Fashion Sewing Blog TV. Her tutorials are so good. But the lining piece she showed had this crazy shape that I had never seen before! I found a tutorial on a blog, Clipped Curves, for drafting a lining - or in my case, altering the existing lining (since I've lined this skirt before). I had pieces that looked similar enough and I was ready.

Well, the slight issue with the CC tutorial is that it's hard to know just how to adjust the curve of the piece and so I had a harder time putting mine together. And with FSB TVs tutorial, there was no mention of hemming everything and so I ended up doing some unpicking. The inside is a little messy but the outside is decent.


I was sewing the side seams of the lining and for some unknown reason, one side seam on the back was short. The center backs matched...the other side matched the front...but this one side was like an inch short. Okay fine, it's a lining. So I laid it out and shortened the rest of the lining an inch.

IT'S STILL AN INCH SHORT! LOL!!!!! I said, Nope. and hemmed it as is. I did not have time for that noise.


My zipper went in *perfecto*! For invisible zippers, I iron the tape flat, use my handy-dandy invisible zipper foot, and sew one side. Close it up, mark the the place where the waistband needs to meet, line it up (always using WonderTape!!) and stitch. I almost always have to true the top of the skirt, but the seam across the zipper is perfectly aligned.


Also, every single tutorial for understitching I read when I first learned what/why/how had you press the seam allowances toward the facing and topstitch. Well, at our last MinneSEWta meet up, I was wowed, WOWED by the incredibly flat waistband on a sewing friend's skirt. (WOWED!!!!) I would not unhand her skirt! I looked between the lining and skirt and was all, huh. Interesting.

The seam was pressed open and under stitched on the facing side. So only facing seam allowance stitched to the facing.

I tried it on my plum Burda pants and it worked a treat. And here, I am also incredibly happy with the outcome. Now, I forgot to trim my allowances here (because this skirt was trying to take me out and I just needed to finish it already), but it really produces a nice, flat waistband. SOLD!

Okay, maybe you can't tell how flat it is here but...it's flat!!! :-p

This skirt comes with a 2" hem allowance and I hemmed this one at 1.5". I did a blind stitch by machine which worked out well.

****************

Currently in progress is the blazer from Burda 11/2007 and another TNT, Vogue 9032. Both from the same black wool blend suiting as the skirt.


I need to construct the entire lining. Tomorrow, hopefully!!


These are ready to have the side seams basted for fit

****************

LASTLY (whew!), I wanted to share something that I've wanted to do for forever--create a booklet of the tech drawings of all of my magazines! I often have an idea of the type of garment I want to sew. I check my paper pattern stash and know that more often than not, I can find what I need in a Burda issue. And then I'm trying to remember approximate issue or trying to search keywords, and it's frustrating!! 

I ordered  thin sheet protectors from Amazon, about $6 for a box of 50. Most mags have the tech drawings over 2 sheets so you can get 2 years worth of issues in one box - I bought 2 boxes as I have near complete years of 2013 and '14 and all of 2015-2017. Binder came from Target (obviously any binder will do), mine is 1.5". The cover was created on my Cricut because I am a crazy Cricut lady now! :) 


The magazine names are printed on white cardstock with the Cricut pen.
The dress form and scissors were cut from printed scrapbooking paper. 
The title was cut from black card stock. 
I used double sided tape to attach to the white cardstock and trimmed it down to size.


Every month a thread is started on PR for the preview of the new mag. Some time ago, someone discovered a one-page summary of tech drawings for an entire year. I have only found them for 2014-2017 on the Russian site, but someone told me on IG that the Polish site has them back to 2011. 


Sunday, December 24, 2017

Christmas Wishes and Updates

I wanted to wish anyone who celebrates a MERRY CHRISTMAS!!! While we aren't religious, we've always celebrated Christmas, scaling it back each year as the kids get older. Next year we're going to 'adopt a family' for Christmas. We're looking forward to it!

I have been sewing up a storm! I wanted to get as much of the loungewear done as possible before Christmas, and on Tuesday I'll start with the work items I intend to get to over break (the 3 patterns below).


The leggings (right) were finished about 10 days ago. Both are Simplicity 8424. The grey pair had the  leg ties but I ended up removing them. More on that later! (and more on why my cutting table has no mat on it. A definite DOH! moment.)

On the left is Burda 6659. In the center is Butterick 6427-also a Cricut project! Woot woot! The blue top is the hi-low top from Simplicity 8424. This one had some fun elements too as I hemmed it with a visible coverstitch loop. It turned out well.

I have 5 more items I want to complete. They may not make it during vacation but soon after. I'll start reviewing these soon. I plan to make:

  • hoodie from Burda 1/2018 in a luscious!! light grey double knit
  • slouchy tee from Burda 1/2018 in burnout jersey 
  • another B6427 in an ivory jersey (this will be an official Cricut project!) 
  • tank from S8424 in a pink knit ribbed fabric
  • yoga pants from KS3115 in pink velour knit

I bought a purple ribbed knit to make the wrap top from S8424 but I don't think I want to make that now. It looks like it has fit issues.

I know it seems like a lot but, this photo is pretty representative of the current state of my loungewear wardrobe:

So I need lots of things. Most of the items in the photo have been worn and laundered already! LOL! So far, so good! I'll get the reviews scheduled to post throughout the next week.

While I've done paper crafts in the past, let's be real, I wanted the Cricut to make cool iron-ons for tee-shirts! LOL! I made the 'Adult(ish)' tee and wanted to do another small project.

The Cricut Design Space comes with a project for a cover for the Maker. It'll cut the fabric and everything! But it was a bit more than I wanted. I wanted a simple cover. My quilting cotton stash is very low right now and I found this scrap that was going to JUST be large enough (I had to piece the cover for the Easy Press).

I measured from the bottom side, over the top, to the other side and front to back, over the top of the machine. I cut out a rectangle 18"x32". I folded it in half and sewed the ends. I knew I could remove a triangle of fabric to create a "square" top but couldn't exactly work it out. I then placed the cover over the top and folded down the amount needed. I did all the construction on the serger because, quick and easy. I hemmed it 3/4" on the coverstitch.

For the Easy Press, I needed a 18"x19" piece. I had to cut two pieces and sew them together (that's the center seam). The handle is in the center so it stops the cover from being a perfect square. The cord is in back and it's pretty thick. I ended up cutting up the center back and hemming it to leave an opening for the cord.

I would have needed to grade out the bottom in order to cover the base as well. I decided to put elastic in the hem (applied like you would for swimsuit or underwear). I then designed the iron on (it's 4 separate pieces for both) and applied it with the Easy Press. I think they're so cute! :-D


For the upcoming workwear project, I am making V9032, B5760 (both TNTs) and Burda 11/2007 all in black suiting. The Burda pattern (the version on the left) will be made with the solid black suiting (where the light gray is) and this printed suiting (where the lace is). I'll muslin that one.


My stay/sewcation is going fantastic!! I've also managed to see Pitch Perfect #, have lunch with my sister-in-law, have pie with my daughter, and cleaned my entire house. 

Here's a sneak peak of what is, so far, my favorite look. 


I hope your Christmas is full of love...and sewing related gifts!!!

Tuesday, December 19, 2017

2017 Hits and Misses and All That...

December will be productive; I'm going to take full advantage of my time off! So my assessments of what works and what doesn't isn't quite complete.

I've sewn much less than previous years. From January-November, I sewed 50 items. I made:
  • 17 Tops (1 fail, 3 so-so, 1 never worn)
  • 13 Dresses (2 fails, 4 so-so, 3 never worn)
  • 6 skirts (2 fails)
  • 6 Cardigans/Jackets (1 fail, 1 so-so, 1 never worn)
  • 4 Other (2 fails, 2 so-so)
  • 3 Pants (1 fail) (*I* only made 3 pair of pants all year)
  • 1 Outerwear 
I have 9 fails and 9 so-so garments and 5 that I've never worn. That's almost half of my garments :/ 

 
There I go making all the tops again! LOL! At least my ratio of "good" projects has improved!

"unsuccessful" isn't entirely accurate but it was the best wording I could come up with. It includes actual fails, those garments that are okaaaaay, and things I haven't worn yet.

 
The most disappointing fails:

 
  • Both Nettie bodysuits. I just don't like the pattern. I will try one of the Big4 patterns that was released this year.
  • The Yellow V1501. I WANTED THIS SO BADLY!! The fabric is just not opaque enough. And I don't want to wear a slip with it because SUMMER. I guess it *could* be lined :/ UGH!!! I hate working on something after it's "finished".
  • Burda 4/2017 striped knit dress. I LOVE the fit and details aside from the ruching. I don't dislike ruching but it just doesn't work up the center back for me. And the stripes make the front ruching look weird. I pulled this back out and tried it on again and NOPE. Donate pile.

So-So (not hated/a fail, and will stay in the wardrobe and will likely be worn):

 
  • M6752. I love this top. I love the fit. I love the fabric print. I love the cowl + zipper. This fabric is shitty. Shitty. Shitty ITY. It's so weird how it is definitely not all created equally. I've made some wonderful garments from ITY and this feels like plastic-y paper. Grrr.
  • M7627! I love this crazy top soooo much but it is hard to wear as I generally run hot (it *is* nearly 4 yards of fabric!). I hope to be able to wear it more in spring.
  • S1499. I love the color of the vest but I rarely wear it. And I put it on - often! But then take it off and hang it back up. The fabric is a little too stiff and it stands away from my body. Suggestions for softening the fabric??
  • Burda 9/2017. My silk blouse :( It rolls back on my shoulders so I'm constantly adjusting it. The sleeves are way too long, and I want to take the ties out but it feels SO AMAZING on my body and I love the color!!

Never worn:
 
  • Burda 12/2015 vest. This was my sewing bee entry. I need to separate the olive from the denim. I adore the denim side and want to have it available to wear in the spring. I intended to have it ready to wear for spring!!!! :-D
  • Burda 6/2012 (gingham). I kept feeling like I didn't have the right occasion to wear this. I don't know why!! It's like a quintessential summer dress.
  • Burda 3/2017 (blue). It feels too dressy for work and I've never worn it :( But I LIKE it!
  • V1501 (print). I made this for an event in MAY and it snowed(!). I never got around to wearing it. I wore the skirt from the same pattern and fabric very often this summer.
  • S1366 cami. I don't know why!! I wear the other Vogue top from this fabric constantly.

We should talk about things I love!

 
  • Ottobre 5/2017 sweatshirt - It's black. It's wool double knit. It's awesome! I seriously have to force myself to wear other things on weekends!
  • Vogue 1522 - this top is everything!
  • M6654 skirt - such a simple staple but I love it. I have worn it in all ways pictured and MORE.
  • M7542 top - I hated every minute of making the pleated sleeves but I always felt so cute and fun and flirty when I wore this top. I'll have to make one of the other views when the weather warms up again.
  • Burda 8/2017 - I have worn this as much as possible!! Winter has firmly settled in here and while it is still quite cozy below freezing, we've been having single-digit mornings so out comes the down coat.
I had a total of 12 "loves" of the 50. I'm not sure I'm okay with a 25% love rate. But I'm already on the path of being more mindful of my sewing so hopefully 2018 will be better.

**A super honorable mention to my newly made M6886 sweater dress. That's going to be a serious staple going into 2018.

I look forward to sharing my 2018 goals post. Do you know that January 2018 is my 5th sewing anniversary?!? :-O How time flies!!

Thank you all for following along with me this year!

Saturday, December 16, 2017

Ok, Fine. Burda 8/2017 #109 (and M6886!!)

I have to review this before I forget any of the details about sewing it. I should say, I wore it to work one day this week.

#BlurrySelfie! :)

It's fine...I am not saying anything is wrong with it...just that the vision of pattern + fabric didn't mesh. I wish I'd used the solid black jersey like I started to and saved this fabric for something else :(

When I first posted about being iffy on it, someone suggested hacking off the skirt and making it a top. Mehhhh. I'd likely give it away before I do that.

I realized with this make (and actually with the Cashmerette Appleton too!) that I'm just not into to true wrap dresses. With the Appleton, I kept asking myself, "why don't I like it?" but that may be it. This dress, being already in the 'not-loved' pile, annoyed me every time I went to put it on. (I tried it on several times over the last 2 months trying to change my own mind!)

I'll stop being debbie-downer now. LOL!

Drama queen!

I sewed my 'normal' Burda combo of sizes - 40 for the neckline and shoulder, 42 through the bust and waist. I used a 42 front skirt and 44 back. Looks like I need to start adding a wedge to the back of skirts/dresses.


I used a binding on the neckline instead of their facings - no way was I using facings in a jersey knit! I like the pleating and the asymmetric skirt front!! Also, I chopped off the sleeves after sewing them. I've mentioned before that I rarely like full-length sleeves on tops (especially knit tops).


Other than that, it was actually a pretty straightforward sew. Remember to clearly mark your pattern pieces - left front and right front are different and the shapes make it tough to distinguish top from bottom!

Let's move on to a LOVE, LOVE, LOVE! :-D


I was inspired to make a black maxi dress for layering. Not sure if I saw something or what...but I started looking around online and this is pretty much what I had in mind, without the 'nakedness'!


Tried & true M6886 to the rescue! :) My Love Affair With Sewing sewed this version in a sweater knit and like me, she normally used a binding on the neckline of this pattern but opted for the turn-and-stitch method the pattern recommends. And used her coverstitch to do so.

I decided that's what I'd do too! And because many sweater knits can be quite open and drape-y and stretchy(!), I decided I needed to practice. My serger required the differential be turned WAY up to feed this through evenly. I clicked up the differential on the coverstitch, and actually made a little sample neckline:

It stretched out a little bit and so I cranked the differential up a little more...PERFECT!

I always have a small bit of extra fabric in this pattern in back but it doesn't bother me enough to make me add a CB seam to the pattern. It's less of an issue in heavier fabric.


The other thing...I bought 4 yards of fabric back in April, along a bundle (and this was actually the same order that I got that awesome plum suiting!). The bundle had 2 yards of this fabric in it. Doh! So I have more black sweater knit projects coming. LOL!

Laying it out was a little bit of a headache but it has a slight ribbed texture to it which helped GREATLY.  The rest of the construction was easy peasy because 1) I've sewn this a million times (normal size 14/16/18 blend for neck & shoulder / bust & waist / hip). and 2) serger + coverstitch. Fast, fast, fast. Not much to discuss via details...I used clear elastic in the shoulder seams and sewed it at the 'out of the envelope' maxi length.


And YES, it is a bit sheer but I purposely made it to layer over something! I'm wearing a black knit cami and black leggings. I've already worn this outfit and every time I look at the dress I get excited. Win.

NL6530 is still stalled. W.A.H.! I started tracing out the jacket from Burda 12/2017 and it's so many pieces. Ughhhh. I have a few more to go but I temporarily moved on to my knit loungewear mini-wardrobe and sewed the leggings from S8424 (2 pair).  I will likely save the blogging so I can group all of the pieces from the pattern in one post. The blog will likely get pretty busy over the next few weeks. But, I love this time of year when everyone starts to wrap up their hits and misses! Makes for tons of blog reading - keep 'em coming! :)


Sunday, December 10, 2017

Burda Challenge: 10/2017 #127


I kind of hemmed and hawed over my October Burda project. I liked several of the dresses but just didn't "need" them. And then I liked the cool top with the integrated tie waist. But I cannot find any fabric in the stash that I really want to use so I figured I'd better let it go for now. I don't want to force it and end up with a garment I don't really like or won't wear (ahem; looking at you nice 8/2017 wrap dress from nice black & white fabric that gives me the sads when I put it on). (also, I took pictures of the dress and still don't like it. It's been almost 6 weeks though so I'd better review it. Soon.)

I fell in love with this very simple top/tunic immediately!


I've always used a 40/42 on top for Burda and figured the plus 44 would be too large. Then I wore the top I made for the PR Sewing Bee, remembered I had a chunk of fabric left, and wondered if I could squeeze this top from it. The pattern calls for 1 3/4 yds of 55" fabric which is closer to 1.5 yards of 60" fabric-I had 1 yard and a large scrap. They had you mirror the pieces and cut single layer. I decided that if I used 3/8" seam allowances instead of 5/8" I'd be able to make it work. And I did! Without using the scrap piece!

Regarding the sizing, I figured 1) it's a "sweatshirt" so a little oversized is fine and 2) I just measured into a 46 on bottom vs my "usual" 44. I graded the neckline and shoulder to a ~42 and traced a 44 for the rest. I added 3/8" seam allowances throughout.

This was quick work on the serger and coverstitch (WHY DIDN'T I BUY A COVERSTITCH SOONER!?!?). You can see it's a very simple construction; sew the shoulder seams, hem the neckline, attach the lower front and back (the fronts cross over slightly), side seams, zippers, hem the armholes. I hemmed the armholes last...if I did it again I'd just coverstitch those while it's still flat.

I like their styling with a long sleeved tee. This is the only one I own and it's too small.
I'd just added 'long sleeved tee' to my sewing list. 

I bought these zippers in my last Wawak order for this top. I was going to use the animal print knit I used for V9022, which the weight of that fabric would've worked nicely. The sweatshirt knit must have some rayon in it - it drapes nicely and it wrinkles if you happen to share the same airspace with it.


Somehow the details of the line drawing escaped me. This happens to me a lot. LOL! It tapers in toward the hip. Whyyyyy Burda?! Why!!!


Yep, totally just like the line drawing. Doh.

So mine is snug across the butt and gets hung up.


I took the pic on the left and was like, eh, it's okay. But the picture on the right is totally my normal posture! LOL! I had a New Year's resolution once to try to correct my posture. Fail!

BUT, this is totally a casual at-home type of garment for me. No judgment here, just my own personal comfort level...I don't do athlesiure. Lounging at home - yes, please! And I definitely need more loungewear. I've been saying it for FOR-EVER! I'm going to make it happen this time though. I have a loungewear mini-wardrobe planned!! :) Oh, all that to say that I'm not happy it's snug across the butt but it isn't a deal breaker. 

I could have sworn the model was drinking coffee in the shot and my mug of coffee was there and...
...I went and checked and nope. She has her phone in her hand! :)

NL6530 is stalled. I have to do some unpicking so wahhhhhh. This morning I started tracing the jacket from the 12/2017 Burda. I hope to get those reviews up while I'm working through the jacket. And I made my black sweater knit M6886 though and luuuuuurrrrrve it.


As always, more later!


Thursday, December 7, 2017

Burda 3/2013 #140

I love these pants. I know I say I love a lot of things but I really, really, really love these pants. Okay I really, really love them. Less one "really" because the fabric is decent but I can only imagine if I had used something a little nicer. Ahhhh. So these are already on the 'must make again' list.

I mentioned seeing a pair of pants that I couldn't get out of my mind. My kids' cousin's mom (haha) had them on and I was so smitten. She bought them so long ago she said and can't remember where she got them. I went straight to Burda because, Burda. This pattern isn't *exactly* right -- these cut back in after the hip whereas the inspiration pant was a true trouser fit. It hit the hip and went straight to the floor. But I am so happy with the fit on these that that's okay.


My fabric is an RPL (rayon-poly-lycra) suiting from Fabric Mart in a plum color. I also had a cut of plum crepe and THAT fabric was the color I thought THIS fabric was. This is a bit more red than the other and I was very dubious when I first pulled the fabric out. But thankfully, I went for it anyway!

I usually use a size 44 for Burda pants but went for a 46 as I'm currently fitting in the middle of the two. I apparently have some extra padding! I measured everything and decided I didn't need to add to the back rise at all. I traced the front crotch curve at the size 44 mark and removed 3/4" via a wedge. Where I would normally add back to the side seam what I lost from this adjustment, this time I did not. I trued the CF and proceeded.

I only had 2.5 yards of fabric and thought I'd have issues fitting the pattern pieces (they say 2 yards and that is accurate if your fabric is closer to 60" wide). I decided to use 5/8" side seams and 3/8" everywhere else.

Forgot about the CB zipper. I had a 3/8" seam allowance back there and had to make it work. So my zipper installation isn't perfect, I have some of the tape peeking through. Womp womp.


I took a few pictures of the process of sewing the curved waistband. First, I chalked the seam line around the curve and sewed that before sewing the rest. I used a very small stitch length so I could navigate the curve easily. After sewing, I use my seam gauge to check the that the seam allowance is correct and then sew the rest of the seam. Then, I notch the curve...

And yes, I did have to redo a section on the other half!

and then trim it down.


After turning it out, I use my hemostat in the closed position to smooth out the curve, and then press!

ta-da!


I used my new favorite, the FM interfacing. The pattern called for interfacing waistband and facing so I went with the lightest weight option.

I was SO CONFUSED on the waistband instructions!!! I'd brought the magazine with me to our MinneSEWta meet up and intended to ask a fellow Burda user what she thought...but totally forgot. I finally decided to tackle it and just slowly went through it sentence by sentence. I didn't get as clean a finish inside as I'd like, but I get what they were instructing now.

The front waistband overlaps. They have you sew waistband and facing together first and then attach. But you have to attach the outside of the waistband, that facing, and the outside layer of the inner waistband while leaving the facing of the inner waistband free. It was very weird because once you're outside of that few inches on either side of center front, it's a "normal" waistband application. It took some finagling and I'm not even sure it's worth it! LOL! I slip stitched the upper curve but now I'm torn if I should remove the stitching or if I should slipstitch the entire thing down. If I made them again I'd just use a normal waistband.


I wasn't sold on the butt zipper but I'll take that over a side invisible zipper any day. I hate invisible side zippers.

I basted the side seams and tried them on and YAYYYYYY! I got the seams sewn and got everything pressed and did a blind hem by machine, and attached the facing to the zipper tape by hand.

And then proceeded to try them on a ton of times while bemoaning my inability to get photos. I finished these on SUNDAY!! The only reason I was able to get photos today is because I'm working from home. Because my car is in the shop. Because apparently Ford SUCKS so my transmission control module and clutch died. Even though I tried to get the KNOWN issue repaired several times. And they kept telling me it wasn't bad enough for Ford to repair. Even though there was a class action suit over the issue (which has been settled and is pending final appeals, etc).  So yeah, that's my day! AND THEN I was unable to find my remote. So I had to use the timer. Snap. Walk back. Snap. Walk back. WAHHHH! :)

I love it with the black and white sweater but not with these shoes. So I changed shoes and tried another top :)

my top is RTW...


I compared this crotch curve to my TNT V9032 and it was a very close match!! Also, Burda didn't suggest it (and they normally do...maybe only for fitted pants?), but I stretched the back inseam a bit. It really makes a difference.

Lastly, I added and used a 1 1/4" hem allowance as I knew I'd wear these with heels.