Pages

Showing posts with label Quilt. Show all posts

Monday, December 31, 2018

G.O.O.D.B.Y.E. 2018!!!

bleh.

That's how I feel about this year. Not that there weren't high points; but there were many, many, many lows. I am so over it. AND, I'm finishing out the year with the timing (I believe) on my machine suddenly going wonky on me and my old machine isn't working well.
So now I'm super cranky.

I haven't been reading blogs but I have seen the year-end posts rolling in, and it's one of my favorite times of year! It'll be nice to sit down and go through them all tomorrow :)

The big numbers!

  • 141.5 - Yards sewn
  • 78 - Garments sewn
  • 239.25 - Yards purchased
  • 33 - Patterns purchased

Somewhat interestingly, I sewed 39 garments Jan-June and 39 garments Jul-Dec! A lot more than last year (50) but last year I spent a few months not sewing because of my hand.

-Only 3 of those items were gifts - oops! :-p
-12 items that were wadders, fails, or ended up not working like I'd hoped and I have 1 actual UFO
-I sewed 6 garments specifically for events

I lost enough weight that I get why I had so much trouble with garments last year! I should have been sewing a size larger in most things. There are quite a few things that were purged this year and only a few that I am committed to altering.

2015201620172018
Chest37383936
Bust39.54041.7539.5
Waist34.2534.53632.5
Belly (navel)36.253940.536
Hip44.544.54643.5

Alrighty! Charts!! Yay!!!


  • Me and the tops. Eesh. 9 of them are out either because of fit, fabric, or just realizing I didn't like it much. That's 25%!  There were quite a few patterns I made multiples of too.
  • I had 2 dress FAILS. Remember Butterick 6551? I also hated the way the color blocked New Look 6301 turned out. I have a couple other dresses that didn't make it primarily due to fabric. I have one UFO because my stitched neckline was just HORRIFIC.
  • I made 7 pair of pants and 2 of those were for events/more one-time garments. 1 wadder, 2 that are too big and I'm unsure if I'm going to alter them. And one pair that's too big but I WILL alter them (Vogue 1522). So yeah, that category was kind of a bust.
  • 7 skirts and so many sad faces. The trench skirt just doesn't work. I love it but it's high waist and I find it hard to wear (maybe it'll be easier in spring?), but I'm also thinking it's going to be too big. My Style Arc Mindi is too big (wah). But SUPER big win on my Butterick 6464 black mini and the In House Patterns mini skirt that's waiting for pics.
  • I made 1 cardigan and didn't like it much (Ottobre)
  • My wonderful navy Burda coat (YAY!) and my black alternative to the Clare coat. I had this in UFO territory but there's no way I can fit it. I'm going to pull it out just in case...but I recall it being somewhat looser than I liked when I made it.
  • I made a host of garments for sleepwear and loungewear that are well-loved.


Not surprised by Burda mag / McCall's being the highest. I AM surprised that I made so few Simplicity patterns. They used to be a huge favorite. 

Indies sewn were:
  1. True Bias Ogden x2
  2. Grainline Felix
  3. Baste & Gather Birkin Flares (wadder due to fabric)
  4. Style Arc Mindi
  5. In House Patterns New York Mini


This is kind of a "throwaway". I realized I'd made A LOT of jersey knit items so I filtered by fabric to check it out. I included the pie chart because as you can see, about half of my garments were knits! (this didn't cover all 78 garments; just the major types).

My favorite garments this year may be surprising as some of them are things I FUSSED about!


First up, and not photographed (for obvious reasons), the 4(!) versions of the Gertie B6301 slip. I made 4 nightgowns and they get a workout! I love them!!!
Despite the ill-fitting bodice, that M7745 makes me happy every time I look at it!
I wore the Grainline Felix A TON this summer. I reached for it very often!
Butterick 6378 is such a nice blouse; I made a second one that still needs to hit the blog.
M7465. Swoon. This was a perfect marriage of fabric+pattern.
B6330 because it was just perfect. I wore this at least one day of the weekend like, every weekend after I made it! DBP is out for me though unless I'm making something that I intend to be warm.

This white tee was just another of those "this is super awesome because it's exactly what I wanted!"
My winter white mini is EVERYTHING!!!  That new Butterick? 6621? I am cutting out the 3rd version (yeah). My V1323 top was my 2nd most liked IG pic (behind the Style Arc/Mimi G dress!)
B6464 is another basic that just makes me happy! And finally my wool melton coat that got me through most of the early days of winter.


And an honorable mention to this 2 year old UFO! M7392 was started in 2016 and I got it to the point of needing buttons/buttonholes and belt carriers. EVERYTHING else was done, topstitched, etc...but I couldn't fit it. At all. I'm so glad I hung on to it!

AND I made two quilts!

LIVES on our couch! <3

This was a gift for a new baby in the family

That's enough for now!  I'll be back in a couple of days to discuss the goals/plans I made for 2018 and to set out goals for 2019!

Thank you all for your lovely comments on my last post. :-D

Have a SUPER FANTASTIC AWESOME NEW YEAR!!!


Monday, April 16, 2018

Burda 7136 v.5

I didn't realize I'd made this 5 times now!

v1 is no longer in my wardrobe. It was made from a tencel blend shirting, very nice fabric, but my flat-fell seams failed at one point.

v2 is decidedly "fall" colored but I still wear it. It's a wonderful flannel shirting in a plaid print.

v3 is the almost a fail chambray version that I now wear all.the.time.!

v4 was done in a green gingham seersucker. I did not care for the seersucker. I still have it but I never want to wear it, so it's in the donate pile.

I adore this one. ADORE!


When I made the first one I noted snug sleeves and made an adjustment. When I made the chambray one I almost wadded it because of the sleeves. Chopping them off to above elbow length and adding decorative tabs helped a ton. The sleeves on the gingham version were bad.

LIGHTBULB. The first version was made in 2014. This time I looked at my "sleeve adjustment".

what in the whole entire hell?!?

I don't know what I did or why I did what I did but it was WRONG. It was a super janky bicep adjustment and THAT'S why my sleeves were wonky! WHEW! I put the sleeve back together as best I could, traced off a new one and did a proper full bicep adjustment. Ahhhhh.

I also added 1" to this version. Adding length, I should have added a little more hip room (did we not JUST have this conversation!?!? Why do I forget that the junk needs more room?)

I wore it with the last button unbuttoned 

It's buttoned full here and you can see it's a bit snug on the hip. 
The left photo, and the pic below, shows off my horrible posture. Wahhhhh!


The fabric is a border print (haha! People kept commenting on "the two fabrics") from Fabric Mart. Spotted during sew camp before it was available to be sold. I ended up with 5 yards of it. What? (there's 8.5 yards left, NAYY shirting)

The border runs along the grain but after a discussion at sew camp I learned to do what you like but be consistent. So, I marked front and back accordingly and cut them on the cross-grain. The yoke and collar were cut on the cross grain as well. The sleeves, pockets and collar stand were cut on-grain. All of the pieces cut on the pink striped border were cut on the crossgrain.

I love these cuffs and the plackets. So much

The main buttons were too big for the placket IMO so I found a plain white button to use. I think it works out okay. The border wasn't wide enough for the entire cuff so I made sure it was on the interior of the cuff.


I set my pockets and looked at them questioningly and carried on. And then when I got the side seams sewn up, I realized how low they were. It is not fun to a) unpick pockets or b) sew them back on with closed side seams. Blergh. But I wanted them this time so I pushed forward!!

Everything is nicely lined up!
Pocket is cut on grain.
I did diagonal bar tacks on the pockets because why not?!


The only other departure from the pattern is button placement. I am a 34H. For serious. I never even bother to pay attention to where the pattern wants a button. I place button #1 at the fullest part and space them 2.5" apart on a fitted shirt, 3-3.5" on a less fitted shirt.  I decided to use smaller buttons on the placket and in hindsight wish I would have used the contrasting pink buttonholes there too!

Interior with burrito'd yoke, contrast interior stand and contrast buttonhole.

I mentioned on IG how quickly I got my buttonholes sewn.
1) we have established that I am a fast sewer (I do not rush, I just am that way!)
2) I have a dedicated sewing room which makes life so much easier. I marked the buttonholes Tuesday night.
3) I had about 30 minutes to kill before I had to leave home. In that time, I tested some buttonholes and (in 20 minutes) sewed all 13(!) for this shirt (7 front, 2 on each cuff, 1 on each placket).
4) my machine makes very nice buttonholes and are just a dream on cotton fabric like this shirting.

Lastly, people asked about my collar and asked for tutorials. I love my sewing peeps but I am not a teacher. I don't have "it". No one who knows me ever asks me to teach them anything...it leads to frustration for everyone! :-p

I will say that I can give some steps/tips as to what I* do (there are myriad ways to skin a cat...or sew a collar).

1) I rarely EVER staystitch but you better believe I ALWAYS staystitch necklines on collared shirts. This time I used my awesome new-to-me knit stay tape.
2) I never cut the collar pieces until I'm ready to sew them. I want to prevent the possibility of distortion as much as possible.
3) Once interfaced I trim the undercollar and interior collar stand by 1/8" where I want them to roll. I used to trim the entire thing but found I don't really need to. Around the curve on the collar stand and around the 3 "exposed" sides on the collar. This helps it roll.
4) I mark my pivot points on the collar and decrease stitch length as I approach to make it easier to stop exactly at that point. I also draw in the entire stitching line around the curve of the collarstand.
5) I PRESS(!) those collar seams open. Made SO much easier by my clapper from Carriage Corner.
6) I trim everything but not too much! I insert my thumb into the space and use my pointer to point the corners in and then wiggle until it's nice and pointy. I don't stick anything in there to push it or pull it. :)
7) topstitch the collar - The distance from the edge all depends on the look I'm going for
8) attach the collarstand to the collar. I do not press up 5/8" on the facing as instructed typically.
9) Once the collar assembly is sewn to the shirt, I trim that seam, press it up, and press the facing in place *just* over the stitching line. I secure it with Wonder Tape in a few places.
10) topstitch. DONE!

Clear as mud? :)

I searched for links but found none that encapsulated everything. But honestly, I almost never take a tutorial as-is. When I'm looking for techniques I usually find a few that look good (e.g. the finished product looks admirable, the instructions are clear, etc) and try them out. Eventually, I come up with some combination and tweak it over time. And that becomes "my" method.

When I went to Fray Check my buttonholes (which I always do before cutting them open), it was coming out very slowly. What did I do? I will tell you...I squeezed it. Of course I did!! So I ended up doing an impromptu load of laundry :-p It all came out. Yay! LOL!

"introspection"!

I'm so silly! :)

Up next, I may make a quick vacay outfit (McCall's 7757 - I bought the larger size, L/XL and the pants are HUGE. I think I'm going to use another pattern for the bottoms if I get to them) before starting the navy coat from Burda 8/2017.

And I got my quilt back!!! It's in the washer but I wanted to photograph it while there was sunlight.


I love this pattern <3

backing and binding (hand stitched this time)


Wednesday, March 7, 2018

Cricut Maker + Riley Blake + Me = A Baby Gift!

This is a sponsored post and contains affiliate links. If you purchase anything through these links or via the banner on my blog, I will make a small commission. 
All opinions are genuine and they are all MINE!

As previously discussed in this post, the biggest, most defining trait of the Cricut Maker is that it can cut non-bonded fabric. I knew I wanted to test the capabilities of the rotary blade and wanted a fabric-based project. As a garment sewer, there are some limitations. The largest mat is 12x24" which translates to 11.5x 23.5" cutting space. And fabric has to be cut single layer. But if you dabble in bag making or quilting...cutting becomes a breeze with the Maker.


I've been working on my daughter's quilt for a long (long, long, long) time. I realized I didn't enjoy the cutting process and certainly don't want to quilt on my machine. I don't find the sewing overly exciting but hey, that's routine for me!

Depending on your quilt, there could be some prep required. This Riley Blake quilt, which is free in Design Space, requires 1/3 yd cuts of most of the fabrics.


I had to clean up my yardage because, JoAnn (grr!)...

How does this even happen!?

...and then cut the yardage in half, resulting in pieces approximately 12" x 22".  Design Space will arrange the pieces for the most efficient layout. You do have the option of adjusting the cutting layout though if you have a different preference.

All of my fabrics cut perfectly until I got to the white fabric. It shifted as it fed back through the roller and I had to clean up a bunch of cuts. I'm going to blame the fabric and not the machine on this one considering I had cut out 6 other fabrics.


Look at all those beautiful squares!!

Also, I didn't realize how simple and straightforward this quilt was and had prepped a little 'map' so I wouldn't get confused:

snips of fabric and a little glue stick!

The estimated time of completion in Design Space is '3+ hours'. It took me about an hour to prep and cut - but honestly, I couldn't keep up with the machine. I was using 2 mats and it took me longer to clean up cuts and prep them than it took the machine to cut.

It took me another 3 hours to assemble. But again, it was me being super vigilant because it seemed so complicated! :)

I loved all of this order!!!! :-D

Once the top was completed I toyed around with binding options, settling on a dark blue. I loved the way it framed the front and it was a nice complement to the backing fabric. 


I knew there was no way I was quilting it myself and figured the small size would mean it wouldn't be too expensive to have it quilted. I chose this loops & stars design as I felt it was a good match for the baby quilt. 


The quilt shop employee suggested this color thread; I don't hate it but I wish I'd gone with the lighter grey.

The blue polka-dot fabric is my absolute fave <3

I plan on making a couple of items to gift with the quilt...There were some Burda baby patterns that were just too cute but I'm unsure about their sizing. A friend sent me a sleep sack that's a free pattern so I may whip up a couple of those. Also plan to make some cute onesies with appliqué or HTV and yep...will use the Maker to make it happen. Who doesn't love adorable, ironic baby onesies?!

I love the way the quilt turned out and as you know, I cut a new quilt out (and finished the quilt top!) using the Cricut and am excited to show that one off when it's done.


This is a sponsored conversation written by me on behalf of Cricut. The opinions and text are all mine.

Wednesday, February 28, 2018

February Wrap-up and March Plans

This month I made 3 items and have 2 in progress; for a total of 12.5 yards.
  • Burda 01/2018 #119 - 2 yards
    • mustard sweatshirt knit
    • notions: twill tape, eyelets, zipper
  • Burda 07/2017 #106 - 3 yards
    • Ankara print cotton
    • notions: zipper, piping, hook & bar
  • Burda 02/2018 #107 - 1.5 yards
    • animal print ITY knit
  • Vogue 9032 - 2.5 yards (wip)
    • heathered taupe RPL
    • notions: zipper, bias tape, hook & bar
  • Burda 09/2011 #114 - 3 yards (wip)
    • black wool coating
    • notions: zipper 
  • I also finished the baby quilt! It'll be posted on March 5th!
Favorite: Burda 7/2017 pants. They just turned out exactly how I expected. <3

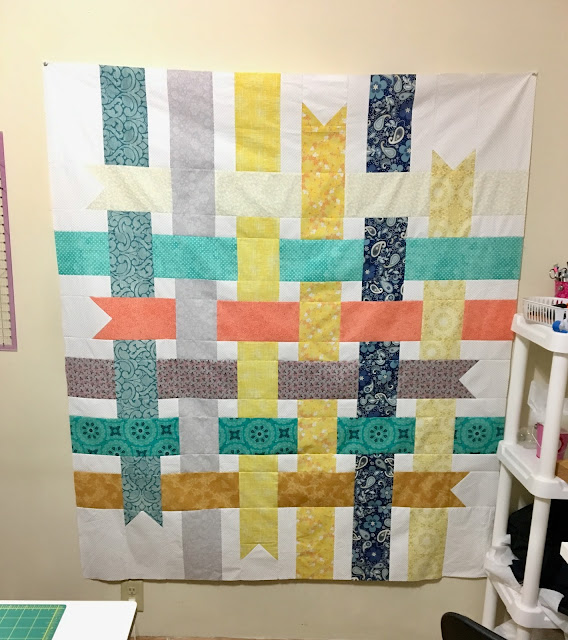
FAILS: I think I used the horsehair canvas in places I wasn't supposed to on the Burda coat. I think it'll be fine but we'll see. I wanted to have it done by Saturday but I'm not sure if that'll happen now. Lots going on right now and I used my quilt as a distraction. (Pattern is the free! Ribbon Box Quilt)

way more yellow than I would have consciously chosen; but I wanted to follow the original scheme closely to make my life as a non-quilter, easier. I'm going to go with a teal-ish color for the backing and coral for the binding. I wish I had more coral in it!

Accomplishments: I have been having a lot of 'make it work' moments! LOL!! Maybe that's just the mark of becoming a better sewer.

Month 2 of not buying any patterns! WOW! I chose the right way to 'fast' *for me*. I am allowed 18 patterns this year so I have to think carefully before jumping on anything. Yay me!

The only fabric purchased in February was the 3 yards of Ankara for the pants. YAY me! We'll see how March pans out :-p

February looked a lot like January in terms of Operation 365.

I wore pants 20 times. I wore BLACK pants 6 times! LOL!  I recently commented on a blog post about personal style and neutrals. My neutrals are navy, charcoal and black. Once I started to think about it, I realized I have (in black):
1 pair of wide leg trousers
1 pair of wide cropped pants
2 pair of slim fit ankle length pants (one pair is VERY stretchy and I don't wear them often)
1 pair of slim ponte pants (V1411)
1 pair of tapered ponte pants (S2061)

I had lots of 3-piece dressing again; 12 times. My favorite looks from this month:
B5678 shirt, RTW slim ponte pants and denim jacket
B6427 tee, B6169 floral jacket, RTW jeans
M7538 top, RTW blazer and jeans (*fave*)
B5926 blazer, RTW top and pants
S1499 vest, V1411 pants, RTW tee

March plans:
Once I finish the Burda coat and Vogue pants, I hope to make:
  • Burda 8/2017 off the shoulder top
  • Simplicity 8216 blouse 
  • Ottobre 2/2018 tee (I actually want to make this in a black & white stripe and plan to shop of the fabric on my trip).
And then SEW CAMP (Carriage Corner B&B Sew Camp)!!! WOOT WOOT! 

I pretty much plan to make my trench coat while there. I figure it's a good project for the trip. I hope to have it fully cut out and have all parts interfaced that needs it; and be ready to sew. I'll also bring my poor daughter's long-neglected quilt to finish piecing. I'll also bring a couple of other just-in-case-I-get-tired-of-my-trench-coat-project projects.