Pages

Sunday, August 25, 2024

Sewing Plan and Fitting: New Look 6692

I had plans to refresh my loungewear wardrobe when a knitting friend invited me to shop her stash. She's long since retired and had a wonderful stash of nearly 100% natural fibers and I scored on wools and silks of all weights, colors, patterns and prints. Woohoo!!

I detoured from my detour and decided to make a summer dress that could transition to fall. I think the color and length allows it to be worn with sandals and when the air is a little crisp, with a cardigan, denim jacket, and booties. 

I am sewing view A in a floral rayon challis that has a mustard background and red, white, and blue in the flowers. 

New Look patterns work really well for me and don't require a lot of adjustments. I cut a size 14 and graded the back bodice to a 16 at the waist and cut a 16 skirt back. I shortened the bodice 1" through the back and on the side front, 1" at the side seam tapering to nothing at the princess seam. 

The pattern calls for 12 rows of elastic sewn into casings. I don't know if you've ever sewn more than 2 rows of elastic in a casing, but it gets progressively difficult. One, I just didn't want to do that. But also, WHY NOT JUST DO SHIRRING?! I cut my panel, shirred it, and it was a tiny bit smaller than the pattern piece, but the shirring is super stretch and it's fine. Worth noting that the casings were 1/2" wide, I shirred it at more like 3/8" and just kept making rows until I got to the bottom that's meant to be left plan. Then, you hit it with a shot of steam and watch it draw up. It's fun! haha! Speaking of stretchy shirring, I eliminated the zipper. I didn't find it necessary with that and the gathered skirt.

My fabric was really, really shifty and I kept having to re-find the grainline and wasted fabric. I didn't have enough for the sleeves and 3 panels for the lower flounce. But, the flounce is just a rectangle! It measured about 17.5" (cut on the fold), for a total of 52.5" folded of fabric. Well, my fabric was at least 58" wide so I just cut two 26" lengths on the fold. 


Current state, it needs side seams sewn, flounce hemmed, gathered and attached, and sleeves inserted. Final step will be to stitch the bodice lining to the skirt. 

I have NOT enjoyed sewing this pattern. It has been a real slog and I almost quit. Luckily, I tried it on as best I could with a partially constructed garment and it is REALLY cute. 

Tuesday, August 13, 2024

Machine Knitting - Minnesota State Fair Entries!

The MN State Fair is apparently the second most-attended fair in the country behind Texas' state fair. It's a big deal!

I'd only been to the fair a few times, ever, and while I'd visited the Creative Activities building, and ooh'd and ahh'd over the things hanging up, I never thought I would have anything hanging in those display cases! When I joined the machine knitting group, I learned that we had many members who had won many ribbons over the years. Two years ago, I knit my best pair of socks and everyone was like, "you should enter them into the fair!" and I thought they were gassing me! HA! Well, I won a BLUE RIBBON for those socks! 

Last summer, it was all house stuff, 24/7. So I didn't submit any entries. But I knew I wanted to a) submit some things this year and b) stretch myself on those projects. 

Now, important to note that you can submit anything made within 3 years. But, I know I'm not going to submit something that I've been wearing regularly, so I plan to make the things I'm going to make. Registration is due a couple weeks before the drop off date so it's best to over-register and under-deliver. I registered for 6 categories this year:

  1. Baby 0-2 
  2. Winter accessory (hat, mittens, gloves, etc)
  3. Pullover sleeveless adult sweater or vest
  4. Adult suit
  5. Pullover plain adult sweater (can include stripes)
  6. Pullover textured adult sweater (like tuck or lace)

I submitted to the first 4 categories. I had a cute top going for the 5th but had yarn bleed and decided to cut my losses on that project. I will finish it, because I like the top, but it wasn't going to be "right" for entry so I moved on. 

I intended to make a garment for the textured category but ended up submitted that item to the sleeveless category. 

1) For the baby outfit, I used a cotton yarn - three strands of very fine cotton loosely twisted together. This yarn did not want to do ANYTHING other than stockinette. It knits up beautifully though!! But tuck, garter, all those other things were out of the question with the individual strands of yarn. The machine hated it. It's a size 6 months (approximately). I never worry too much about baby outfits. If gauge is close enough, that's good enough. It's a baby. Chances are it's a very short term wear and it's more about the thoughtfulness. 

I did an envelope shoulder for the first time and I DID TWO DRY-RUNS and still did the shoulder backwards. ARGH! When working on the machine, you're purl side facing, and I mixed up the directions. So that might prevent a 1st place win but maybe 2nd :) (they judge harshly! LOL!)

look at those tiny poms! (made with a fork!)

2) Next up, I intended to make a pair of fair-isle mittens and at the last minute, pivoted. I wanted vertical stripes without knitting sideways and worked out how to do it and knit a couple samples and LOVED it. Woohoo!!!! I used scraps of sock yarn that was in my stash but now I want to buy yarn for the style and make up a handful with different color schemes. A couple friends have expressed interest so they shall have them. 

I'd had a few false starts with the hat and then somehow talked myself into going into the craft room at like 9:30 p.m. I then made changes to the sizing on the fly (sigh). I added 8 rows of ribbing (so another inch) and instead of knitting 10 rows of each color change (also an inch -ribbing knits up a little tighter), I went to 12 rows. Well, that 2 extra rows x 6 changes = 12 rows or a little over an inch. So now I've added 2 inches to the "height" of my hat. DOH! But it's still CUTE!


3) One of my goals this year was to start using my mid-gauge machine more. It is so handy in that the stitches are SO much larger than the standard gauge, it's easier to do some hand-manipulation...but it's a plastic bed machine and doesn't have a ribber or electronics or anything. I bought a few projects worth of DK and Worsted yarn for the purpose.

I picked up this Plymouth Yarn Sea Isle (in Lime) on a recent trip to Chicago from Wool & Co. It's a chainette pima/merino blend so it's super squishy! I thought the lace motif would really stand out in this yarn and I think I was right! Initially, I'd planned to a cable on each side of the lace but decided to let this design shine on its own. 

The lace is all manipulated by hand with a transfer tool. AND I was talking to a friend while working on it! That means it's SUPER easy! lol!!! When I do short row shaping, I still have to pause my music and focus really, really hard on what I'm doing. 

This photo is before I weaved in all the ends and gave it a final steam, but showing it on Lily gives a better idea of fit (though Lily is a little larger than I am so it is a loser fit)

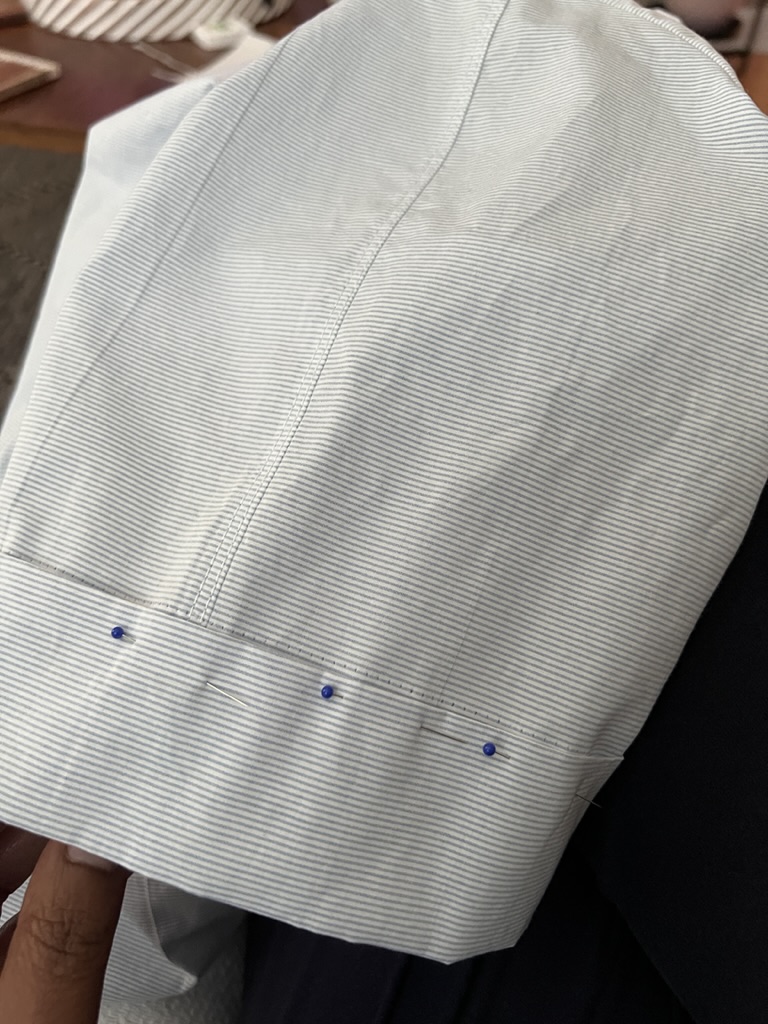
4) The woman that sold me my machine and gave me my first few lessons was a designer and test knitter for St. John. She also designed a pant pattern to sell (cough, cough). I was determined to make the pants and bought a 1.5 pound cone of wool/rayon crepe yarn in suede from Made In America Yarns for the purpose. I'd bought a second BIG cone (that's what they call 'em) in eggplant to make a skirt and cardigan. Well, I was halfway through the top before thinking, "so interesting I bought this and I don't normally wear this color..." Well, that's because I bought it for PANTS. oy! 

I created all of the garment patterns in the Knit it Now software. You start with a base pattern, input custom measurements and yarn gauge, and it creates a pattern.

I decided on this round neck, fitted top but wasn't 100% on the "right" measurements for each section. Yes, I measured myself and it all seemed fine, but it is a little longer than I'd typically wear, so that's something to keep in mind. I have a short torso and do not like to wear longer length tops for the most part. 

The skirt is a straight skirt with minimal shaping on the lower half (I think the bottom hem is about 1" narrower than the hip). I used about 2 inches of negative ease in the hip and 1" positive ease in the waist. IT LOOKS SO CUTE ON! I don't have pics though (because it was nighttime and dark and I'm not wearing a bra so those will stay in the photo album!) until I get it back from the fair. 

I did ribbed hems on the sweater (1" on the bottom and about 3/4" on the sleeve) and I did stockinette with picot edge for the neckband. The skirt is finished with a hung hem (essentially a fold-over hem). 


It's not quite finished though (shhhhh). This yarn wants to be steamed hard. That brings out the drape and softness, but I couldn't risk it not drying in time, so I lightly steamed after wet-blocking. But look at this pic before blocking or steaming:
steaming really brings this yarn to life!

Here is the in-progress sweater that was going to be entry #5. It wasn't until I was about to stitch down the neckband that I realized the center stripe on the front had bleed from the olive yarn. It is REALLY discolored compared to the bright white band :/


The other issue that caused me not to submit this one, with this being a sideways knit, you cast on a sleeve, knit to the body, cast on for the body, knit across, cast off the body, ,knit the sleeve, cast off the sleeve. I have done this but only on a round neck, never a v-neck. 

Do you see it??

The first side has nice, fully fashioned decreases. The second side is messy by comparison. I'll ask my knitting group if there's a fix for that. I *think* I know what it is but want to verify. 

And don't mind that messed up stitch in the band on the left, I will fix it when I stitch down the band :)

Now that that's done...whew! I have some SEWING to do! 

I was given a whole bunch of amazing wools and silks from a knitting friend's stash and I am still sorting through it all, but have already identified 3 must-have-now garments from the fabrics. More soon :)


Monday, August 5, 2024

Fitting and Construction: Butterick 5526 (B5526)

So, score for me not having to cut the pattern out! For me and my myriad hand issues, this is a major win! Sometimes, cutting the paper pattern is a one-day activity because I "use up my hand" doing that task and have to wait before moving on to cutting fabric.

I'm almost 5 years post-reduction (OMG WHERE DOES THE TIME GO!?) and I'm slightly larger than I was. I could probably use a tiny FBA on things...like less than 1/2" for an additional 1" total, so I don't bother. I often just shape the side seams a little bit. 

In the case of this casual top, there is no dart control (no darts or gathers), and I intended to add a bit (3/8") to the side seam at the bust, and forgot. Ah well. It'll be fiiiine! 

(this is one of the benefits of being more experienced, I'm able to decide what to fuss on and what not to)

I did a rounded back adjustment of 5/8". This is standard for me with Big4 patterns. I open it at the neckline -- this dart is usually about half the width of the opening at the center back. You can sew the dart shut, in my case I leave it and just ease it into the collar. For some garments or fabrics, I alter the collar to fit this additional width. 

I also wanted to remove some of the sleeve cap ease and consulted two sources. 

Threads used a method by Sarah Veblen where you walk the seam and note the excess, add back an appropriate amount of ease, slice it through, add seam allowance, and sew the seam. 

I trued that bad curve when I cut the fabric

David Coffin similarly has you walk the seam, remove the excess ease, but has you sew this dart closed. 

I decided to add the seam and topstitch it for a decorative effect. 

BUT I MADE A MISTAKE. oy! I noted the excess ease but did not add back ANY sleeve cap ease. I know there's some discussion around the necessity of sleeve cap ease and while I think most Big4 patterns do include an excessive amount, I don't know that zero ease is always appropriate. Considering this is a semi-fitted, casual fit top, the amount of ease seemed over the top. So even removing it all (accidentally! haha!), does not result in a too-tight fit. 

Lastly, I don't care much about front pockets on shirts so often opt for just one, on the left. Other times, I include them both pretty much to cover the dart ends. Ymmv. The pocket is standard construction, stitch the upper part, turn it out, and then fold in the seam allowance and topstitch in place. I did note a review by Lladybird where she mentioned how high it was and I agreed when holding the pattern piece up to Lily...I lowered the placement by 1 inch. Wonder Tape is everything but for pockets, a good old fashioned glue stick works very well too!

My preferred order of construction for shirts:

  1. darts (n/a in this case)
  2. front pockets (if applicable)
  3. serge hem
  4. front placket, including turning out hem
  5. shoulder seams (sew and serge)
  6. fit side seams
  7. side seams (sew and serge)
  8. sew hem
  9. sleeves (fully assemble including cuff if a long-sleeve pattern, sew and serge)
  10. attach sleeves to body (sew and serge)
  11. cut and prepare collar and stand (I don't even cut the fabric out until this point and always block interface a piece of fabric and cut the stand from that since there's some bias in this piece)
  12. attach collar
  13. top stitch collar stand (sometimes I topstitch the collar, sometimes I don't)
  14. sew buttonholes and buttons
When sewing the placket, I traced in the fold lines on the right side of the fabric (be mindful of your marking tool e.g., marker-like tools will make a thicker line). I use my seam rule and this line to ensure accuracy. And here is a quick nod to PRESSING. It is game-changing!


At the hem, I fold it back and stitch at 5/8". I trim it to a scant 1/4", clip the fold, and turn it out. I do not poke anything in anywhere or any of that! There shouldn't be a need for poking and prodding. 

blue annotation because I forgot to take a photo of trimming

Another tip - always mind your markings. Notches and such exist to ensure pieces match where they should. The only time I'll ignore markings is when it is literally two straight pieces coming together and I know they have to be the exact same length. Whenever there is any shaping, curves, etc., I make the appropriate markings and am sure to match up. 

Here on the sleeve, you can see where I matched the sleeve to the body, exactly. 


On the collar and collar stand, I use the pattern markings plus drawing in the seam allowance (this was done with a fixion pen for accuracy) to ensure everything is sewn properly. Fold the seam allowance up on the interior collar stand before sewing, again, to ensure you are accurately stitching at 5/8". Because this is a bulky amount of fabric, I trim this seam with pinking shears after pressing it up. Be careful with trimming - you don't want to remove too much fabric and with it, the integrity of the pieces. Lastly, Wonder Tape to the rescue! Once the collar stand is attached, I use wonder tape to hold the interior stand in place. Using my walking foot and a slower speed, I topstitch the stand. I usually start in the middle so I can navigate the curves of the collar stand more easily. 


When I tried the shirt on, I hated the sleeve length! Using a scrap piece of fabric, I played around with the idea of sleeve bands and really liked the look. Deciding on a finished length of 1 3/4", I cut pieces 4 1/2" wide (adding seam allowance) and longer than the sleeve opening since it would be a little more difficult to accurately measure the sleeve in the round. I then pinned the band into the sleeve opening to ensure an accurate measurement. I used my walking foot to topstitch the band. 


I need to do the buttonholes and sew the buttons, but that's a straightforward task for my machine. If you struggle with buttonholes and your machine, be sure to read your manual and follow the directions there, run a test buttonhole or two, use tear away stabilizer if needed, and be patient! 


When choosing between two buttons, I'll stitch them on loosely like shown, and come back to it later, deciding pretty instantaneously which one I prefer. I'm going with the smaller button on bottom.

The shirting is a bit crisp, as cotton shirting tends to be. My trick to this is to add the item to my laundry EVERY time. Even if it I haven't worn it. It helps break it in a little faster :)

Watch for finished photos in a bit! 

Next up, I am making a slight detour from the plan in my head to sew up a few pair of lounge/pj shorts and maybe a nightgown or two. In 2016 and 2018, I made a bunch of loungewear and it's about time to refresh. 

I'm also knitting up a storm, working on State Fair entries(?). 

More, later!