
But...but...but it just WORKS! :)

The moment I had an accepted offer on my house, I started sketching out plans to build the cutting table of my dreams. I knew I was going to be making space for woodworking at the house and was R E A D Y.
Planning:
I was pretty particular about the style of table (okay, fine, I'm pretty particular about almost everything), and some of the more popular folks' versions weren't my style. Last June, I posted to IG discussing my table plans, with a rough sketch of what I had in mind. From that post:
📌 I was really excited to build a table from scratch. But woodworking is harder than it looks (I know there are some plans using 2x4s and corner braces but that’s not what I want please don’t suggest that tutorial 🤣)
📌 And I didn’t really want a Kallax base either…but then it dawned on me that most of them felt “off” but that’s because a lot of people don’t have any overage/extension of the tabletop off the base, or lacked clearance underneath.
📌 My folding table from JoAnn died with moving things out of the room for the floors. It just tipped over. Lol! It’s okay but not solid, the bottom leg is no longer straight. But, I got that table in summer 2014!!!! 10 years?! I got my money’s worth! So I need a table like…NOW.
📌 IKEA has gotten so expensive. The 2x4 Kallax is now $79 and the 2x2 is $45. Plywood and lumber costs are up too. (Another consideration with building as I’d want to use cabinet grade plywood and a sheet is EXPENSIVE).
📌 So I’m going to use two Kallax 2x4 units on a plywood base. This gives me a surface of 30 1/8” x 57 5/8”. I’ll top it with a sheet of melamine (once everything else in the room is in place, I’ll tape off a 42x72 area and a 45x76 area. If I can comfortably adapt the larger size, I will). I am 5’5” (and a half!) but have a short torso and longer legs (respectively). 36” is minimum cutting table height for me. So I hope to find 5” casters. The other option is a plywood sheet between the Kallax and the melamine for an additional 3/4” and then use 4” casters. I’ll let costs drive that decision.
📌 The left shading indicates plywood on the side to hang a pegboard and roll holders for my tracing paper (as an avid Burda mag sewer, this is a must-have).
📌 I don’t really *need* the additional storage a Kallax provides (my basement is 14’x28’!!) but will move some things to the cutting table to store, like interfacings or tools that are primarily used at the cutting table.
I had this long, ongoing discussion with a sewing friend where we were plotting out our tables. We essentially wanted the same thing and were constantly discussing components, pricing, etc. :) The more I researched, the more I realized it was going to cost a lot more than I thought. Plywood is expensive. Good casters are expensive (and you need so many to properly support the thing!). It was going to cost quite a bit to make this happen.
Then one day I had a lightbulb moment. The 4x2 Kallax has a base/stand available. Wanna guess how tall those legs are? Go head...guess.
...
...
FIVE INCHES. Woohoo!
And, I have been so accustomed to the idea of having the table on casters, that I hadn't considered building one without them. My basement is 14ft x 28ft. In this space, I wouldn't be moving it (and in fact, hadn't moved the other table that WAS on casters a single time in the prior 18 months). Having my table on wheels was not a necessity and that made the Kallax make even more sense.
My plan was to use two of the 4x2 Kallax with base ($109 each) and a sheet of melamine ($60). But then, my world imploded and nothing else mattered so yeah...I got all the things.
Structure:
Important to note: My minimum required height was 36". The finished height of the Kallax in this orientation is 30 1/8". The finished height with the base and legs is 37". Before I got the sheet of melamine, I kept saying, "wow! this is perfect!". The only reason this wouldn't work as-is is that the overall size of the cutting surface was only 30 1/8" x 57 5/8" -- Not a giant cutting table of awesomeness. 3/4" sheet goods have a nominal width of around 0.7". So now my table is about 37 3/4" which is *just* a bit tall. Keep this in mind if you are shorter.
Standard measurements for sheet goods is 4x8 feet. Many stores say they'll provide one cut for free. I'd measured out floor space as mentioned and decided that 48" wide would be overkill, but I'd do it if I had to. I have the tools at home to cut melamine but 1) it was the middle of winter and 2) cutting melamine is a bit more of a skill than wood. I really waffled on the finished width and ultimately decided to leave it long enough that I could choose to add a 2x2 Kallax to the end later if needed. I bought my melamine from a lumber yard (it was the same price everywhere-Home Depot, Lowes, Menards, and the lumber yard), but I figured the cutting would be better and more precise there. The additional cut was only $10, so worthwhile to do. I decided on a finished top size of 42" wide and 76" long. Yall, it's glorious!!!
My top is not attached to the Kallax. A full sheet of melamine weighs about 90lbs. Since mine is a little under 3/4 the size of a full sheet, I estimate it weighs 60-65lbs. I purchased that tacky, rubbery shelf liner from the Dollar Tree and my top does.not.move. Lastly, I decided not attach the the two Kallax's to each other at all (some people use mending plates or straight brackets to connect them). Leaving them separate means it's easily disassembled, but it does not impact the stability.

Accessories:
I knew that I wanted a pegboard for all of my tools, and I also wanted a paper roll mounted to the side (I sew a lot of Burda magazine patterns!). I was going to "wait and see" on the Kallax accessories (link to IKEA accessories, not monetized), but as mentioned, went whole hog.

Now, if you're keeping track, I have about 12" of overhang width-wise and a little under 18" length-wise. It took a couple tries to get the overhang on the working side right. Even though I have had a free-standing table for a while, I primarily work on one long-side of the table, accessing the surface from other sides as needed.

On "my" side, I have 4" of overhang. I have the wave doors on the two left cubes (top and bottom). The two upper center cubes I have the divider that splits into two, and on the lower two cubes, I have Drona boxes. On the right side, I have the wave drawers.

On the back side, there is 8" of overhang and I have four Drona boxes in all of the lower cubes.
On the side open to the room, I have two Skadis peg boards. Initially, I purchased the large 30x22" Skadis. It would span the width of the two Kallax shelves and extend about 2/3 of the way down the side. While you can screw into the upper parts of the Kallax (pretty much in the same area where the attachment screws are), I really didn't want to as they can be reused individually at any point currently. So I exchanged that for two smaller versions, each 14x22", attached with 20lb 3M Command Strips. Each of the Skadis boards weighs less than 3lbs and I figured at most, there'd be another 3-5lbs loaded on them. So far, so good. They feel very secure and are holding up well.
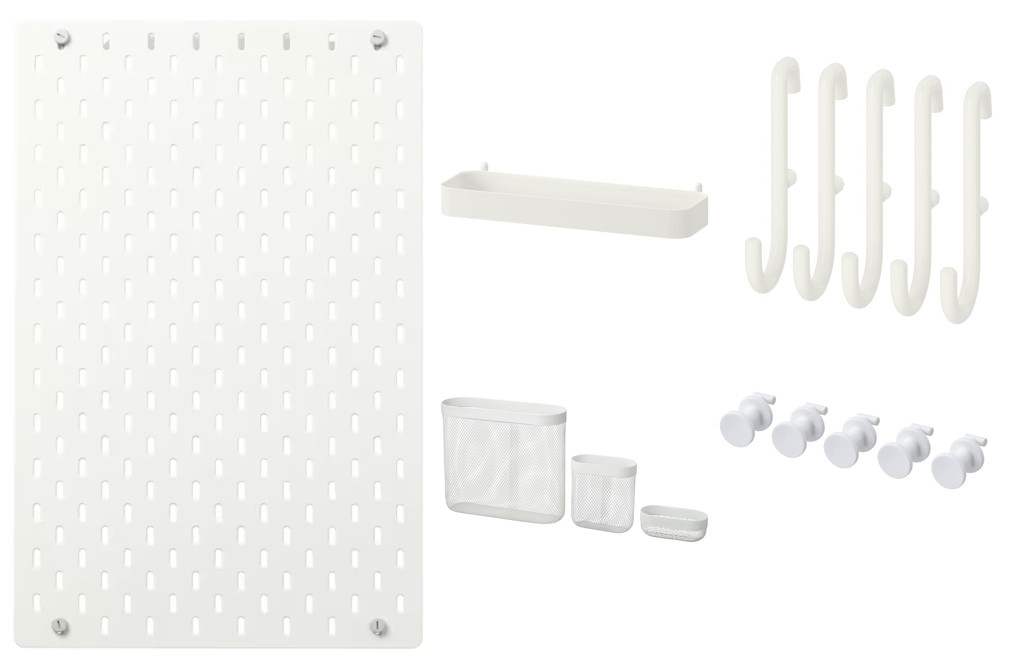
For the pegboards, I felt like I bought nearly one of everything, lol! The components are so affordable, and there are so many options available, you can find exactly what you need to organize your things. The rest of my containers inside of drawers and doors are from Dollar Tree - my store has such an amazing selection!


Assembly:
I find IKEA items the absolute easiest to assemble of any ready-to-assemble furniture. It is almost always smooth sailing and things go together quickly. I assembled the frames and Kallax's in one evening. I tackled the doors and drawers the next day. It is CRUCIAL when assembling the doors that you mark everything as instructed. Ensure that you can open and close the door with the hinges in position before screwing everything in place. After the first one, the other one was a piece of cake.
My kid's dad was in town and while my son and I could have managed the melamine sheet, I took advantage of having the two of them here and rented a truck from Home Depot for $19 (mileage is free up to a certain amount and the distance from HD to the lumber yard to my house and back to HD is less than 15 miles, so whatever it was worked fine!). Below, I have melamine recorded as $51. It was $71with the additional cut fee and tax, but my son, intent on contributing something, put $20 toward my melamine. He's adorable :)
Once the table top was positioned, and after he continued to exclaim that there was NO WAY I needed a table this big, I applied the edge banding to the melamine with my iron and parchment paper to keep the iron free of adhesive. Recommendation: Apply it flush at the top and trim the bottom. I trimmed the top and had to use a putty stick to fill in the parts that went wonky. The melamine banding and putty stick came from Lowe's.


Cost:

Organization:
I have only wished I had a larger cutting mat once or twice. Initially, I was very fixated on the whole surface being covered. I don't think that's necessary. The Olfa mat comes in a larger size, but it is clipped together, which doesn't sound like a good option for a garment sewer. My current mat is 2 x 3 ft. I am leaning toward buying an 18x24 mat to extend my cutting surface when needed and once my current large mat wears out, springing for a custom 3x4 ft mat.
On the working side, I have pens and pencils, marking tools, seam gauges, tracing paper, transfer paper and wheels, Wonderclips, extra pins, etc. One of the two Drona bins holds all of my interfacing, the other is empty for now.
On the other side, the lower Drona bins hold: (1) lining fabrics (2) large scraps (3) muslin (4) empty for now
The pegboard holds all of my scissors, rotary cutters, and rulers. I added a quilting ruler holder to the tabletop as well.
While I had no intention on spending $500 on a cutting table, it is everything I could have wanted. It has been so nice to have ample surface to cut my projects (I'm working on a coat now!). I have all the storage that I need (and more!) and have no concerns over the long-term stability of the table. The only concession I made was not having my tracing paper mounted.


11 comments:
Love this
! How exciting! This was David Page Coffin’s favorite mat when you’re ready to splurge. https://bigmatrotarycuttingsurface.com/?srsltid=AfmBOoqSt-GqlCaKHUvmGd2F8imkT1_fW4rTC-Gx32miBqb36_6bbuEv
Love love love everything! The planning and preparation truly paid off and now you have an awesome cutting surface. The pegboard with compartments is a great idea, too! I'm happy that you're happy with it. =)
Oh and that height on the table is *definitely* noticeable on my 5' frame. Ya girl has to streeeetch. LOL
Very nice cutting table! The rest of the room in the background looks good too. I hope we get to see the rest someday. How many knitting machines do you have now - I think I see 3?
Love your new table! I lost my large cutting surface and have been planning and scheming how I could build a new one....you figured it out for me, lol. I will definitely be using some of your ideas. Thanks for sharing!
Thanks, Sue! I found that site. The one thing that I prefer about Olfa mats is the 1/2" marks. And I don't like that BigMat has random finished lengths. LOL!! The 4ft map only has 43" worth of markings.
Hahahaha! STRETTTTTTCCCCHHHHHHHH! Thank you for hours of brainstorming :-D
Thanks, Gail! I will! I'll have to get some pics on a nice, bright day. I really enjoy my space.
I have three set up at all times - my standard gauge (used most often), a bulky, and a mid-gauge. I ALSO have another standard gauge, a duplicate of the bulky (given to me), and my old standard gauge that I'll be looking to sell soon. It's so crazy how they propagate :-p
Thanks, Lisa. Good luck with your table!!!
Ooh I am so jealous. I don't have enough space for a permanent cutting table, so I make do with a collapsible one. Hand knitter here: knitting machines can't switch between yarn gauges? Learning something new every day... I thought you could put any yarn in any machine.
It makes me so happy! :)
Nope!! There are four gauges: fine, standard, mid, bulky.
Worsted, Aran and some chunky yarns on a bulky (yarn size 4 and 5 and mayyyyyyybe some 6).
Sport, DK and some worsted on a mid (yarn size 2, 3, 4)
Lace and fingering on the standard gauge (yarn size 0 and 1). You can knit some sport weights on the highest tension. Usually cone yarn made for machines since it’s oiled.
Fine gauge machines are rare and expensive. You’re talking knitting stockings or something. So thread weight yarns. Not common at all on the domestic side!
Wow. I am speechless in Minneapolis!
Post a Comment