Pages

Wednesday, February 28, 2018

February Wrap-up and March Plans

This month I made 3 items and have 2 in progress; for a total of 12.5 yards.
  • Burda 01/2018 #119 - 2 yards
    • mustard sweatshirt knit
    • notions: twill tape, eyelets, zipper
  • Burda 07/2017 #106 - 3 yards
    • Ankara print cotton
    • notions: zipper, piping, hook & bar
  • Burda 02/2018 #107 - 1.5 yards
    • animal print ITY knit
  • Vogue 9032 - 2.5 yards (wip)
    • heathered taupe RPL
    • notions: zipper, bias tape, hook & bar
  • Burda 09/2011 #114 - 3 yards (wip)
    • black wool coating
    • notions: zipper 
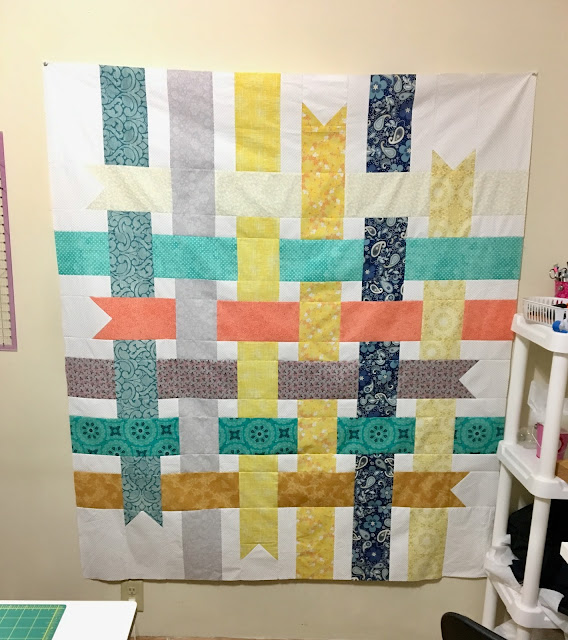
  • I also finished the baby quilt! It'll be posted on March 5th!
Favorite: Burda 7/2017 pants. They just turned out exactly how I expected. <3

FAILS: I think I used the horsehair canvas in places I wasn't supposed to on the Burda coat. I think it'll be fine but we'll see. I wanted to have it done by Saturday but I'm not sure if that'll happen now. Lots going on right now and I used my quilt as a distraction. (Pattern is the free! Ribbon Box Quilt)

way more yellow than I would have consciously chosen; but I wanted to follow the original scheme closely to make my life as a non-quilter, easier. I'm going to go with a teal-ish color for the backing and coral for the binding. I wish I had more coral in it!

Accomplishments: I have been having a lot of 'make it work' moments! LOL!! Maybe that's just the mark of becoming a better sewer.

Month 2 of not buying any patterns! WOW! I chose the right way to 'fast' *for me*. I am allowed 18 patterns this year so I have to think carefully before jumping on anything. Yay me!

The only fabric purchased in February was the 3 yards of Ankara for the pants. YAY me! We'll see how March pans out :-p

February looked a lot like January in terms of Operation 365.

I wore pants 20 times. I wore BLACK pants 6 times! LOL!  I recently commented on a blog post about personal style and neutrals. My neutrals are navy, charcoal and black. Once I started to think about it, I realized I have (in black):
1 pair of wide leg trousers
1 pair of wide cropped pants
2 pair of slim fit ankle length pants (one pair is VERY stretchy and I don't wear them often)
1 pair of slim ponte pants (V1411)
1 pair of tapered ponte pants (S2061)

I had lots of 3-piece dressing again; 12 times. My favorite looks from this month:
B5678 shirt, RTW slim ponte pants and denim jacket
B6427 tee, B6169 floral jacket, RTW jeans
M7538 top, RTW blazer and jeans (*fave*)
B5926 blazer, RTW top and pants
S1499 vest, V1411 pants, RTW tee

March plans:
Once I finish the Burda coat and Vogue pants, I hope to make:
  • Burda 8/2017 off the shoulder top
  • Simplicity 8216 blouse 
  • Ottobre 2/2018 tee (I actually want to make this in a black & white stripe and plan to shop of the fabric on my trip).
And then SEW CAMP (Carriage Corner B&B Sew Camp)!!! WOOT WOOT! 

I pretty much plan to make my trench coat while there. I figure it's a good project for the trip. I hope to have it fully cut out and have all parts interfaced that needs it; and be ready to sew. I'll also bring my poor daughter's long-neglected quilt to finish piecing. I'll also bring a couple of other just-in-case-I-get-tired-of-my-trench-coat-project projects.


Sunday, February 25, 2018

Burda 02/2018 #107


I expect we'll see a lot of this pattern. It's quick and easy and fun. It looks far more complicated than it is...lots of bang for the buck.

This pattern is worth going for a wearable muslin. I love this print - LOVE. But this is one of those ITYs that feels...something. It's not completely icky but I don't think I'll be able to wear it once the weather warms up. But the pattern pieces are so oddly shaped that going through it once when there's less at stake is worth it, IMO.


Once you get the lay of the land though, it's a quick zip through the serger if you have one; otherwise it's a front and back seam then the side seams (which include the sleeve seam). Hems (I used the coverstitch) and done. When you put it on, the twists just happen! It's awesome!!


The neckline doesn't sit wide on me but I have narrow shoulders. It wants to roll in almost like a shallow cowl. I'm okay with that.

I used a size 42. I didn't reduce the neckline because I wasn't 100% sure where the neckline was! LOL! I also need a to add space to the sleeve. In a fabric with less give than ITY they may be unwearable. I'll add 1/2" to 3/4".  I didn't add any hem allowance to the bottom or sleeves and hemmed at 5/8".


I also really like this length on me. I put this on for pics and didn't want to take this outfit off! Fabric is from Fabric Mart purchased ages ago. I had 2 yards and had a decent chunk leftover. BUT the pattern pieces are large and oddly shaped so you want to make sure you have enough.

I'm pretty wild (har, har) about the cut-on sleeve. It's one of my favorite styles!!


 Love. Love. Love.

My coat is in progress!


Wednesday, February 21, 2018

Clare Coat Muslin...and Moving On...

I was VERY excited to sew my black and gold Clare coat.  I bought the pattern very soon after it was released and splurged on black wool coating.  

And then a long time passed without seeing any reviews. I don't mean tester versions...I mean reviews!! And THEN I sewed the Nettie. Twice. And that's when I started looking for an alternative pattern. The shoulders/armhole/sleeve fit on the Nettie was really bad on me. After version 2, I scrapped the pattern. 

But I really like this style so I decided I'd go forward. And here we are, approaching the very end of February, and this was my February outerwear project, and I hadn't done anything. I went back and looked at every version I found. I saw LOTS of sleeves that gave me pause. I read LOTS of comments about uncomfortable or tight sleeves that people felt that needed to size up or sew smaller seam allowances to fit. 

I knew deep down inside that this pattern wasn't going to be it.  I was hopeful though! I suspected it was not at all a size issue but a drafting issue. I buckled down and got the necessary pattern pieces cut out for muslining. I went to try it on and suspicions confirmed. 

I don't have photos on me because I *literally* could not lift my arm in any meaningful way to take a pic. 


I posted on IG and several people chimed in that it looks like it may need to be redrafted. Here is the complete armhole shape:

I am not a professional pattern drafter and don't even make attempts to draft my own patterns -- 
But man that is one weird set-up. 

And because I don't have that skillset, I wasn't about to try to redraft the front, side panel, back, front sleeve and back sleeve. That is the kind of thing that makes a pattern get the boot for me. I don't pay $18 for a pattern and expect to redraft it.

I immediately remembered my raglan-sleeved S2508 coat and of course, I sewed the Sewaholic Minoru which also has a raglan sleeve. In comparison, here are those garments:


But, I had already gone on the hunt for an alternative when I put this coat in queue for February.  I found and ordered a copy of the 9/2011 Burda magazine for this pattern:

ignore those sleeves...they used faux fur on the sample...so crazy.

There's also a version of it sewn as a duffle with a hood and it is ADORABLE. When I went back to plan out mods to #114...I stumbled on #103:


I really like the magazine version of this pattern! It just isn't what I want for *this* coat. So I thought I could draft the funnel collar onto this coat, leave off the flaps on front and possibly the sleeve tabs and of course sub a zipper for the snaps and welts for the patch pockets. Not much work actually.

This A-line shape more mimics what I liked about the Clare and the back vent is a bonus! 

Another thing...in making the muslin I realized I didn't actually like that the zipper was attached to the front raglan. I like the look of that side zipper but not the functionality of it. This style still works and this coat should also look just as good partially zipped or open as it does closed. 

So I was torn...overall style or possible slight improvement in fit with the set-in sleeve? Decisions, Decisions...

I posted a poll in my IG stories (that was fun!) #114 with the funnel drafted onto the neckline or #103 with the body flared a bit to be an A-line.

When I posted I was CERTAIN I was going to make #114. And it won the poll too! 71% for 114 and 29% for 103. But there's a vibe I'm getting from the raglan - very mod, 60s like - that I am digging!

I really LOVE the look of the Clare! I wish it had worked out for me!! But life is too short and sewing time too precious for me to exert that much energy. I'll just never be the person to work and rework and rework the actual technical aspects of a pattern. THAT'S WHY I BUY PROFESSIONALLY DRAFTED PATTERNS! I'm a sewer, not a pattern designer/drafter thankyouverymuch.

I don't know that I'll get the Burda done before February is out...stranger things HAVE happened :) But I'm going to get started on it tomorrow!

Monday, February 19, 2018

Burda 7/2017 #106 Ankara Pants

Last year, I'd chosen this pattern for my Burda challenge project for July. But then I sprained my hand and never got around to them. 


I was planning to use a different pattern for my "Black Panther pants" :) but when the fabric came and I washed/dried it, I knew it was too lightweight for that pattern. Then I thought joggers...but then I kept coming back to this pattern.  So glad I did.

I'd posted on IG that the back leg looked really wide and I was concerned - well, no need to be. This pattern works!

I used a size 44 and based on the waistband measurement (it's a straight/rectangle waistband), I figured that would be fine. I removed 1/2" from the front rise and added 1" to the back rise (split 3/4" via a wedge and 1/4" by slashing and spreading near the crotch point). I made no other fitting adjustments.

Someone asked why I bother tracing Burda; because THIS. The draft is so consistent and their designs are usually pretty great.

I decide to add black piping to break up some of the print - it didn't make that great a impact, IMO but...oh well.

And now, my DOH! moment...I was in no way going to insert an invisible side zipper. I'm pretty sure all invisible side zippers are evil incarnate. So I decided to go lapped. I like lapped side zippers - a lot! I was basting it in place and thinking, "this is so dumb. why would they have the zipper extend into the pocket area?" stitch... "This makes NO sense..."

Did I stop? No, No I did not. I was doing the topstitching..."So they just have you sew through part of your pocket opening? What the heck..."

DOHHHHHH! LOL!!!!

The zipper was supposed to go in AFTER the waistband. Exhibit A:
The zipper extends 1 5/8" into the pocket area...and the waistband is just about 1 5/8"! Huzzah! lol!

Soooo...I ended up adding two sets of hook/bar closures. And I finished sewing these about 30 minutes before we had to leave to go to the theater. So they aren't the neatest.


The waistband is super cute!! You have the regular rectangular waistband underneath. Then you take this other rectangle that finishes 3/8" higher (wider?) finish the front ends,  fold it in half, and gather the top and bottom. The left goes from zipper to the front and the right is longer; it wraps around from the side seam all the way to the front. You then make your tie ends (again, the left side is shorter) and insert them between the gathered band and the flat band. Now, in a thicker fabric, I might choose to shorten them and just stitch them in place at the front. The waist on these are fitted it just gives the illusion of an elastic waist; the tie doesn't really cinch them

zoom-in of the tech drawing

I LOVE everything about them. I love the print I chose (fabric from Michael Levine by the way!!), the cool little details, the length, I love that they are fitted through the waist and hip and though the legs are voluminous, they work. I love that they taper in a bit and look super cute with heels or flats (they looked cute with my all white Adidas too!)


I will definitely be making these in that lightweight suiting I'd planned on. I think they'll make for a great casual work pant for spring/summer. The Russian Burda site has some really fantastic versions done in fabrics with drape and I immediately considered making them in the white tencel twill I have. That may have to happen this summer! :)

Even though I screwed up when I inserted the zipper, the pockets still work!


This is how I wore them for Black Panther <3 I even sacrificed and wore a cool leather jacket (it was COLD that night! LOL!) so King T'Challa could be on display!


My purple lipstick has become my "going out" shade!

February started out really slow but I've still managed to sew a lot this month. I am working on V9032 and hope to get a quick & dirty muslin of the Clare coat done today. I don't think I'll finish that this month if I end up going with it, but stranger things have happened!

Saturday, February 17, 2018

Patterns On Repeat

I'm getting behind again on reviews and wanted to get these posted.

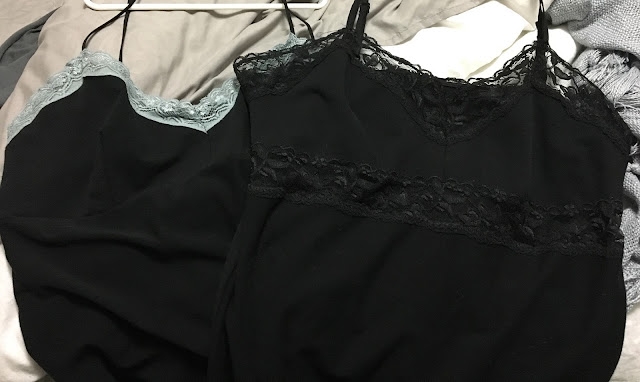
After making the B6427 tee from the black cotton lycra, I decided I didn't like it enough for garments but it would be fine for loungewear. And I was already wearing my other B6031 nighties as often as possible...so I made two more!


The first was made with the same lace as the grey one. I had enough for the bust lace but nothing else. I added 1/2" to account for not using the lace and just sewed that seam. I cut the bottom straight and skipped the lower lace. With the grey fabric, it was SO easy to make straps from self-fabric!! For this fabric?! Oh my gosh. It drove me mad. I think I tried 3 or 4 times before quitting. I had some old straps from a long-gone strapless bra that I used.


For the all black version I had 2" black lace (the pattern calls for 1 1/2") so it's a little bit more exposed.


I used a pretty elastic lace on back and made straps using rayon challis an packaged bra slides/rings. It worked out great.


I ADORE the lace on the hem!!! I admit, the two with lace hems are my favorites <3


These have been in heavy rotation and I cannot say I won't revisit this pattern again sometime in the future. Someone mentioned a navy one and now I'm pretty sure I'll make another one if I find a nice navy knit. I have yards and yards of white lace. Some people expressed interest in a sew along so if I remake the pattern, I'll revisit the idea.

The other repeat was a black pair of S8424 leggings from the same fabric. I'd decided to do something using HTV and the Cricut. When making transfers, you have to remember to mirror the design. So I cut both leg designs mirrored. Well...pants legs are ALREADY mirrored! I only needed to mirror one. DOH!! And then, when doing the waistband, I had the unit ready to go, and installed it "backward". The stitching for the elastic is on the outside. DOH!!

I went back into Design Space and created this "Oops!" iron-on. LOL!!!! :)


No other changes were made. I REALLY like this leggings pattern!

Last, but certainly not least; on repeat is Burda mag 1/2018 sweatshirt but for my daughter, not me. 

When I made my M7688 sweatshirt, she wanted a mustard one and I ordered this fabric from Cali Fabrics. Well, this stuff is THICK. There was no way it would be made into that top. As mentioned in my review post, I had been hiding my Burda hoodie from her and one day she saw it, freaked out, and begged for one.

I got it started and my mojo went on hiatus. Plus, I didn't care for the zipper when it came (Wawak). The fabric was difficult to handle; it did not press well at all and cutting was tough on my hands so I spread it out over quite a period of time. And then I forgot she didn't want the bias binding on the hem. But I forgot to add hem allowance. And as mentioned, shortening metal zippers is a no for me. I stewed for DAYS over what to do with that hem. And then I had an ER-visit as I had a bout of vertigo (I've experienced dizziness but never THAT! It was scary!!) so more days passed. At the same time, my pants for wearing to the premier of Black Panther were sitting as well. I knew I had to finish those by Friday and decided to knock the sweatshirt first. Luckily, I found my mojo!

Lightbulb moment...self binding! The fabric wouldn't have liked being quadrupled so I basically cut a strip, serged it to the edge, turned it inside and topstitched. IT WORKED PERFECTLY! 


I also remembered to widen the pocket. I slashed and spread and added an inch. If you make this, MAKE THIS ADJUSTMENT!!!! Her pockets are so much more usable than mine.

Daughter is slim and has a short torso and LONG limbs. I knew the straight size would work but we'd have to lengthen those sleeves. And since I wished I had another inch, I added 2" to hers; 1.5" about mid-sleeve (she's long shoulder to elbow and elbow to wrist). I also added 1/2" at the hem and made the cuffs about 1/2" longer than called for in Burda's instructions.

Sleeve on me :) It is *perfect* on her!

For my version, I used a size 40. For hers I used a size 36 and graded the neck/shoulder to a 38. This worked out so well.  I bought natural twill tape which really played well with the zipper color. YAY!!

I didn't bother trying to do the hood seam the 'right way' this time either...it's fine.

And, as thick as the fabric is, the doubled fabric for the hem was fine. Go figure. 
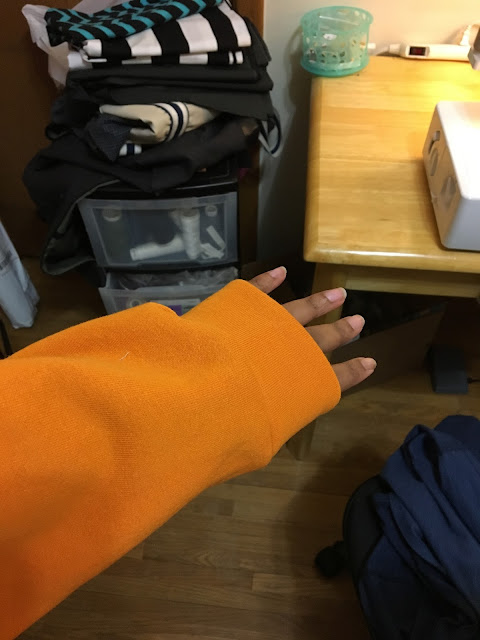

After all the fussiness, I finished and was really impressed by it! And she LOVES it. She wore it to school Friday and said she got lots of compliments.

Hopefully, since my mojo has returned, and I don't have to work Monday, I can get going on a Clare coat muslin. I'm running out of time to get that sewn *in* February.

Friday, February 9, 2018

New Look 6314 and a modified McCall's 6886

I have maintained my Pattern Review membership primarily for managing my pattern stash. And every now and then I realize something is missing and then its 'woe is me I have to audit my entire collection now'. Since my paid membership expired, I haven't renewed, and my collection is out of control. I keep finding stuff or unfortunately, NOT finding things! Oy!! I have to either clean it up and pay for the membership or find another solution which is NOT appealing because it's well over 600 patterns. WHEW.

All that to say, I didn't know I had NL6314 in stash. LOL!

It's now OOP

I was into the shorter view with drawstring immediately and I'd found a 1 yard cut of fine French Terry in a pretty floral at Cali Fabrics. I knew I could squeeze this top from the yard of fabric even though it called for 1 1/4.

I cut a size 14 neckline and graded to a 16 for the rest, typical for me. I made a pivot and slide FBA and no other fitting adjustments.

It is NOT hi-low and it isn't riding up; I have terrible posture. TERRIBLE!

I love the length and the easy-wearing style. The neck binding went in perfectly and I like the tie - mostly. It's a pretty wide hem and then the tie is just free floating in there. I used eyelets vs buttonholes and my twill tape is a bit short; I'd bought it for something else but it matched this color perfectly.


I don't like the sleeve bands, they're kind of wimpy. I'd make them wider if I made this pattern again.

I held my breath the entire time while coverstitching that neckline! LOL!!!!

Then I wanted to use this rose-colored ponte for a coordinating dress. I wanted to use M7430 but I COULDN'T FIND IT! Blergh. I wish I'd used my recently made NL6530 neckline/collar but I tried to DIY the adjustment on M6886 and I don't love it. But I also do not love this fabric. I think I got it from SR Harris and it feels...weird. I can't explain it. It is a ponte that washed up quite nicely. It has great stretch and recovery but something is just a little off in the feel of it. I also don't love the color. I wish it were a bit more muted. Lastly, I thought about it but then forgot to adjust the armholes. I've never made this pattern without sleeves and should have raised the armhole/brought it in a bit.


So the dress is meh. Not bad, will probably get worn, but not good. And I don't like them together. I wouldn't wear dress boots with the combo though, so I did take that into account...it would definitely be a more casual/sporty pairing...


I've always made the scoop neck version of this dress. I wanted to attach a collar and traced the crew neck onto my fabric. I think this neckline is too high (other patterns with a collar seem to sit a little lower) and the collar is too big around not my neck but not big enough to slouch. And it's too tall to stand as one layer but a little too short to fold down nicely.

Pairing it with a denim jacket didn't even make me love it.

Now, I will admit that I was having a super, horrible, crappy day when I took the pics. Yes, I know I look like I'm ready to murder someone (I didn't!). So I gave it another shot and still...meh.

Top - winner. Dress - a little less so. It happens!

My mojo has been absent. I have my daughter's Burda sweatshirt cut out and will get that done this weekend. And I ordered this African print cotton (IDK if it's actual Ankara??) from Michael Levine and plan to make a fun pair of pants to pair with my new RTW/DIY Black Panther hooded top.


The HTV is "Vegas Gold" from Expressions Vinyl (affiliate link in sidebar)
The image came from Divas Craft Too on Etsy (NAYY)

I was going to make high-waist pants and a fitted tee but found this hoodie on clearance at Target for $5 and decided to go sporty. I may add carriers and a tie/belt to the pants. The drawstring on the top obscures T'Challa and must go!! :) Or someone made a great suggestion to do a Celtic knot to secure them. I gambled that these metallics would match!! We'll see!


Monday, February 5, 2018

The NEW Cricut Maker + A Birthday Banner


If you follow me on Instagram (@dressmakingdebacles) then you know I am head over heels in love with my new Cricut Maker. As a garment sewer I wasn't completely unfamiliar with cutting machines; but had never felt the need to buy one. I assumed they were for paper crafters.

A sewing friend owns a Silhouette and had mentioned a heat transfer vinyl project for her little one, and the wheels started to spin. I soon decided I needed!! a cutting machine! :) So when Cricut contacted me I jumped all.over.it!

So. Shiny. Swooooon.


The cover on mine is rose gold and every time I pull the dust cover off, it makes me smile!

I have read about the differences between the Explore machines and the Maker but wouldn't feel comfortable contrasting them as I've never used the prior models. The biggest difference between the Maker and the older machines from a newbie standpoint? 

-Adaptive tool system: The older machines had dials that you had to set according to the material you were cutting. With the Maker, you select your material in Design Space prior to beginning the cut. The machine is intelligent enough to make the adjustment based on your material! e.g., if cutting vinyl or iron-on, it knows to do a "kiss-cut". When cutting heavier materials, it knows to cut with additional pressure. Brilliant! The Maker has 10x more cutting power, massively expanding it's range of materials it can cut.


-Rotary Blade: The rotary blade is exactly what it sounds like! A mini rotary cutter that allows it to effortlessly cut shapes and curves and this new blade can cut through hundreds of fabrics without bonding it first.

Speaking of patterns...sewing projects are simplified thanks to the pattern library in Design Space that allows you to cut and mark fabric with one click. Cricut has partnered with big names like Simplicity Patterns and Riley Blake to offer hundreds of projects!

Caveats:
You have to buy the pattern in Cricut. They are priced higher than most of us in the US pay for Simplicity patterns.

The fabric cutting mats available are 12"x12" or 12"x24". This means limited pattern options. Think small - quilt pieces, craft projects, accessories, doll clothes or baby/toddler clothing items.  Okay, maybe it isn't exactly limited...but somewhat for a garment sewer! :)

The machine includes a docking slot to hold your tablet or smart phone while working. You can also charge your device while using it! There's built-in storage in the tray and deep cups on the side of the machine for storing tools.

-Knife Blade: The deep-cut knife blade allows the Cricut Maker to cut through a wide variety of material including Balsa wood and mat board. It essentially replaces the X-acto knife that many crafters have in their arsenal. The knife blade will be available some time in early 2018!! Soon I hope!

The sewing kit I received with my machine

I haven't actually used any of the sewing tools because of course I have a TON of sewing tools! Though I'd forgotten about the scissors and I can totally use those right now! There's the washable pen, seam ripper, thread snips, tape measurer, pins, leather thimble and pin cushion. 


You know I've already used the heat transfer vinyl and adhesive vinyl for projects. I do plan to use the leather pieces they included in the kit to try my hand at a small envelope clutch. I have two thumbs when it comes sewing to any type of bag-like item so hopefully, this simplifies it for me.


I received several mats: light, standard, strong and fabric. I have used my other light grip mat TO DEATH already! I would recommend buying a few light grip mats and then adding others as you need them.

If you ARE mainly into paper crafting well...you're probably well aware of the awesomeness of a cutting machine! 

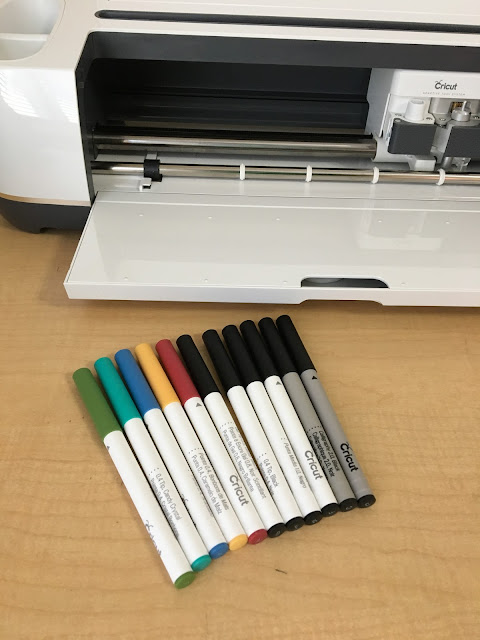
I love the pens!! I will say though, be mindful of the font choices. I found the thick, 'blocky' fonts didn't come out as smoothly as others. I look forward to using the calligraphy pen too!!

I think about way(!) back in the day and making cards by hand and boy do I wish I had one of these back then! I made a few Christmas cards, a couple of paper crafts for my daughter, and decided to go all out with a Birthday Banner for my *baby* son who is turning 18!!! 

18 ACTUAL EARTH YEARS! Where did the time go?!

Honest to goodness, this paper cutter is about 30 times better than my old Fiskars version. 
I also bought a giant roll of double sided tape and was introduced to the absolute wonder that is adhesive dots. I swear these were not a thing in like, 2001. Game. Changing.

I enjoy working in Design Space. I have heard that if you're familiar with creating .svg files and fonts and what-have-you, that Design Space feels limiting. On the other hand, if you're like me, and have next to no experience...it's quite user friendly. I've also built projects on my iPhone and it's worked out just fine. 


I used the system banner to create the background. It cuts slots for your ribbon/twine, making life easier. I decided on a size based on getting 4 banners per sheet. But I didn't know that you can only cut up to 11.5" on the 12" mat. Makes sense...I just didn't realize it! So I got 2 banners per sheet of cardstock. I was absolutely giddy when I found the iridescent cardstock for the circle bases for the letters. I cut them as circles and then chose this sparkly paper for the lettering; choosing a relatively simple font. I cut a couple of tests out of plain white cardstock (which I have loads of!) and set up my final project once I decided on dimensions.


I'm amazed at how quickly it cuts through everything -- I could not keep up with the machine. I had planned to cut it one day and assemble it another, but I got the entire thing done in one evening after work. 

Because I had so much sparkly paper I decided to cut a 1 and 8 at the full 11.5" length and I think it's so stinking cute!


I also cut out little "celebrate" and "party" confetti out of the iridescent paper. Too cute.


This was taken when he was 2 and a half years old <3
Also, he isn't big on cake but *I* love Bundtinis so...hahaha!


 I have made so many projects with my Maker already and have more to come. (Hint: I took a quilt pattern and translated it into Design Space and I am actually excited about making a quilt!) I am absolutely thrilled to have the Maker in my arsenal now and see myself getting tons of use from it.

The Cricut Maker retails for $399.99. While it is the most expensive cutter on the market; it is *by far *the most versatile. Included with the purchase is:

Cricut Maker machine, Rotary Blade + Housing, Fine point blade + Housing, Fine Point Pen, Mats; Fabric Grip, Light Grip, welcome book, USB Cable, Power adapter, Free trial membership to Cricut Access, 50 free ready-to-make projects (including 25 sewing patterns), and materials for a trial project.


This is a sponsored post. I have partnered with Cricut as they graciously sent me the new Cricut Maker and accessories in exchange for me writing about my experience with the machine. Also, this post contains affiliate links. This means I earn a small commission on any purchases made via these links. All thoughts and opinions are my own!


This is a sponsored conversation written by me on behalf of Cricut. 
 The opinions and text are all mine.