Pages

Wednesday, March 7, 2018

Cricut Maker + Riley Blake + Me = A Baby Gift!

This is a sponsored post and contains affiliate links. If you purchase anything through these links or via the banner on my blog, I will make a small commission. 
All opinions are genuine and they are all MINE!

As previously discussed in this post, the biggest, most defining trait of the Cricut Maker is that it can cut non-bonded fabric. I knew I wanted to test the capabilities of the rotary blade and wanted a fabric-based project. As a garment sewer, there are some limitations. The largest mat is 12x24" which translates to 11.5x 23.5" cutting space. And fabric has to be cut single layer. But if you dabble in bag making or quilting...cutting becomes a breeze with the Maker.


I've been working on my daughter's quilt for a long (long, long, long) time. I realized I didn't enjoy the cutting process and certainly don't want to quilt on my machine. I don't find the sewing overly exciting but hey, that's routine for me!

Depending on your quilt, there could be some prep required. This Riley Blake quilt, which is free in Design Space, requires 1/3 yd cuts of most of the fabrics.


I had to clean up my yardage because, JoAnn (grr!)...

How does this even happen!?

...and then cut the yardage in half, resulting in pieces approximately 12" x 22".  Design Space will arrange the pieces for the most efficient layout. You do have the option of adjusting the cutting layout though if you have a different preference.

All of my fabrics cut perfectly until I got to the white fabric. It shifted as it fed back through the roller and I had to clean up a bunch of cuts. I'm going to blame the fabric and not the machine on this one considering I had cut out 6 other fabrics.


Look at all those beautiful squares!!

Also, I didn't realize how simple and straightforward this quilt was and had prepped a little 'map' so I wouldn't get confused:

snips of fabric and a little glue stick!

The estimated time of completion in Design Space is '3+ hours'. It took me about an hour to prep and cut - but honestly, I couldn't keep up with the machine. I was using 2 mats and it took me longer to clean up cuts and prep them than it took the machine to cut.

It took me another 3 hours to assemble. But again, it was me being super vigilant because it seemed so complicated! :)

I loved all of this order!!!! :-D

Once the top was completed I toyed around with binding options, settling on a dark blue. I loved the way it framed the front and it was a nice complement to the backing fabric. 


I knew there was no way I was quilting it myself and figured the small size would mean it wouldn't be too expensive to have it quilted. I chose this loops & stars design as I felt it was a good match for the baby quilt. 


The quilt shop employee suggested this color thread; I don't hate it but I wish I'd gone with the lighter grey.

The blue polka-dot fabric is my absolute fave <3

I plan on making a couple of items to gift with the quilt...There were some Burda baby patterns that were just too cute but I'm unsure about their sizing. A friend sent me a sleep sack that's a free pattern so I may whip up a couple of those. Also plan to make some cute onesies with appliqué or HTV and yep...will use the Maker to make it happen. Who doesn't love adorable, ironic baby onesies?!

I love the way the quilt turned out and as you know, I cut a new quilt out (and finished the quilt top!) using the Cricut and am excited to show that one off when it's done.


This is a sponsored conversation written by me on behalf of Cricut. The opinions and text are all mine.

Wednesday, February 28, 2018

February Wrap-up and March Plans

This month I made 3 items and have 2 in progress; for a total of 12.5 yards.
  • Burda 01/2018 #119 - 2 yards
    • mustard sweatshirt knit
    • notions: twill tape, eyelets, zipper
  • Burda 07/2017 #106 - 3 yards
    • Ankara print cotton
    • notions: zipper, piping, hook & bar
  • Burda 02/2018 #107 - 1.5 yards
    • animal print ITY knit
  • Vogue 9032 - 2.5 yards (wip)
    • heathered taupe RPL
    • notions: zipper, bias tape, hook & bar
  • Burda 09/2011 #114 - 3 yards (wip)
    • black wool coating
    • notions: zipper 
  • I also finished the baby quilt! It'll be posted on March 5th!
Favorite: Burda 7/2017 pants. They just turned out exactly how I expected. <3

FAILS: I think I used the horsehair canvas in places I wasn't supposed to on the Burda coat. I think it'll be fine but we'll see. I wanted to have it done by Saturday but I'm not sure if that'll happen now. Lots going on right now and I used my quilt as a distraction. (Pattern is the free! Ribbon Box Quilt)

way more yellow than I would have consciously chosen; but I wanted to follow the original scheme closely to make my life as a non-quilter, easier. I'm going to go with a teal-ish color for the backing and coral for the binding. I wish I had more coral in it!

Accomplishments: I have been having a lot of 'make it work' moments! LOL!! Maybe that's just the mark of becoming a better sewer.

Month 2 of not buying any patterns! WOW! I chose the right way to 'fast' *for me*. I am allowed 18 patterns this year so I have to think carefully before jumping on anything. Yay me!

The only fabric purchased in February was the 3 yards of Ankara for the pants. YAY me! We'll see how March pans out :-p

February looked a lot like January in terms of Operation 365.

I wore pants 20 times. I wore BLACK pants 6 times! LOL!  I recently commented on a blog post about personal style and neutrals. My neutrals are navy, charcoal and black. Once I started to think about it, I realized I have (in black):
1 pair of wide leg trousers
1 pair of wide cropped pants
2 pair of slim fit ankle length pants (one pair is VERY stretchy and I don't wear them often)
1 pair of slim ponte pants (V1411)
1 pair of tapered ponte pants (S2061)

I had lots of 3-piece dressing again; 12 times. My favorite looks from this month:
B5678 shirt, RTW slim ponte pants and denim jacket
B6427 tee, B6169 floral jacket, RTW jeans
M7538 top, RTW blazer and jeans (*fave*)
B5926 blazer, RTW top and pants
S1499 vest, V1411 pants, RTW tee

March plans:
Once I finish the Burda coat and Vogue pants, I hope to make:
  • Burda 8/2017 off the shoulder top
  • Simplicity 8216 blouse 
  • Ottobre 2/2018 tee (I actually want to make this in a black & white stripe and plan to shop of the fabric on my trip).
And then SEW CAMP (Carriage Corner B&B Sew Camp)!!! WOOT WOOT! 

I pretty much plan to make my trench coat while there. I figure it's a good project for the trip. I hope to have it fully cut out and have all parts interfaced that needs it; and be ready to sew. I'll also bring my poor daughter's long-neglected quilt to finish piecing. I'll also bring a couple of other just-in-case-I-get-tired-of-my-trench-coat-project projects.


Sunday, February 25, 2018

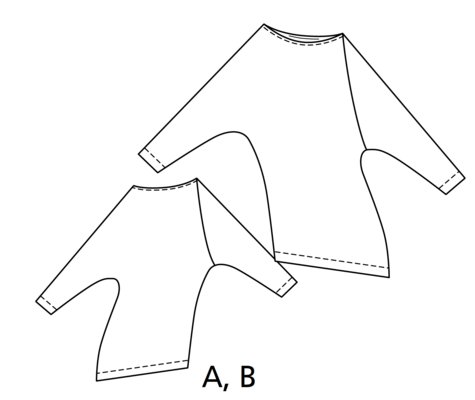
Burda 02/2018 #107


I expect we'll see a lot of this pattern. It's quick and easy and fun. It looks far more complicated than it is...lots of bang for the buck.

This pattern is worth going for a wearable muslin. I love this print - LOVE. But this is one of those ITYs that feels...something. It's not completely icky but I don't think I'll be able to wear it once the weather warms up. But the pattern pieces are so oddly shaped that going through it once when there's less at stake is worth it, IMO.


Once you get the lay of the land though, it's a quick zip through the serger if you have one; otherwise it's a front and back seam then the side seams (which include the sleeve seam). Hems (I used the coverstitch) and done. When you put it on, the twists just happen! It's awesome!!


The neckline doesn't sit wide on me but I have narrow shoulders. It wants to roll in almost like a shallow cowl. I'm okay with that.

I used a size 42. I didn't reduce the neckline because I wasn't 100% sure where the neckline was! LOL! I also need a to add space to the sleeve. In a fabric with less give than ITY they may be unwearable. I'll add 1/2" to 3/4".  I didn't add any hem allowance to the bottom or sleeves and hemmed at 5/8".


I also really like this length on me. I put this on for pics and didn't want to take this outfit off! Fabric is from Fabric Mart purchased ages ago. I had 2 yards and had a decent chunk leftover. BUT the pattern pieces are large and oddly shaped so you want to make sure you have enough.

I'm pretty wild (har, har) about the cut-on sleeve. It's one of my favorite styles!!


 Love. Love. Love.

My coat is in progress!


Wednesday, February 21, 2018

Clare Coat Muslin...and Moving On...

I was VERY excited to sew my black and gold Clare coat.  I bought the pattern very soon after it was released and splurged on black wool coating.  

And then a long time passed without seeing any reviews. I don't mean tester versions...I mean reviews!! And THEN I sewed the Nettie. Twice. And that's when I started looking for an alternative pattern. The shoulders/armhole/sleeve fit on the Nettie was really bad on me. After version 2, I scrapped the pattern. 

But I really like this style so I decided I'd go forward. And here we are, approaching the very end of February, and this was my February outerwear project, and I hadn't done anything. I went back and looked at every version I found. I saw LOTS of sleeves that gave me pause. I read LOTS of comments about uncomfortable or tight sleeves that people felt that needed to size up or sew smaller seam allowances to fit. 

I knew deep down inside that this pattern wasn't going to be it.  I was hopeful though! I suspected it was not at all a size issue but a drafting issue. I buckled down and got the necessary pattern pieces cut out for muslining. I went to try it on and suspicions confirmed. 

I don't have photos on me because I *literally* could not lift my arm in any meaningful way to take a pic. 


I posted on IG and several people chimed in that it looks like it may need to be redrafted. Here is the complete armhole shape:

I am not a professional pattern drafter and don't even make attempts to draft my own patterns -- 
But man that is one weird set-up. 

And because I don't have that skillset, I wasn't about to try to redraft the front, side panel, back, front sleeve and back sleeve. That is the kind of thing that makes a pattern get the boot for me. I don't pay $18 for a pattern and expect to redraft it.

I immediately remembered my raglan-sleeved S2508 coat and of course, I sewed the Sewaholic Minoru which also has a raglan sleeve. In comparison, here are those garments:


But, I had already gone on the hunt for an alternative when I put this coat in queue for February.  I found and ordered a copy of the 9/2011 Burda magazine for this pattern:

ignore those sleeves...they used faux fur on the sample...so crazy.

There's also a version of it sewn as a duffle with a hood and it is ADORABLE. When I went back to plan out mods to #114...I stumbled on #103:


I really like the magazine version of this pattern! It just isn't what I want for *this* coat. So I thought I could draft the funnel collar onto this coat, leave off the flaps on front and possibly the sleeve tabs and of course sub a zipper for the snaps and welts for the patch pockets. Not much work actually.

This A-line shape more mimics what I liked about the Clare and the back vent is a bonus! 

Another thing...in making the muslin I realized I didn't actually like that the zipper was attached to the front raglan. I like the look of that side zipper but not the functionality of it. This style still works and this coat should also look just as good partially zipped or open as it does closed. 

So I was torn...overall style or possible slight improvement in fit with the set-in sleeve? Decisions, Decisions...

I posted a poll in my IG stories (that was fun!) #114 with the funnel drafted onto the neckline or #103 with the body flared a bit to be an A-line.

When I posted I was CERTAIN I was going to make #114. And it won the poll too! 71% for 114 and 29% for 103. But there's a vibe I'm getting from the raglan - very mod, 60s like - that I am digging!

I really LOVE the look of the Clare! I wish it had worked out for me!! But life is too short and sewing time too precious for me to exert that much energy. I'll just never be the person to work and rework and rework the actual technical aspects of a pattern. THAT'S WHY I BUY PROFESSIONALLY DRAFTED PATTERNS! I'm a sewer, not a pattern designer/drafter thankyouverymuch.

I don't know that I'll get the Burda done before February is out...stranger things HAVE happened :) But I'm going to get started on it tomorrow!

Monday, February 19, 2018

Burda 7/2017 #106 Ankara Pants

Last year, I'd chosen this pattern for my Burda challenge project for July. But then I sprained my hand and never got around to them. 


I was planning to use a different pattern for my "Black Panther pants" :) but when the fabric came and I washed/dried it, I knew it was too lightweight for that pattern. Then I thought joggers...but then I kept coming back to this pattern.  So glad I did.

I'd posted on IG that the back leg looked really wide and I was concerned - well, no need to be. This pattern works!

I used a size 44 and based on the waistband measurement (it's a straight/rectangle waistband), I figured that would be fine. I removed 1/2" from the front rise and added 1" to the back rise (split 3/4" via a wedge and 1/4" by slashing and spreading near the crotch point). I made no other fitting adjustments.

Someone asked why I bother tracing Burda; because THIS. The draft is so consistent and their designs are usually pretty great.

I decide to add black piping to break up some of the print - it didn't make that great a impact, IMO but...oh well.

And now, my DOH! moment...I was in no way going to insert an invisible side zipper. I'm pretty sure all invisible side zippers are evil incarnate. So I decided to go lapped. I like lapped side zippers - a lot! I was basting it in place and thinking, "this is so dumb. why would they have the zipper extend into the pocket area?" stitch... "This makes NO sense..."

Did I stop? No, No I did not. I was doing the topstitching..."So they just have you sew through part of your pocket opening? What the heck..."

DOHHHHHH! LOL!!!!

The zipper was supposed to go in AFTER the waistband. Exhibit A:
The zipper extends 1 5/8" into the pocket area...and the waistband is just about 1 5/8"! Huzzah! lol!

Soooo...I ended up adding two sets of hook/bar closures. And I finished sewing these about 30 minutes before we had to leave to go to the theater. So they aren't the neatest.


The waistband is super cute!! You have the regular rectangular waistband underneath. Then you take this other rectangle that finishes 3/8" higher (wider?) finish the front ends,  fold it in half, and gather the top and bottom. The left goes from zipper to the front and the right is longer; it wraps around from the side seam all the way to the front. You then make your tie ends (again, the left side is shorter) and insert them between the gathered band and the flat band. Now, in a thicker fabric, I might choose to shorten them and just stitch them in place at the front. The waist on these are fitted it just gives the illusion of an elastic waist; the tie doesn't really cinch them

zoom-in of the tech drawing

I LOVE everything about them. I love the print I chose (fabric from Michael Levine by the way!!), the cool little details, the length, I love that they are fitted through the waist and hip and though the legs are voluminous, they work. I love that they taper in a bit and look super cute with heels or flats (they looked cute with my all white Adidas too!)


I will definitely be making these in that lightweight suiting I'd planned on. I think they'll make for a great casual work pant for spring/summer. The Russian Burda site has some really fantastic versions done in fabrics with drape and I immediately considered making them in the white tencel twill I have. That may have to happen this summer! :)

Even though I screwed up when I inserted the zipper, the pockets still work!


This is how I wore them for Black Panther <3 I even sacrificed and wore a cool leather jacket (it was COLD that night! LOL!) so King T'Challa could be on display!


My purple lipstick has become my "going out" shade!

February started out really slow but I've still managed to sew a lot this month. I am working on V9032 and hope to get a quick & dirty muslin of the Clare coat done today. I don't think I'll finish that this month if I end up going with it, but stranger things have happened!