Pages

Monday, August 5, 2024

Fitting and Construction: Butterick 5526 (B5526)

So, score for me not having to cut the pattern out! For me and my myriad hand issues, this is a major win! Sometimes, cutting the paper pattern is a one-day activity because I "use up my hand" doing that task and have to wait before moving on to cutting fabric.

I'm almost 5 years post-reduction (OMG WHERE DOES THE TIME GO!?) and I'm slightly larger than I was. I could probably use a tiny FBA on things...like less than 1/2" for an additional 1" total, so I don't bother. I often just shape the side seams a little bit. 

In the case of this casual top, there is no dart control (no darts or gathers), and I intended to add a bit (3/8") to the side seam at the bust, and forgot. Ah well. It'll be fiiiine! 

(this is one of the benefits of being more experienced, I'm able to decide what to fuss on and what not to)

I did a rounded back adjustment of 5/8". This is standard for me with Big4 patterns. I open it at the neckline -- this dart is usually about half the width of the opening at the center back. You can sew the dart shut, in my case I leave it and just ease it into the collar. For some garments or fabrics, I alter the collar to fit this additional width. 

I also wanted to remove some of the sleeve cap ease and consulted two sources. 

Threads used a method by Sarah Veblen where you walk the seam and note the excess, add back an appropriate amount of ease, slice it through, add seam allowance, and sew the seam. 

I trued that bad curve when I cut the fabric

David Coffin similarly has you walk the seam, remove the excess ease, but has you sew this dart closed. 

I decided to add the seam and topstitch it for a decorative effect. 

BUT I MADE A MISTAKE. oy! I noted the excess ease but did not add back ANY sleeve cap ease. I know there's some discussion around the necessity of sleeve cap ease and while I think most Big4 patterns do include an excessive amount, I don't know that zero ease is always appropriate. Considering this is a semi-fitted, casual fit top, the amount of ease seemed over the top. So even removing it all (accidentally! haha!), does not result in a too-tight fit. 

Lastly, I don't care much about front pockets on shirts so often opt for just one, on the left. Other times, I include them both pretty much to cover the dart ends. Ymmv. The pocket is standard construction, stitch the upper part, turn it out, and then fold in the seam allowance and topstitch in place. I did note a review by Lladybird where she mentioned how high it was and I agreed when holding the pattern piece up to Lily...I lowered the placement by 1 inch. Wonder Tape is everything but for pockets, a good old fashioned glue stick works very well too!

My preferred order of construction for shirts:

  1. darts (n/a in this case)
  2. front pockets (if applicable)
  3. serge hem
  4. front placket, including turning out hem
  5. shoulder seams (sew and serge)
  6. fit side seams
  7. side seams (sew and serge)
  8. sew hem
  9. sleeves (fully assemble including cuff if a long-sleeve pattern, sew and serge)
  10. attach sleeves to body (sew and serge)
  11. cut and prepare collar and stand (I don't even cut the fabric out until this point and always block interface a piece of fabric and cut the stand from that since there's some bias in this piece)
  12. attach collar
  13. top stitch collar stand (sometimes I topstitch the collar, sometimes I don't)
  14. sew buttonholes and buttons
When sewing the placket, I traced in the fold lines on the right side of the fabric (be mindful of your marking tool e.g., marker-like tools will make a thicker line). I use my seam rule and this line to ensure accuracy. And here is a quick nod to PRESSING. It is game-changing!


At the hem, I fold it back and stitch at 5/8". I trim it to a scant 1/4", clip the fold, and turn it out. I do not poke anything in anywhere or any of that! There shouldn't be a need for poking and prodding. 

blue annotation because I forgot to take a photo of trimming

Another tip - always mind your markings. Notches and such exist to ensure pieces match where they should. The only time I'll ignore markings is when it is literally two straight pieces coming together and I know they have to be the exact same length. Whenever there is any shaping, curves, etc., I make the appropriate markings and am sure to match up. 

Here on the sleeve, you can see where I matched the sleeve to the body, exactly. 


On the collar and collar stand, I use the pattern markings plus drawing in the seam allowance (this was done with a fixion pen for accuracy) to ensure everything is sewn properly. Fold the seam allowance up on the interior collar stand before sewing, again, to ensure you are accurately stitching at 5/8". Because this is a bulky amount of fabric, I trim this seam with pinking shears after pressing it up. Be careful with trimming - you don't want to remove too much fabric and with it, the integrity of the pieces. Lastly, Wonder Tape to the rescue! Once the collar stand is attached, I use wonder tape to hold the interior stand in place. Using my walking foot and a slower speed, I topstitch the stand. I usually start in the middle so I can navigate the curves of the collar stand more easily. 


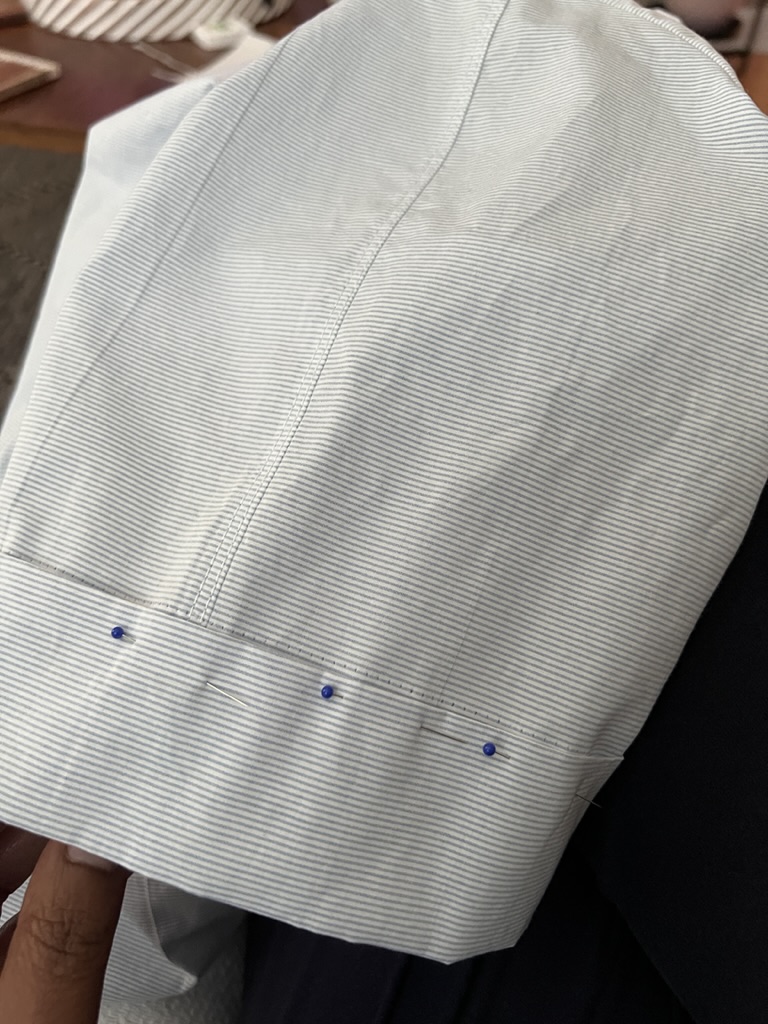
When I tried the shirt on, I hated the sleeve length! Using a scrap piece of fabric, I played around with the idea of sleeve bands and really liked the look. Deciding on a finished length of 1 3/4", I cut pieces 4 1/2" wide (adding seam allowance) and longer than the sleeve opening since it would be a little more difficult to accurately measure the sleeve in the round. I then pinned the band into the sleeve opening to ensure an accurate measurement. I used my walking foot to topstitch the band. 


I need to do the buttonholes and sew the buttons, but that's a straightforward task for my machine. If you struggle with buttonholes and your machine, be sure to read your manual and follow the directions there, run a test buttonhole or two, use tear away stabilizer if needed, and be patient! 


When choosing between two buttons, I'll stitch them on loosely like shown, and come back to it later, deciding pretty instantaneously which one I prefer. I'm going with the smaller button on bottom.

The shirting is a bit crisp, as cotton shirting tends to be. My trick to this is to add the item to my laundry EVERY time. Even if it I haven't worn it. It helps break it in a little faster :)

Watch for finished photos in a bit! 

Next up, I am making a slight detour from the plan in my head to sew up a few pair of lounge/pj shorts and maybe a nightgown or two. In 2016 and 2018, I made a bunch of loungewear and it's about time to refresh. 

I'm also knitting up a storm, working on State Fair entries(?). 

More, later!

Wednesday, July 24, 2024

Sewing Plan: Butterick 5526 (B5526)

I'll be sharing my new sewing space soon! But suffice to say, the paint, new floors, and reorganization really sparked my desire to make. 

I wanted a straightforward project, but not a fast project. I wanted to spend some time in the process, and decided on a button front shirt. I knew I wanted a more casual top (not too fitted) that was fairly neutral and could mix and match readily with skirts and pants in my wardrobe. 

I also decided on short sleeves. I recently thrifted a blue & white striped cotton shirt with long sleeves and I just don't really wear long sleeves in summer - even rolled up!

I wear this chambray version of Burda 7136 ALL the time. I made it in 2016 and it has only gotten better with time. 


I was going to go for the TNT (I've made this pattern 5 or 6 times) but ultimately decided to branch out. I searched my stash and decided on the oldie but goodie, Butterick 5526

Imagine my surprise to find THREE copies of this pattern in my pattern drawers! Oy! I got back ups to my back up! Haha!

I opened the first one, and huzzah! the size 14 was already cut out. I chose a thin striped cotton shirting from the stash. There was no label on it, so I don't have a source for it, but it's been in the stash for a while.

I'll be using Fashion Sewing Supply's ProSheer Elegance Light interfacing (HERE) and shirt buttons from Wawak (HERE). I swear by FSS interfacing. It's pretty much all I've used for about 5-6 years. I remember one year snagging a deal on some interfacing from Fabric Mart at $1/yard and it was VERY comparable to FSS. Aside from that, I keep going back for more, even as the price has increased a bit. 

Her interfacing is 60" wide (vs Pellon which is 20") and is preshrunk. It performs fabulously. I usually keep the Light, Medium, Couture, and Tricot on hand, in white and black. 

As I edit this for posting, I have the collar, buttonholes, and buttons left to do. Looking forward to this addition and sharing a bit more about the process. 


Tuesday, July 16, 2024

Tap, Tap, Tap...Is this thing on?

Hey y'all!!

Apparently, it has been approximately 539 days since I last blogged. And let me tell you, a lot can happen in 539 days!

I think most that follow the blog follow me on IG, so probably not news but since my last post I've purchased a home (new sewing room to share! woohoo!!), got a divorce (joyfully!), and became a grandma again (for the 3rd time!).

While I've certainly sewn a few things, I have not been sewing like I'd like. I'm thinking my recent sewing room upgrades will change that, and I'm excited to reconnect with the sewing community without relying on IG. The algorithm continues to be an issue, the exclusive focus on Reels is an issue, and now, they've made hashtags useless. 

I've always excitedly shared new makes here, but I think I'm going to move to a different format, especially since I'm sewing less overall. I hope to share projects in 2-3 parts: 

  • planning;
  • fitting and/or construction; 
  • construction and/or modeled photos
Planning: pattern choice, fabric choice, notions needed (and where to acquire them!)

Fitting: I have some standard changes that I make for various pattern brands that I sew regularly (Big4 patterns, Burda magazine, and Style Arc), but I will also share in these posts the resources used or similar resources available to determine fit changes that may be needed and how to do them. Depending on the garment, this post may include construction information (e.g., a simple knit dress or straight skirt may not have a lot of fitting details or construction steps).

Modeled photos: This post may include construction if it is a more complex garment, along with the modeled photos. I hope to share items after they have been integrated into my wardrobe so that I can talk about what works, what may not work, and/or what I might do differently on a future make (or if the pattern won't be revisited!).

I will forever state, vehemently, that I am not a teacher! But, as my sewing continues to improve, I'd like to be a resource for people who care about the overall craft and not just shiny finished goods and high-quality photos. I'm *considering* a YouTube channel, but I'm not sure yet if I can commit to that. 

I am also diving heavier into machine knitting. I can't be a resource on that topic yet...but will be sure to share as much info as I can in each project post for anyone who may be interested. 

I have dove head-first into DIY since buying my house! I've done so many projects and have started a bit of amateur woodworking, so you might see that too! (it's MY BLOG! haha!). 

Lastly, while I don't do much general crafting or Cricut crafting anymore, those posts will be here as well. I am no longer a Cricut ambassador. They dropped me after I gave an honest (but not negative!) review of the Cricut Joy. Booooooo.

For now, here is a picture that brings ME great joy...lounging in my new hammock in my backyard :-D


Tuesday, January 24, 2023

Happy Anniversary to Me!

Today, I had one of those Facebook memories pop up and today is the 10th anniversary of when I bought my first sewing machine!


I bought a Singer Talent 3321 from my local JoAnn that day. And as you know... the rest is history! :)

I sewed on that machine from January 2013 until around April 2015 when I got a Singer Stylist 7258 (it was SUCH a great machine at its price point). I kept that until spring 2017 when I treated myself to a Singer Quantum Stylist 9985 and Brother 2340CV coverstitch for my birthday. 

During the pandemic, I got the Janome Skyline S5 (and upgraded my Brother serger to a Babylock!).

I haven't sewn much in the last year but boy was a busy little bee that first 3-4 years. I sewed HUNDREDS of garments. Some are still in my wardrobe. 

I made this coat on that little $120 Singer!


And these jeans!

And this quilt!

I was so fearless in my sewing! I didn't shy away from anything! Nothing felt "too hard". I just kept sewing and sewing and sewing and one day, I got really good at it :)

I am always so grateful that I took the leap, and always wish I'd started sooner. It truly is a lifelong skill with infinite opportunity for development. 

So while I haven't been sewing a lot, the craft remains such an integral part of my life. Here's to many, many more years of sewing!


Most recent project: 
Burda 8/2017 skirt in an eggplant/plum wool. I wore it for the first time today and I LOVE it. I should have lined it but I was being lazy. :)


And I've started some more knitting! 

We had two baby girls born into our family this month, and of of my closest friends became a grandma to a baby girl as well. So expect a couple more things to pop up! 


Thursday, January 12, 2023

Welcome, 2023!

It's so easy to slip away from the blog, isn't it? Eesh. 

Though I haven't been sewing very much and the sewing I have done?? Well...Minnesota winters always present a challenge for photo taking and I just don't have the energy right now to be bothered. 

I think last year may have been the first in like...forever that I didn't do an annual wrap-up! But, I didn't track my sewing, pattern purchases or fabric purchases at all. And...I don't have the energy to figure it out! LOL!

Looking at my 2022 goals posts, My plan was:

  • Trench Coat - Nope.
  • Burda blazer - Nope.
  • Formal black dress - Nope.
  • LBD or jumpsuit - Nope.
  • Men's blazer - Nope.
  • Then, I pivoted with a plan to sew "A Dozen Drafts", but the year had other plans for me. Womp. 
I did sew a couple things last year that are absolute wardrobe staples now:
Burda 2/2013 
(I have a bright blue pair in progress right now)

McCall's 7834 
(and then I made it in white for my birthday!)

Today, January 12th, is actually the anniversary of the day I got my Beatrice form! I still owe you all a write-up and review! This month - I promise.


I don't have a fully formed plan for 2023 yet. I just want to get back to enjoying my sewing space. I am reminded always how much I love blazers so I really want to sew 1 or 2. And, as much as I love Burda for their style and fit, I'm going to have to either find a different pattern. One of the tricky things with more complex garments is knowing what's best practice for seam allowances, etc. I was really loving that vest I was working on and I realized I did something wrong with the facing vs. jacket hem allowance and got discouraged and threw the entire thing away. MEH! 

I also find myself with the same outerwear holes that have persisted. I need 2 more in-between pieces. Which for me are pieces for the 30/35 degree weather. I have two handmade coats that WOULD be good here but I made them both collarless. LOL! The fabric is warm and they are roomy (for layering), but both collarless! And a scarf isn't enough to make them usable for those temps. I also WANT MY TRENCH! I think it's been 4 years now that I say I want to sew a trench coat. I CAN SEW A TRENCH COAT! 

Oh, and skirts. More skirts! :)

I have WIPs for the grandsons - an outfit from Ottobre 4/2022, and I plan to make matching hoodies too. 


Machine knitting goals:

  • Sweaters for the grandsons - No :cry: I got ready to start them and realized I did NOT have enough yarn
  • St. John copycat pants - Not yet! But I did procure wool crepe yarn! Woot!
  • Raglan sweater - SIGHHHHH. I have a WIP and I made a big mistake so I have to get my mojo back to finish it.
  • Sweater with set-in sleeves - Yes! AND I won the 3rd place prize in the Minnesota State Fair!
  • Dolman sweater with detail - Yes! I made a couple of them! 
  • Socks - I made ALL the socks! 
  • Wrap or Poncho - Nope. 
I made a bunch of gifts once I started to feel better during recovery. I made 4 hats (plus 1 for myself!), 5 pair of fingerless mittens (plus 1 for myself!), a pair of flip-top mittens (plus 1 for myself!), 2 cowls, and 2 pair of socks. 


My machine knitting exploded this year! I have ventured into a few areas unexpectedly, but there's more that I want to do! I have yet to make a finished item with my bulky machine, so that's on the agenda. And I am determined to make a fair isle garment. I'm going to do it!!!

Personal goals:

  • Graduate school - Definitely won't be ready to apply Feb 1. When I made this goal last year, I had no clue that the application deadline was so early in the year. So hopefully, I can apply mid-year for Spring entry. 
  • Read 3 books per month - I've barely read any books! Wait, does self-help count? Because I always read self-help books! LOL! I did read a handful of books while I was recovering from surgery, but no where near 3 per month. 
I'm so determined to have a good year. 

Work is really hectic right now and not likely to improve in the near future. I spent weeks just crashing on the couch once I logged off. This past week, I've been a lot better at not doing that. I've tried to expend some energy doing ANYTHING else. Sewing, knitting, decluttering, something

And, I've already attended 3 crafting meet-ups (1 via Zoom) this year! Starting the social aspect of sewing and crafting off right!