

Before time slipped completely away from me on the contest, I'd sewn the unreleased Baste and Gather jeans. Because I'd planned to follow my B+G skinny jeans with the flares, I was going to review them together. But alas! :) My hands aren't cooperating and I have to rest them before cutting out some more denim.
I've dealt with carpal tunnel and tendinitis in some combination for 20 years. I've tried it all people. lol! Well, I want to try acupuncture. And I was recently put on to kinesio tape, which actually helps! Anyway...
The Kendall skinnies were to be based on the same fit of the Birkins from the hip up - very fitted with a slightly high-rise. Lauren, the pattern designer, went back and forth quite a bit tweaking the Kendalls and in the end decided to scrap the pattern. She wasn't happy with the fit through the legs. I never got the last revision of the pattern - I think those who volunteered to officially test did. So my pattern was from the very early stages.
Right away, looking at the pattern paper, I realized the leg was too straight. There was not much contouring, which won't work for a skinny jean.

Look at how straight the leg is!
Here is my try on, pinch out, stitch, rinse/repeat:

I may have fitted them a wee bit too tight through the calf but that's an easy fix should I make them again.
The other part, I think, true skinny jeans just require a stretch woven. It seems too difficult to get a close fit like that with zero Lycra. This denim is a cotton/poly/lycra blend (which I don't care for stretch wovens on my lower half but if I must wear a stretch denim, I prefer this blend). I got it from Hancock Fabrics some time ago and was happy to finally sew this denim up! The only thing is, I swear I prewashed this cut of fabric. And yet, when I washed the final jeans, they came out of the dryer looking like they've seen months of wear. That's not a bad thing aesthetically, but it makes me wonder about wear in the long run.
Another fabric-related thing to note; when I topstitched my rear pockets, they stretched out a bit. Using the pattern piece as a guide, I steamed them back to the right size:

When doing something like this before the iron is nice and hot/steamy and allow the pattern piece to fully cool before moving it.
I've mentioned this before I think...and I've passed this tip along to others on IG sewing jeans. For the longest time I couldn't remember where I learned it but a little sleuthing turned it up! I found this through a post by Emily Fournier of Jalie. For whatever reason, attaching a denim waistband (I've never tried it with other pants) to the inside first and THEN folding to the outside and topstitching, results in a much cleaner finish. Whenever I've mentioned this and someone has tried it, they've RAVED about it. So I wanted to be sure credit was given where it was due! I can't find the original blog post but snagged this photo from Pinterest:

I don't even press the seam allowance up before hand. I do it after it's been attached.
The original reason I found this blog post was an even handier trick re: the waistband. For those of us with pronounced curves in our back, stopping jeans from gaping is always at the forefront!
The CB seam of the waistband is sewn with a wedge. It's 5/8" (or whatever your SA is) and tapers in at the center, and then back out to end at 5/8" on the other end. For this pair, I went in a total of 1 1/4". This gives a noticeable 'dip' on the waistband but not so on the body. I didn't transfer this to the paper pattern as I assume the amount I'd need to take in may be fabric dependent. At any rate, NO GAPING!

Lastly, after trying them on so many times trying to tweak the leg fit, I found the back had stretched out a little bit. I ran a basting stitch and eased it up just so that it was back to 'normal'.

My topstitching was done with doubled thread - nice for matching or choosing whatever sort of contrast you wish without trying to track down topstitching thread! Another technique is to use the stretch stitch but I find that so time consuming. I only use that stitch through the seat of my pants/trousers for extra strength. And I'm always #overit by the time do that back crotch seam! LOL!

1 1/4" hem: 5/8" folded up twice

Fun polka-dot cotton poplin as pocket bags.
(see what I mean about them looking well-lived in already?)
I think they are so cute and a nice basic, making them worth all the fiddling!!

The top is M6702, previously blogged here. I can't wait to wear this for summer. That cut out is so cute...and I can dig cute hi-low hems like this one!

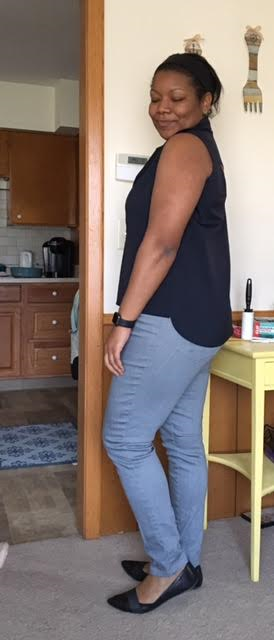
You can see they're a little snug on the calves...otherwise, I think jeans + leg wrinkles = totally normal.

While making them I wasn't too jazzed about trying to make this pattern a TNT. But I think it's worth it. They fit so well otherwise!! Minor changes for next time: lower the front rise just a little bit more (maybe 3/8") and narrow the belt loops. And aside from that, try to perfect that fit from thigh-to-knee-to-calf. I do LOVE the leg opening though. They look great with heels!
Up Next:
Finishing the olive green vest and then hopefully I can make the flares. If not, I'll get started on the dress from 3/2017 Burda mag.
And after THAT...vacation sewing! YAY!!!!!!!!!!!!!!!!!!!!!!!!!!!!!!!!!!!!!!!!!!!!!!!!!
Yep, I'm *that* excited! I had a somewhat hellish 2014-2016 and am stoked to be taking my giant babies to Disneyworld! I'll have to post plans for a vacation mini-wardrobe.
Until Later!
17 comments:
Love these jeans on you! And thanks for the tip on how to attach a waistband. It never occurred to me. Duh!! These look so good that I really think you should consider this a TNT pattern. Even though I tweak my TNT pants I always find out that the fabric makes so much difference that I need to tweak each pair I make. But at least I am not having to reinvent the wheel. Love your blog.
I've never tried the attaching from the inside first! I think I will though! I'll also give that tape a try. I can vouch for acupuncture helping the tendonitis with acute pain. My grip is better too, but I've been seeing a hand therapist and doing exercises at home. I still can't lift weights though. That destroys me. And, cutting isn't awesome either. But, everything is better than it was a few weeks ago when I just wanted to cry.
Thank you!!
And you're so right. Even with TNT, some fitting has to happen. Fabric changes the equation!
Yes, give it a try!
And the lack of grip strength is the issue. It's not necessarily pain very often but weakness and lack of grip strength.
I think the gray skinnies are adorable on you, and I like the finish on them after washing. Yay to M6702! It looks super, and the back cutout is perfect.
You will enjoy Disney World (and your kids too)! It is such a beautiful, magical, and friendly place!
The jeans look wonderful!
Already told you on IG these look great on you! Love the grey and love the fit.
Wow! These look incredible on you! Beautiful job.
What a perfect fit! They look great on you. Have fun at Disney world. That's always an amazing experience.
The fold the waistband to the outside is an old trick. Back in the 70's lots of patterns used this technique and I always do for top stitched or cased bands.
Thanks Vanessa!!!
Thanks Irene!
Thanks much Manju!
Thank you!!
Thanks so much!! We're looking forward to it!
Ahhh. So good to learn these little things! It works fabulously!
That trick for the waste band works really wwll on collars too!
Post a Comment